J234 Buckley's Chance
Ron Duenskie took a 2-hour ride to get to the Reading, PA to visit Rob Schoenen, who hosted an excellent ASL get-together. Jim Brackin and Ron played Battle of Rome and Rob served some delicious sandwiches and chile. After our scenarios we had a fun apocalyptic car race/battle game. I was ahead early in the car game, but then mysteriously (to me anyway) ended up in last place
")
.
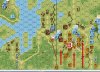
In ASL, I played Kevin Meyer in this IJA/AUS Timor scenario from the recent Journal with the dice giving me the IJA. I had a dozen 448/447 with two MMG, two mortars, and (on turn 3) two HA-GOs. I had 6 turns to go 17 hexes on the nice historical map and exit 10 CVP (with the tanks counting for 2 each). Kevin had 11 458/457 with 3 lmg, 2 mortars, an ATR and (also on turn 3) two carriers which brought a 2nd ATR.
The map is covered by palm/huts/light jungle/kunai with little open ground and only a few wooden buildings. It feels like almost a naval battle in that there is little effective fire that isn't adjacent. It seemed more about very fluid maneuver than holding key ground. Kevin spread out and I punched into the middle turn 1. Turn 2 my mortars both forget to bring either WP or smoke, so I just pushed forward up the gut.
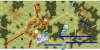
Turn 3 my mortar got a CH on one of Kevin's mortar teams to break it. During the course of the game I had four half squads go berserk, which gave me a couple free banzai-like charges each turn and soaked up a lot of firepower. By turn 4, we had each lost about 4 squads. Kevin abandoned the carriers to avoid THHs and fell back to the 4-hex wide exit area.
Turn 5 I ran the Ha-GOs off, my 1 armor proving tough enough to survive one ATR and one lmg hit. My 10-1/228/448 schwerepunkt died in HtH CC to a lowly 247. Close combat was fairly brutal throughout the game.
Turn 6 I managed to use a captured Aussie mortar to get two(!) smoke shots which gave me the cover I needed to exit. I exited the required points for the win, but only had 5 CVP left on board. If I hadn't gotten smoke with the mortar, it would have been very tough. All in all a fun game with an excellent opponent. I'd recommend the scenario.