So what scenarios have you played Recently?

william.stoppel

Elder Member
Joined
Nov 10, 2004
Messages
1,312
Reaction score
948
Location
Northern Virginia
Country
llUnited States
Dan and I finished up HG-6 Damned at Demyansk last night. This is an excellent Dave Lamb scenario from Bounding Fire’s High Ground pack. It features deep snow and extreme winter. Extreme Winter really affected my Germans defense and the deep snow definitely channelized Dan’s Russian attack. We both had good rolls and bad rolls but my 9-2 led HMG (broke twice and repaired twice) providing overwatch of the roadblock Dan had to clear won it for the Germans in the end. He never broke and always rallied his brokies the first time. This one seems nicely balanced but the Russians have to have a little Schwerpunkt gittie up to find the roadblock quickly so it can be cleared. Highly recommend
 

King Scott II

Member
Joined
Oct 22, 2022
Messages
86
Reaction score
235
Location
Riverside
Country
llUnited States
SmR2 Fenton's Foe

Started this one a couple of weeks ago against Jim Aikens. With school out for the summer for me, and Jim having some time available, we have been playing some larger scenarios that we would not normally get to play at the Club's weekly Saturday gatherings. We have both been eager to get LFT's beautiful The Fight For Seoul maps on the table and playing...we played one of the scenarios on the Seoul map to first get acquainted with the special rules and terrain, which we both enjoyed...but that just made us both really want to play something on the Smith's Ridge map.

I am playing the "peace-loving" North Koreans (to shamelessly borrow Blaire's trademark description) against Jim's wicked and terrible Marines. We started this one a few weeks back and completed the first three turns before pausing for my European vacation, and now that I am back home, we will get going once again tomorrow night. (Side note...got to see some great museums both in Paris and Viena, and lucky to have a lady who is cool with going to military history museums. Stumbled upon a monument to Count D'Aosta in Turin that I was not expecting to see.)

So far Jim has not had any air support show up, which is good for me as it has allowed me to use the captured American .50 against the evil Marines to good effect. My outpost troops did not put up much of a fight to speak of, but they did their job of stripping concealment and getting a few pins and breaks on the swarm of Marine squads, half squads, and fire-teams. Most importantly, their sacrifice achieved several payoffs for me, which will strengthen my defense in the mid- and end-game sections. First, they slowed down the Marine assault by forcing the Marines off the roads and Banks into the rice paddies. Secondly, I was able to recombine and successfully extricate an elite squad, LMG, and the 8-0 leader who have reached the stone building at the base of the objective peak to add to the defense. Third, the crew and .50 cal. did not make it back as far as I had wanted, but they are in the fight and have successfully made it to the rear of the outpost hill while also sweeping the immediate area of Marines. All of this has combined to slow down the Marines and prevented an early Marine breakthrough.

The remainder of the innocent North Koreans in the objective area have been retaining concealment awaiting the Marines to come into range of the squad rifles. I had selected Group 1 to add to my defenses with an eye on the long range and rate potentials of the 82mm MTR and 45LL ATG...both have been doing good work, aided by the MMG, to obtain a number of Pins, breaks, and some kills.

On the down-side from my perspective, the MMG broke and I got lucky on a concealment roll to gain concealment...but now his OBA spotting round is on top of me. If I make an attempt to repair the MMG, I will lose concealment and make it easier for him the OBA to be accurate...remaining concealed increases my chances of surviving the OBA strike, but at the cost of one of my few SW's able to reach out and hit the Marines on their approach. Gotta love these tough ASL decisions! :) Another negative for the North Koreans is that I have yet to go on any significant rate-tears or to get more K or KIA results.

And Jim is a complete and shameless jack-ass by generating a total of 4 Marine Heroes so far...can you believe the indignities? :p:rofl:

Semper Fi!
Scott
 
Last edited:

Paul John

Senior Member
Joined
Jan 1, 1970
Messages
786
Reaction score
604
Location
Cincinnati Ohio
Country
llUnited States
Houlie and I played FT 286 Operation Scipio. My Brits won, but there is a caveat...dice.
The Brits set up on a couple hill masses while the Germans largely enter and cross a scrubland
on the excellent new desert boards It started inauspiciously for me as my overwatch HMG rolled
6,6 on the first shot and, with ammo shortage, it was gone for the game. Then, Craig got an SR into
valley between my forward and rear hill. The observer at level two had a level two hill between him
and the 2 level high SR at ground level, so I shuffled squads around, out of foxholes and so on,
thinking that the SR was out of LOS. After all, it doesn't create a hindrance, but I learned a new rule
and the tippy top of the SR is apparently visible. I thought my defense would be shattered, but the OBA
was pretty ineffective and he followed up with two red chits. Meanwhile the bulk of the German force
had moved up relatively unopposed. That was the end of anything positive for them however.
At game end, I had lost 2 half squads to fate (MC or rally, I forget) and one more to CC. In that CC
I got his half squad as well. The Germans also lost 2 half squads to fate, but then lost a leader to a
'1' sniper and a crew + 3.5 or 4 or ??? (lost notes) squads to KIA or K/ results, while rarely troubling
the defense. My ability to pass MCs was only equaled by his ability to whiff IFT rolls. He still made it to
the slopes of the final VC hill, but with a very weak force and I had made the hilltop a fortress by then.
Fun scenario, but one of the worst dice episodes I have seen in a while.
 

Houlie

CEO of HoulieDice (TM)
Joined
Nov 15, 2003
Messages
3,263
Reaction score
1,649
Location
Minnesota, USA
Country
llUnited States
Played SP72 One Tough Canuck as the Canadian vs. Rich Domovic’s Germans. Smashmouth ASL. This went down to turn 7 CC (at the Japanese counter in the image). I had a 1-2 (-1) and Rich I recall a 1-1 (-1). He got enough to wipe out my stack and I whiffed on mine. We each felt like we were on our heels all game and it was indeed tight. Losses for both sides were high as momentum see-sawed back and forth. This was a super-fun scenario and we both recommend it highly. Thanks again to Rich for a well-played game!

One note: counter density can be a bit high, so may be best played on VASL.

Final picture
26496
 

King Scott II

Member
Joined
Oct 22, 2022
Messages
86
Reaction score
235
Location
Riverside
Country
llUnited States
The battle for Seoul continues...

Ok...
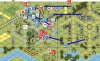
SmR2 Fenton's Foe did not end well for my peace-loving North Koreans. A number of events contributed to the Marine victory, including a one-two punch of OBA and airpower hitting my troops on the hilltop, as well as Jim generating a total of 5 heroes...along with Jim playing (and rolling) very well. I put up as good of a fight as I could, but threw in the towel when the writing was on the wall before the last turn.

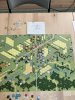
SmR4 Passage of Lines

Again, facing off against Jim Aikens as we prepare to play the CG...but with me on the attack with the USMC/RoKMC and Jim on the defense with the North Koreans. We squeezed every last penny of fun out of this 9-turn scenario with my Marines failing to secure victory in the final CC by one single pip.

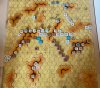
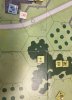
The KPA defenders kicked my poor Marines in the teeth for the first two turns. Jim's guns all seemed to each get rate multiple times, and they all scored hits and effects with most of those shots...my sh*t-bird Marines in Company E in support felt like they could not get rate or land hits on the defenders in response to assist the assaulting Marines on both flanks (Company D on the Marine left flank, and Company F on the right flank). By the end of the second turn, Company F had been chewed up and halted at the road near the bottom of the hill, but a single fire team made it up onto the most forward hill hex where the KPA 76 ART was located to capture the gun and then spike the barrel...this would be the high-water mark for Company F as the they spent the remainder of the scenario pinned behind the road while being chewed to pieces. On the left, Company D was able to get across the rice paddy fields relatively intact and entered the village of Yonhi-Jong, including located (the hard way) the two minefield hexes. Despite the gains of Company D, the losses incurred by Company F had my personal moral faltering and considering throwing in the towel...but decided to see how the two Pershings entering on turn 3 would impact the assault.

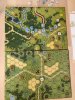
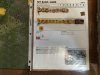
Aparantly the Marines in Company D were very inspired by the tanks, as well as the turd birds in Company E, and their supporting fires and assaults began to crack the KPA defenses. By the final turn, the Marines had cleared one of the three Hilltop Defensive Perimeters (HDPs) by clearing "The Knob" and engaged with the final defenders on Smith's Ridge HDP. Jim had a single 5-2-7 remaining in the HDP, which I entered into CC with two 7-6-8 squads and a leader...a 3:1 +1 attack where I needed to kill the enemy to win, needing a net 6 to eliminate the enemy but rolled a 7 to have a KPA hs survive to deny me the victory.

An immensely fun scenario that had a Tarawa feel to it, in that the Marines have to pass a 2PMC while crossing the rice paddies to engage the KPA...then the surviving Marine firepower can be brought to bear to start pushing the KPA off of the hills. Like Jim said at the end, when it comes down to the final dice roll in the final close combat and the loss is by a single pip...it does not really matter who won. What a crazy back and forth scenario...tons of fun. This scenario took us three sittings to complete.

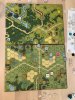
SmR9 Puller's Pugilists

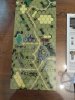
I played the attacking Marines against Matt Cicero's defending KPA. In this one, the Marines need to 10 EVP off of the east edge of the playing area. I split my attack with one platoon working up the crest of the hill to clear the holdouts, while the other two platoons worked to grind through the town, and the MG armed jeeps unloaded the MGs near the factory on the hill. As usual, Matt did an awesome job eating up the clock while rotating defenders onto the front line. The Marines ground the KPA down wherever they decided to hold their ground, and I had one squad that battle hardened to fanatic that would not be stopped. In the second to last turn, I advanced a squad into a building on their left rather than the on their right, that allowed Matt to stuff the exit with bodies and denied the Marines any chance of exit in their final turn. Another loss, but again, a very close scenario that we both enjoyed.

Jim and I will be starting the CG for Smith's Ridge this week. So many decisions to make regarding purchases! o_O:love::geek:

Semper Fi!
Scott
 
Last edited:

gorkowskij

Senior Member
Joined
Jan 23, 2020
Messages
185
Reaction score
543
Country
llUnited States
J209 Corking the Chambois Bottle Turn 5 Allied Advance Fire Phase

This one's a beast that starts slow, even tedious, since terrain channels the attacker into obvious kill zones. But, with a little luck and some patience, the Germans can breakout out on turn 3 to make reasonable gains with acceptable losses and unlock a much more engaging mobile battle. Jury is still out on time though. Three turns to go and three buildings still needed, all within striking distance.
 

Attachments

gorkowskij

Senior Member
Joined
Jan 23, 2020
Messages
185
Reaction score
543
Country
llUnited States
J 104 Flanking Flamethrowers

Another masterpiece of tension and suspense from Xavier Vitry. The Germans attacked in a wedge centered on the sunken road playing conservative with their two tanks. The Russians held on to the village for two turns (See the first pic below) with a 7-0 leader, four squads, two LMGS, and an MMG to knock off a few German half squads and break the German momentum, but were themselves busted in the process.

To finish off those broken Russians fleeing the village, the Panzer III swung round through the orchards behind the two-hex building. That’s when the Russian 76L ART in the brush at 38CC7 let loose. Thanks to some misses and no rate, it took two turns to smash the Panzer III, but it did eventually go up in flames. Meanwhile, the Russian HMG at 38Y5 kept up a fire lane running northwest to 32D3 that forced the Germans into time consuming, circuitous routes while losing two half-squads in the process. German rifle squads at mid field eventually broke the HMG with an 8 up 3 shot that seemed to open the field to progress.

Then the Russian 76L went on a couple of rate tears. The first was to pivot south to knock out the charging Panzer IV before it could overrun. The second was to pivot back northwest and riddle a stack of three German squads and 9-1 with losses that sealed the game on turn 6. See the second pic below. At that point, both sides had lost about 11 CVP of infantry, but the Germans had another 10 points of losses in tanks, so even if their four remaining GO squads could cross the road, they almost certainly couldn’t overcome the CVP deficit.

Great, nail-biting scenario. The Russians have to wrestle with how much to start near/south of the road. Putting the ART, at least one of the two MTR, and at least one of the two big machine guns gives the Russians a decent chance of getting rate shots when they need them. On the other hand, the Germans have to wrestle with how much tank exposure to tolerate. They need tank firepower/SMOKE to move forward, but if the Panzers get too far out in front they might “find” that 76L – yikes.
 

Attachments

Vic Provost

Forum Guru
Joined
Sep 18, 2016
Messages
1,591
Reaction score
3,629
Location
Pittsfield, MA USA
First name
Vic
Country
llUnited States
Ran out of time as the German in J246 Loser Takes All, assaulting Bd 46 is not easy with those narrow streets and claustrophobic inner village, I lost most of my armor and though the Russian infantry was pretty beat up, ran out of time but could have won if there was a turn 7. I recommend trying it but the German needs to be on his toes and his armor is very vulnerable. I used a bunch of panzerfausts and made some impact on his infantry along with burning an SU-100. FUN scenario for sure, lots of nasty stuff for both sides.
 

gorkowskij

Senior Member
Joined
Jan 23, 2020
Messages
185
Reaction score
543
Country
llUnited States
Turning the Tables, ASL 39, Start of German 6

The Western Desert is under rated, probably due to overlays. If we produced a (semi) historical map with all the terrain printed it might get the attention it deserves. We're halfway through a quintessential desert fight with Turning the Tables; dunes, dust, minefields, wire, Stukas, crappy armor, awesome machine guns, and great leaderships, it's all there. The Germans have pushed their infantry forward in a bid to take the center so their armor can punch through for exit VP later. The British HMG held up the advance with a cross fire that avoided sun blindness. So a Stuka dove in with machine guns only, but failed to kill. That in turn triggered fire from the HIP British AA gun, but he too missed the mark. The German 10-2 MG kill stack stepped in to knock out the British heavy, which later recovered to clobber a leader and two squads trying to clear mines. Along the way, after many turns of firing, a British mortar finally knocked out one of the German HMGs on a dune. The Germans are still seeking the British ATG before committing their armor. It's a real chess match. So far, the German have lost 4 VP and the British 2.

26691
 

gorkowskij

Senior Member
Joined
Jan 23, 2020
Messages
185
Reaction score
543
Country
llUnited States
J209 Corking the Chambois Bottle Turn 5 Allied Advance Fire Phase

This one's a beast that starts slow, even tedious, since terrain channels the attacker into obvious kill zones. But, with a little luck and some patience, the Germans can breakout out on turn 3 to make reasonable gains with acceptable losses and unlock a much more engaging mobile battle. Jury is still out on time though. Three turns to go and three buildings still needed, all within striking distance.
We finished this one. The Allies gave up during the penultimate turn when the Germans, firmly in control of two buildings, seriously threated three more. As the game unfolded, the Allies feed more and more manpower into the central church which enabled German tentacles to circle round other buildings with fewer defenders. And the church was in dire straits too with two German tanks inside on the ground floor and a Panther out back followed up by three or four German squads about to enter close behind. Elimination for failure to route was looming for the Allies.
 

william.stoppel

Elder Member
Joined
Nov 10, 2004
Messages
1,312
Reaction score
948
Location
Northern Virginia
Country
llUnited States
Robert Hammond and I got together to play the classic Acts of Defiance yesterday. We mirrored Steve and Bill from ASLOK last and used the Budapest (best HASL) rubble rules and have the Krauts the balance. That rubble and debris really transformed the map even more than usual. Robert’s first OBA beat up both of us and shocked my Brunbar (but then disappeared with a red an d high contact rolls) and his CC was deadly. I dropped my first bridge ever (bucket list) with a Goliath and weathered sphincter tightening shots to get his T-44’s (and my Brunbar recovered. Game went to the end. What more can you ask for? We both highly recommend with the Budapest rubble! A new game every time!
 

PS NJ

Senior Member
Joined
Nov 16, 2021
Messages
97
Reaction score
522
Country
llUnited States
Ron and I played the recent Cellar Pack scenario FT234 Smashing the Corridor yesterday. It's a big, fun, 1945 scenario. 21 elite russian squads with 12 assorted tanks/TDs (and two -2 leaders!) vs 16 mixed (548/467/447/436) ELR 2 german squads with 3 guns and eventually 5 75L/75LL JgPz4's. Russkies need to exit about half their afv force in 8 turns, although they get about a tank's worth of credit for each multihex stone building taken, mostly in the rear of the central board (71). I was initially worried the russians might just dash across the board, but the 1945 panzerfausts make that unlikely to work, plus the aFVs are need for exit VP so I think an attacker is likely to lead with infantry. There's the board 5 forest on the german left and a four hex river board (79) length-wise on the german right (with three bridges across). Ron pointed out that the road on the far side of the river ends in a building, which makes it less than ideal for scooting off-board quickly. I set up about six squads and one JgPz to discourage an attack through the woods. I wanted Ron to have to cross the open ground in the middle. I put a HMG and MMG in the central 2nd level building, although it's a deathtrap once some 122Ls/85Ls are lined up on it. The first couple turns Ron established himself in the middle with lots of armored-assaulting. My left flank forest troops skulked/held up well forcing Ron to pivot that flank towards the middle. My right flank 548's also did pretty good until an advancing fire CH obliterated one squad. My 105L gun disabled on a IF shot early, and we traded one JgPz for an SU85 in the middle. I managed to hit a JS2 twice in the hull with a PSK on a DR of 3 for NE, arggh! My 75L AT gun did immobilize it, and then poured some smoke on top of it. Ron was channeled into the center but pushed right up to the central building area. I was trying to figure out how to get my surviving forest troops back into the village as a 10-2-directed HMG on a first level central perch cut them off quite convincingly. Of course then a sniper immediately broke the HMG squad. Got to love ASL! The 10-2 rallied the squad back under DM before a brash charging 236 could reach building, but my forest troops had already dashed across the open ground.

Then in GT5 my 9-1/247/MMG on the first floor on my right flank poured in five ROF shots into a mass of twelve 8 morale squads spread out in five hexes and led by a 9-2. When the dust cleared the 9-2 and all but one squad broke (8 out of nine failed 1MC's!). I sent a manly 7-0 forward who survived a 30+5 shot to eliminate the whole group for FTR. That's MR. 7-0!

Despite the awkward-luck induced early end of the scenario, we both liked it. We got through 5 (of 8) turns in 5 hours. I think it would be a good all-day scenario for the Thursday round at Albany. I'd play it again as either side.

- Paul
 

Gunner Scott

Forum Guru
Joined
Jan 27, 2003
Messages
13,750
Reaction score
2,698
Location
Chicago, IL
Country
llUnited States
Ya my fav scenario from that pack. A desperate defense vs a desperate attack to close the corridor. The armored reinforcements for the Germans is pretty nifty and powerful. Anyway, glad you had fun.

Ron and I played the recent Cellar Pack scenario FT234 Smashing the Corridor yesterday. It's a big, fun, 1945 scenario. 21 elite russian squads with 12 assorted tanks/TDs (and two -2 leaders!) vs 16 mixed (548/467/447/436) ELR 2 german squads with 3 guns and eventually 5 75L/75LL JgPz4's. Russkies need to exit about half their afv force in 8 turns, although they get about a tank's worth of credit for each multihex stone building taken, mostly in the rear of the central board (71). I was initially worried the russians might just dash across the board, but the 1945 panzerfausts make that unlikely to work, plus the aFVs are need for exit VP so I think an attacker is likely to lead with infantry. There's the board 5 forest on the german left and a four hex river board (79) length-wise on the german right (with three bridges across). Ron pointed out that the road on the far side of the river ends in a building, which makes it less than ideal for scooting off-board quickly. I set up about six squads and one JgPz to discourage an attack through the woods. I wanted Ron to have to cross the open ground in the middle. I put a HMG and MMG in the central 2nd level building, although it's a deathtrap once some 122Ls/85Ls are lined up on it. The first couple turns Ron established himself in the middle with lots of armored-assaulting. My left flank forest troops skulked/held up well forcing Ron to pivot that flank towards the middle. My right flank 548's also did pretty good until an advancing fire CH obliterated one squad. My 105L gun disabled on a IF shot early, and we traded one JgPz for an SU85 in the middle. I managed to hit a JS2 twice in the hull with a PSK on a DR of 3 for NE, arggh! My 75L AT gun did immobilize it, and then poured some smoke on top of it. Ron was channeled into the center but pushed right up to the central building area. I was trying to figure out how to get my surviving forest troops back into the village as a 10-2-directed HMG on a first level central perch cut them off quite convincingly. Of course then a sniper immediately broke the HMG squad. Got to love ASL! The 10-2 rallied the squad back under DM before a brash charging 236 could reach building, but my forest troops had already dashed across the open ground.

Then in GT5 my 9-1/247/MMG on the first floor on my right flank poured in five ROF shots into a mass of twelve 8 morale squads spread out in five hexes and led by a 9-2. When the dust cleared the 9-2 and all but one squad broke (8 out of nine failed 1MC's!). I sent a manly 7-0 forward who survived a 30+5 shot to eliminate the whole group for FTR. That's MR. 7-0!

Despite the awkward-luck induced early end of the scenario, we both liked it. We got through 5 (of 8) turns in 5 hours. I think it would be a good all-day scenario for the Thursday round at Albany. I'd play it again as either side.

- Paul
 

Gunner Scott

Forum Guru
Joined
Jan 27, 2003
Messages
13,750
Reaction score
2,698
Location
Chicago, IL
Country
llUnited States
Hi ya-

Rich D. and I sat down and played CH Kohima scenario KH 3 Hit Back Hard. I was the defending Japanese and Rich of course was the Attacking Commonwealth. The scanrio went 6 out of 8 turns with my Japanese forces getting overwhelmed with what was left of Rich's Commonwealth forces. We both had a good time, and the scenario was a lot of fun to play. I think a better defense on my part (I am a bit rusty with the Japanese) would have given the commonwealth a bit more of a headache. We really like the maps, and for a scenario that probably saw no playtesting, it did play out surprisingly well.

26824

26825
Scott
 

fenyan

Elder Member
Joined
Nov 19, 2004
Messages
778
Reaction score
1,347
Location
California
Country
llUnited States
You don't often see Jagdtigers on a Deluxe map but a couple guys in our group were playing Grumble Jones' "what if the 512 Battalion Jagdtigers didn't surrender at Isenhorn" playtest quality scenario Kapitulieren Nein! They hadn't finished by the time I left but both players were finding it to be a challenge.

26857
 

Gunner Scott

Forum Guru
Joined
Jan 27, 2003
Messages
13,750
Reaction score
2,698
Location
Chicago, IL
Country
llUnited States
Hi ya-

My buddy Bob came by and we decided to play BoF 8 Sting of the Italian Hornet. I wanted to play something short due to a lot of stress and pressure from outside forces, so this one fit the bill. In addition, you can not go wrong with a Friendly Fire scenario, I can play those things over and over again and never get tired of playing them. That is a testament to how well crafted these scenarios are. So with that said, I had set up the the Italians with one rubble counter on the main road into the Village, I set up my main force in the secondary factory in back while I had a few Luigies and Marios in the up front factory along with mines and wire.

The game starts with Bob slowly making his way forward, I am tempted to shoot but I want to hold my fire as much as I can so as to keep the Arty from the Brits from coming down on me. On the 3rd turn, Bob whips around a Stuart Recce behind the upfront factory and stops between the factory and a building, so I just could not resist and luige steps out and street fights the Brit vehicle, sticking macoroni into its drive sprockets and burns it. I was amazed that my 6ML dude was able to pass a PATC and accomplish such a feat.

But thats where things kinda went down hill from there, on turn four, the Brits manage to get Arty on to the secondary factory and all hell rains down on my guys. My 90L rolls boxcars on the first roll, Arty pieces cant hit crap, just tough all the way around, we end up ending the game on turn 6 as the Italians just did not have enough to muster to fight on.

Personally, I think I could have mustered a better defense, perhaps more upfront. Still, this was a super fun scenario no matter how many times it has been played and Bob had a very good time playing very well as the Brits. here are some pics of my set up:

EDIT: I did change the placement of the rubble counter to the road and the fortification and gun to the factory after I took these pics.

26872

26873

26874
 
Last edited:
Top