von Marwitz
Forum Guru
FT230 Italian Behemoth - AAR
This scenario was in the offering of GRENADIER 2019, but then I did not have the chance to play it. As I had created a VASL file for it back then and now VASL allows the easy updating of counters to the current version, I did this to v6.6.1 and gave it a shot.
What I find interesting about this scenario is that it reflects and captures historical Italian doctrine. A quote from the scenario card:
"At about 0330 on 16. February, the forward sections under Lieutenant Kay heard engines coming towards them. The Italian trucks moving at full speed with lights out, were immediately attacked with machine gun fire, forcing the colonial infantry to seek cover. At about 0515 before dawn, the Italians tried a frontal assault, supported by light tanks."
In a nutshell, Italian doctrine was to move motorized infantry fast and deep into enemy territory before opposition could crystalize. The problem was that the Italian formations were too lightly armed if they ran into serious opposition and then had trouble breaking it - and thus jeopardizing the concept of the 'fast and deep' doctrine.
Trucks are not in play in this scenario, but their parking just offboard can easily be imagined after the Italians being checked in their initial thrust, with the burnt out wrecks more representing Italian Trucks rather than South African AFV.
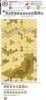
Despite ETO terrain being in effect, I originally designed the VASL file with DTO colors for the added atmosphere of Abyssinia, where the action takes place. Unfortunately, I found out, that using DTO colors for ETO maps disables the LOS-Tool in VASL. So for our game I switched colors back to ETO and added an extra line of half-hexes to the boards on each side in VASL which are not in play (see dotted lines), because displaying full hexes disables the LOS-Tool as well and I needed the full hexes of the playing area displayed because this could be relevant for Bypass.
After many forewords, now let's get to it!
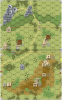
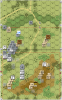
The Italians are instructed set up onboard on the far side of the depression, while the South Africans sit on the hill with some pickets in Foxholes up front.
The Italians either have to exit 16VP including 6VP of Infantry for an immediate win or Control hex 61H3 at game end with vehicular Control being N/A. The early morning dawn ist represented by a +1 LV Hindrance being in effect at all ranges for Turn 1 and 2. Note, that Light Woods (B35) are in effect, which are a +2 Hindrance for same level LOS, can be more easily traversed by vehicles but are otherwise treated as Woods.
The situation feels like the challenge the Italians must have felt historically. You have to cross that ground but have nothing with which you can really punch the enemy to cover your approach.
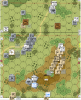
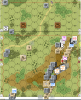
Situation at Game Start:
My plan for the Italian attack was as follows:
It was clear that I could not avoid being fired at while moving across open ground - with ASL Italians. Uh-oh... With a Good Order morale of 6 or 7, even Armored Assault would leave my Italians vulnerable. And once broken, not much safe rally terrain around nor leaders to spare, those Italians who broke early would likely never come back.
Thus I planned to avoid being seen as much as possible. By brute force and frontal assault, my Italians would overcome the western flank of the picket line and rush forward to the dubious cover of the Light Woods, taking advantage of any blind hexes created against the dangerous fire from the hill.
The Light Woods on the western flank would provide Rally Terrain for the inevitable brokies. The assault would continue taking advantage of blind hexes as much as possible for an exit in the south-west. If things would somehow go awry, the Italians would switch the objective and capture the victory hex.
What could possibly go wrong?
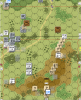
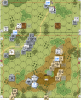
Situation at End of Italian Turn 1:
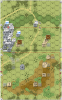
The initial Italian assault worked as well as I could have ever hoped.
Key was to overcome the South African HS in 69S10, which duly laid down a Fire Lane right into my path of blind hexes and safety. I sent out one platoon of tankettes against it, just entering its hex, not bogging, and thus cancelling the FL with both tankettes surviving and imposing Target Selection Limits on the enemy HS.
Next it was time for some brave Italian 'volunteers' roughly shoved forward by their officers to draw and exhaust the enemy fire. This cost two Italian squads Casualty Reduced and broken and a third squad broken. Much to my relief, neither the enemy MTR nor the MMG on their Level 2 perches kept ROF and paths were left open without residual FP.
In this much hoped for 'now or never'-moment, the Italians rushed forward and most reached the safety of blind hexes. The South African HS+LMG in 69S10 was overcome in CC. Unfortunately, the Italians destroyed the LMG in the process. Also unfortunately, the MA MG of one of the tankettes had malfed on its first shot.
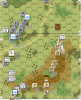
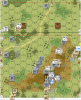
Situation at End of South African Turn 1:
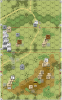
Luckily for my Italians, nothing bad happened to them during South African Turn 1. The MTR attempted to dig in and did not fire, the MMG could not harm anything nor could the other pickets. Having reached the safety of the blind hexes paid off.
To be continued in a subsequent post...
von Marwitz
This scenario was in the offering of GRENADIER 2019, but then I did not have the chance to play it. As I had created a VASL file for it back then and now VASL allows the easy updating of counters to the current version, I did this to v6.6.1 and gave it a shot.
What I find interesting about this scenario is that it reflects and captures historical Italian doctrine. A quote from the scenario card:
"At about 0330 on 16. February, the forward sections under Lieutenant Kay heard engines coming towards them. The Italian trucks moving at full speed with lights out, were immediately attacked with machine gun fire, forcing the colonial infantry to seek cover. At about 0515 before dawn, the Italians tried a frontal assault, supported by light tanks."
In a nutshell, Italian doctrine was to move motorized infantry fast and deep into enemy territory before opposition could crystalize. The problem was that the Italian formations were too lightly armed if they ran into serious opposition and then had trouble breaking it - and thus jeopardizing the concept of the 'fast and deep' doctrine.
Trucks are not in play in this scenario, but their parking just offboard can easily be imagined after the Italians being checked in their initial thrust, with the burnt out wrecks more representing Italian Trucks rather than South African AFV.
Despite ETO terrain being in effect, I originally designed the VASL file with DTO colors for the added atmosphere of Abyssinia, where the action takes place. Unfortunately, I found out, that using DTO colors for ETO maps disables the LOS-Tool in VASL. So for our game I switched colors back to ETO and added an extra line of half-hexes to the boards on each side in VASL which are not in play (see dotted lines), because displaying full hexes disables the LOS-Tool as well and I needed the full hexes of the playing area displayed because this could be relevant for Bypass.
After many forewords, now let's get to it!
The Italians are instructed set up onboard on the far side of the depression, while the South Africans sit on the hill with some pickets in Foxholes up front.
The Italians either have to exit 16VP including 6VP of Infantry for an immediate win or Control hex 61H3 at game end with vehicular Control being N/A. The early morning dawn ist represented by a +1 LV Hindrance being in effect at all ranges for Turn 1 and 2. Note, that Light Woods (B35) are in effect, which are a +2 Hindrance for same level LOS, can be more easily traversed by vehicles but are otherwise treated as Woods.
The situation feels like the challenge the Italians must have felt historically. You have to cross that ground but have nothing with which you can really punch the enemy to cover your approach.
Situation at Game Start:
My plan for the Italian attack was as follows:
It was clear that I could not avoid being fired at while moving across open ground - with ASL Italians. Uh-oh... With a Good Order morale of 6 or 7, even Armored Assault would leave my Italians vulnerable. And once broken, not much safe rally terrain around nor leaders to spare, those Italians who broke early would likely never come back.
Thus I planned to avoid being seen as much as possible. By brute force and frontal assault, my Italians would overcome the western flank of the picket line and rush forward to the dubious cover of the Light Woods, taking advantage of any blind hexes created against the dangerous fire from the hill.
The Light Woods on the western flank would provide Rally Terrain for the inevitable brokies. The assault would continue taking advantage of blind hexes as much as possible for an exit in the south-west. If things would somehow go awry, the Italians would switch the objective and capture the victory hex.
What could possibly go wrong?
Situation at End of Italian Turn 1:
The initial Italian assault worked as well as I could have ever hoped.
Key was to overcome the South African HS in 69S10, which duly laid down a Fire Lane right into my path of blind hexes and safety. I sent out one platoon of tankettes against it, just entering its hex, not bogging, and thus cancelling the FL with both tankettes surviving and imposing Target Selection Limits on the enemy HS.
Next it was time for some brave Italian 'volunteers' roughly shoved forward by their officers to draw and exhaust the enemy fire. This cost two Italian squads Casualty Reduced and broken and a third squad broken. Much to my relief, neither the enemy MTR nor the MMG on their Level 2 perches kept ROF and paths were left open without residual FP.
In this much hoped for 'now or never'-moment, the Italians rushed forward and most reached the safety of blind hexes. The South African HS+LMG in 69S10 was overcome in CC. Unfortunately, the Italians destroyed the LMG in the process. Also unfortunately, the MA MG of one of the tankettes had malfed on its first shot.
Situation at End of South African Turn 1:
Luckily for my Italians, nothing bad happened to them during South African Turn 1. The MTR attempted to dig in and did not fire, the MMG could not harm anything nor could the other pickets. Having reached the safety of the blind hexes paid off.
To be continued in a subsequent post...
von Marwitz
Last edited:
") .
.