von Marwitz
Forum Guru
AP86 Milling About - AAR
Scenario Overview:
This is a tournament size PTO action that has seen plenty of play with 43 Japanese wins vs. 46 British ones and received an exceptional Excitement Rating on ROAR of 7.14 by 83 players (as of May 2021). Almost perfectly balanced looking at the win/loss record and that fine rating, it seems to number among one of the quality designs of Gary Fortenberry. With this designer, you can also be pretty sure that you will have something to think about attempting to grok the fineries of what to do.
I played the defending British in this one.
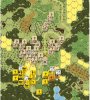
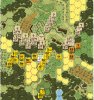
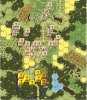
Set in Burma in January 1942, this means that per G1.621 'No Quarter' is not yet automatically in effect. We have PTO terrain with Light Jungle, but Brush remains Brush. All Buildings are Huts and single story, the road exists as depicted in the above illustation. EC are Dry but Kindling is N/A. Hedges are Cactus Hedges (B9.7) and thus difficult to cross.
Some of the British are Gurkhas and only these have an ELR of 5. The Japanese may not use HIP. The Partisans are indigenous Burmese that may freely deploy at setup and they and those moving together in a stack with them can enter Jungle, Kunai and Brush at a reduced cost of 1.5 MF.
As an added twist, setup is simultaneous but out of view of the opponent and a dr decides which side moves first. If it turns out to be the Japanese, they may not Double Time in Turn 1 and in any case Banzai Charges are N/A in the first Turn. This will give you a lot to think about during your setup, especially, as the game is 5.5 Turns long which means that the side moving first will also be moving last.
The objective is for the Japanese to inflict a CVP Total exceeding that suffered by a certain number of points, while the Japanese/Burmese earn double Exit VP to add to their total. By erratum, it has been clarified that Prisoners count for neither CVP nor Exit VP purposes. By erratum furthermore, the side moving second may claim Wall Advantage first.
Preliminary Assessment:
The forces pitted against each other are similar in size: 11 squad equivalents, 3 Leaders, 3 MGs and a small MTR for the British vs. 12 squad equivalents and 2 crews, 3 Leaders, 3 MGs, 2 small MTR and a DC for the Japanese along with two Burmese Partisan squads and a Partisan Leader. Both sides may set up concealed.
There was quite a pile of things to consider - first and foremost the consequences of not knowing of whether one would move first or second along with the implication of having 6 half-turns if going first but only 5 if going second. Obviously, it was a good idea to prevent the Japanese from exiting the board across the North edge, as this was rewarded by double points. Looking at the size of the forces, the British are apparently well suited to fight a delaying battle as the Japanese do not enjoy a marked numerical advantage. But the Japanese being what they are, they have good chances to kill superior numbers in H-t-H combat which could allow them to overcome the required CVP gap. On the other hand, with more than half of the British being Gurkhas, this is literally a two edged sword that can cut both ways. The Japanese have Banzai Charges and the Partisans with their special ability with regard to movement into Jungle, Brush, and Kunai in their toolbox which hints at the Axis being able to 'outrun' their adversaries.
The 'fastest' way for the Japanese to reach the board edge is 21 MF, so they need some 4 turns out of possibly only 5 just to get there if the British would let them. Other routes take considerably longer due to the terrain, but for sure, the Partisans are there for a reason and the Japanese can Banzai Charge (which the Partisans cannot). So 'getting there' is not impossible but it is likely to be a challenge.
On the other hand, the Japanese can win without exiting any unit at all. The British cannot trade ground for time indefinitively as they would be running out of ground. Things are going to get close and personal. As 'No Quarter' is not yet in effect automatically, the Japanese could take Prisoners which might ease taking out some of the British. As Prisoners don't count for CVP nor Exit, you don't want to be these Prisoners at they will eventually meet a grisly fate by Massacre to 'make' them into CVP. Before that, however, the Japanese could (ab)use the Prisoners as human shields taking advantage of the A26.222 exception: [EXC: if a prisoner is eliminated due to an attack by its own side, the capturing side immediately receives double CVP for the elimination]. I do not believe that Gary Fortenberry has overlooked this rotten possibilities... So the British should better not let themselves be captured.
The fineries of H-t-H combat should also not be forgotten. The extra -1 CC DRM for Japanese/Gurkhas in HtH only applies if they are unpinned. Furthermore, while the Japanese will always go HtH (unless pinned or Ambushed), the Gurkhas have the option to make CC in HtH - or not. By that way, they may possibly drag out a CC a bit longer by making it less lethal if it fits their bill.
The challenge for both sides will be to find the best balance of aggressiveness and seeking a fight or delaying against avoiding it or maneuvering for the board edge.
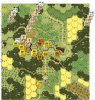
Situation at Game Start - British Turn 1:
The Battle Plan:
You have to consider when viewing the British setup, that I neither did know whether I would be moving first or second nor that I could see any of the Japanese dispositions as setup was simultaneous and out of view of the opponent.
What you do not want to happen to you as the British is being outflanked or overrun by the Japanese. The SSR forbidding Banzais in Turn 1 and forbidding the Japanese/Burmese Double Time in Turn 1 if they move first is a sure indicator that this is a very real threat. In a Fortenberry design, nothing is there without reason... The SSRs and the Cactus Hedge would help the British to avoid that threat if the Japanese moved first. Still, my great fear was a Japanese Push with Burmese 'guidance' (i.e. lessening of MF costs) along the western (left) flank. If they elected to do so, this would force my British to fall back quickly to slow them around the E10 area.
The Japanese could attempt a flanking move in the East (right) as well, but due to the depression and the Jungle switching to Brush and Kunai, this could cost more MF and provide less TEM while allowing me defensive Fire Lanes.
Of course, the Japanese could also make a central push across the Cactus Hedge into the Kunai enclosed by it or opt to blast me there, having Wall Advantage, during Prep Fire. Probably part of them would do one or both of this. The good thing was merely that crossing a Cactus Hedge would me a Minimum Move or Advance vs. Difficult Terrain, so they would not get far in their first Turn and present me with chances to take pot shots. Since Banzai Charges were NA during Turn 1, I could deny G14 during the MPh and could - provided I survived long enough - rout away before the Japanese APh. If I remained in Good Order, CC Modifiers might be favorable to me if the Japanese advanced in.
The British setup area is quite restricted. So in the end, I decided to place two sacrificial Gurkha half-squads up front with the intention of optimizing my Ambush odds and making CC as dangerous as possible for the Japanese as Gurkhas get the -1 modifier in HtH provided they are unpinned.
The central 'fast lane' road would have to be infested by fire if the Japanese would prove so audacious to dare that route. The British LMGs were placed to cover the center with Fire Lanes.
Most of my units would be placed towards the rear as to be able to counter-march any fast Japanese Turn 1 pushes. I would deploy, preferrably the Gurkhas, to have more units on hand to block paths or make the best of CC modifiers if the Japanese would push for Close Combat.
Provided that my British moved first, I would use the headstart to take up blocking positions in the E10 area and to set up shop with the dismantled MMG and MTR in a suitable spot. The Leaders would find positions where to rally any brokies falling back.
A tricky part would be to move the British back after being expelled from the central line of Light Jungle running from West to East.
That said, I was not confident (and I am still not after play) that I have grokked all the fineries and implications of the design. For example, it seems to me that the side moving first has quite a substantial advatage:
If it is the British, they can spread out, deploy and take up better positions. They can make it more difficult for the Japanese to reach them or to set up a Banzai Charge. Maybe most importantly, in this case they will move last, depriving the Japanese of an extra MPh they would otherwise have had.
If it is the Japanese, they can push up especially the western (right) flank with the British being absolutely unable to prevent this. To 'catch' the Japanese, the British will have to move/fall back quickly. But what the British want to do is to delay them, ceding ground as slowly as possible while avoiding casualties.
So far, I have failed to perceive the 'counterbalance' for moving second - if there is any. Which is likely, because usually Fortenberry won't grant an advantage to one side without providing a 'counterbalance' somewhere.
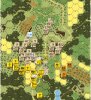
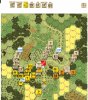
Situation at the End of British Turn 1:
As the dice would have it, my British would be moving first and I was happy with it.
My British attempted to deploy where they could but were successful only in one of three instances. As explained before, 248 Gurkha half-squads would form most of the frontline according to my plan.
In general, I fell back, especially to plug the western (left) flank and to bring my heavy weapons (MMG and lt. MTR) back while still in the initial dismantled state. These units would also have the option to either stay in their new position or to shift quickly to the East or West as the situation would demand. The Cactus Hedge enclosing the Kunai would serve as a 'speed breaker' while the other approaches could be reasonably well kept under fire.
To my surprise and relief, my opponents had apparently not positioned the Burmese with other Japanese which would have lessened the MF cost of these squads for their initial turn.
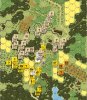
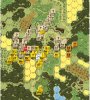
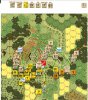
Situation at the End of Japanese Turn 1:
For Japanese Turn 1 I had expected a rather encompassing rush by the enemy especially as was possible for him to avoid most fire if he wanted to and it was in his interest to come to grips with me or to get close to the exit edge quickly. Instead, the first Japanese push was rather cautious. I would not complain.
Only my 248 half-squad that I had left a bit too exposed in I13 received effective fire and broke, routing back to G9 because the Schwerpunkt of the enemy seemed to develop on this flank.
To be continued in a subsequent post...
von Marwitz
Scenario Overview:
This is a tournament size PTO action that has seen plenty of play with 43 Japanese wins vs. 46 British ones and received an exceptional Excitement Rating on ROAR of 7.14 by 83 players (as of May 2021). Almost perfectly balanced looking at the win/loss record and that fine rating, it seems to number among one of the quality designs of Gary Fortenberry. With this designer, you can also be pretty sure that you will have something to think about attempting to grok the fineries of what to do.
I played the defending British in this one.
Set in Burma in January 1942, this means that per G1.621 'No Quarter' is not yet automatically in effect. We have PTO terrain with Light Jungle, but Brush remains Brush. All Buildings are Huts and single story, the road exists as depicted in the above illustation. EC are Dry but Kindling is N/A. Hedges are Cactus Hedges (B9.7) and thus difficult to cross.
Some of the British are Gurkhas and only these have an ELR of 5. The Japanese may not use HIP. The Partisans are indigenous Burmese that may freely deploy at setup and they and those moving together in a stack with them can enter Jungle, Kunai and Brush at a reduced cost of 1.5 MF.
As an added twist, setup is simultaneous but out of view of the opponent and a dr decides which side moves first. If it turns out to be the Japanese, they may not Double Time in Turn 1 and in any case Banzai Charges are N/A in the first Turn. This will give you a lot to think about during your setup, especially, as the game is 5.5 Turns long which means that the side moving first will also be moving last.
The objective is for the Japanese to inflict a CVP Total exceeding that suffered by a certain number of points, while the Japanese/Burmese earn double Exit VP to add to their total. By erratum, it has been clarified that Prisoners count for neither CVP nor Exit VP purposes. By erratum furthermore, the side moving second may claim Wall Advantage first.
Preliminary Assessment:
The forces pitted against each other are similar in size: 11 squad equivalents, 3 Leaders, 3 MGs and a small MTR for the British vs. 12 squad equivalents and 2 crews, 3 Leaders, 3 MGs, 2 small MTR and a DC for the Japanese along with two Burmese Partisan squads and a Partisan Leader. Both sides may set up concealed.
There was quite a pile of things to consider - first and foremost the consequences of not knowing of whether one would move first or second along with the implication of having 6 half-turns if going first but only 5 if going second. Obviously, it was a good idea to prevent the Japanese from exiting the board across the North edge, as this was rewarded by double points. Looking at the size of the forces, the British are apparently well suited to fight a delaying battle as the Japanese do not enjoy a marked numerical advantage. But the Japanese being what they are, they have good chances to kill superior numbers in H-t-H combat which could allow them to overcome the required CVP gap. On the other hand, with more than half of the British being Gurkhas, this is literally a two edged sword that can cut both ways. The Japanese have Banzai Charges and the Partisans with their special ability with regard to movement into Jungle, Brush, and Kunai in their toolbox which hints at the Axis being able to 'outrun' their adversaries.
The 'fastest' way for the Japanese to reach the board edge is 21 MF, so they need some 4 turns out of possibly only 5 just to get there if the British would let them. Other routes take considerably longer due to the terrain, but for sure, the Partisans are there for a reason and the Japanese can Banzai Charge (which the Partisans cannot). So 'getting there' is not impossible but it is likely to be a challenge.
On the other hand, the Japanese can win without exiting any unit at all. The British cannot trade ground for time indefinitively as they would be running out of ground. Things are going to get close and personal. As 'No Quarter' is not yet in effect automatically, the Japanese could take Prisoners which might ease taking out some of the British. As Prisoners don't count for CVP nor Exit, you don't want to be these Prisoners at they will eventually meet a grisly fate by Massacre to 'make' them into CVP. Before that, however, the Japanese could (ab)use the Prisoners as human shields taking advantage of the A26.222 exception: [EXC: if a prisoner is eliminated due to an attack by its own side, the capturing side immediately receives double CVP for the elimination]. I do not believe that Gary Fortenberry has overlooked this rotten possibilities... So the British should better not let themselves be captured.
The fineries of H-t-H combat should also not be forgotten. The extra -1 CC DRM for Japanese/Gurkhas in HtH only applies if they are unpinned. Furthermore, while the Japanese will always go HtH (unless pinned or Ambushed), the Gurkhas have the option to make CC in HtH - or not. By that way, they may possibly drag out a CC a bit longer by making it less lethal if it fits their bill.
The challenge for both sides will be to find the best balance of aggressiveness and seeking a fight or delaying against avoiding it or maneuvering for the board edge.
Situation at Game Start - British Turn 1:
The Battle Plan:
You have to consider when viewing the British setup, that I neither did know whether I would be moving first or second nor that I could see any of the Japanese dispositions as setup was simultaneous and out of view of the opponent.
What you do not want to happen to you as the British is being outflanked or overrun by the Japanese. The SSR forbidding Banzais in Turn 1 and forbidding the Japanese/Burmese Double Time in Turn 1 if they move first is a sure indicator that this is a very real threat. In a Fortenberry design, nothing is there without reason... The SSRs and the Cactus Hedge would help the British to avoid that threat if the Japanese moved first. Still, my great fear was a Japanese Push with Burmese 'guidance' (i.e. lessening of MF costs) along the western (left) flank. If they elected to do so, this would force my British to fall back quickly to slow them around the E10 area.
The Japanese could attempt a flanking move in the East (right) as well, but due to the depression and the Jungle switching to Brush and Kunai, this could cost more MF and provide less TEM while allowing me defensive Fire Lanes.
Of course, the Japanese could also make a central push across the Cactus Hedge into the Kunai enclosed by it or opt to blast me there, having Wall Advantage, during Prep Fire. Probably part of them would do one or both of this. The good thing was merely that crossing a Cactus Hedge would me a Minimum Move or Advance vs. Difficult Terrain, so they would not get far in their first Turn and present me with chances to take pot shots. Since Banzai Charges were NA during Turn 1, I could deny G14 during the MPh and could - provided I survived long enough - rout away before the Japanese APh. If I remained in Good Order, CC Modifiers might be favorable to me if the Japanese advanced in.
The British setup area is quite restricted. So in the end, I decided to place two sacrificial Gurkha half-squads up front with the intention of optimizing my Ambush odds and making CC as dangerous as possible for the Japanese as Gurkhas get the -1 modifier in HtH provided they are unpinned.
The central 'fast lane' road would have to be infested by fire if the Japanese would prove so audacious to dare that route. The British LMGs were placed to cover the center with Fire Lanes.
Most of my units would be placed towards the rear as to be able to counter-march any fast Japanese Turn 1 pushes. I would deploy, preferrably the Gurkhas, to have more units on hand to block paths or make the best of CC modifiers if the Japanese would push for Close Combat.
Provided that my British moved first, I would use the headstart to take up blocking positions in the E10 area and to set up shop with the dismantled MMG and MTR in a suitable spot. The Leaders would find positions where to rally any brokies falling back.
A tricky part would be to move the British back after being expelled from the central line of Light Jungle running from West to East.
That said, I was not confident (and I am still not after play) that I have grokked all the fineries and implications of the design. For example, it seems to me that the side moving first has quite a substantial advatage:
If it is the British, they can spread out, deploy and take up better positions. They can make it more difficult for the Japanese to reach them or to set up a Banzai Charge. Maybe most importantly, in this case they will move last, depriving the Japanese of an extra MPh they would otherwise have had.
If it is the Japanese, they can push up especially the western (right) flank with the British being absolutely unable to prevent this. To 'catch' the Japanese, the British will have to move/fall back quickly. But what the British want to do is to delay them, ceding ground as slowly as possible while avoiding casualties.
So far, I have failed to perceive the 'counterbalance' for moving second - if there is any. Which is likely, because usually Fortenberry won't grant an advantage to one side without providing a 'counterbalance' somewhere.
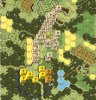
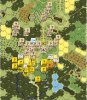
Situation at the End of British Turn 1:
As the dice would have it, my British would be moving first and I was happy with it.
My British attempted to deploy where they could but were successful only in one of three instances. As explained before, 248 Gurkha half-squads would form most of the frontline according to my plan.
In general, I fell back, especially to plug the western (left) flank and to bring my heavy weapons (MMG and lt. MTR) back while still in the initial dismantled state. These units would also have the option to either stay in their new position or to shift quickly to the East or West as the situation would demand. The Cactus Hedge enclosing the Kunai would serve as a 'speed breaker' while the other approaches could be reasonably well kept under fire.
To my surprise and relief, my opponents had apparently not positioned the Burmese with other Japanese which would have lessened the MF cost of these squads for their initial turn.
Situation at the End of Japanese Turn 1:
For Japanese Turn 1 I had expected a rather encompassing rush by the enemy especially as was possible for him to avoid most fire if he wanted to and it was in his interest to come to grips with me or to get close to the exit edge quickly. Instead, the first Japanese push was rather cautious. I would not complain.
Only my 248 half-squad that I had left a bit too exposed in I13 received effective fire and broke, routing back to G9 because the Schwerpunkt of the enemy seemed to develop on this flank.
To be continued in a subsequent post...
von Marwitz
Last edited: