Adrian Carter
Senior Member
Our next game was taken from the Winter Offensive Pack #10 from MMP. The action was set in the town of Ranville, France in June 1944. Elements of the British 12th Parachute Brigade, 6th Airborne Division, dug in around the town, were attacked by elements of Panzergrenadier-Regiment 125 supported by three self-propelled guns (SPG) and one Panzer IVJ from the Sturmgeschütz-Abteilung 200 of Panzer-Division 21 on board 11a. I attacked with the Germans and Johan defended with the Brits. The goal of the Germans was to amass 8 or more VP than the British at game end by controlling any wooden buildings on/north of hexrow J or any stone buildings, and/or exiting non-crew personnel off the north edge on/between Q4 and Q17. The Brits won a VP for each armoured fighting vehicle (AFV) eliminated. Our personal goal was to familiarize ourselves more with the vehicle and bocage rules.
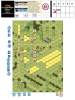
Figure 1 shows the starting positions. The Brits opted for an upfront defence taking full advantage of the bocage and concealment, looking to fall back to the victory buildings. The Germans attacked broadly, thereby ready to adapt to taking victory buildings and/or exiting personnel off the northern edge between Q4 and Q17. I wanted to keep my AFVs well away from the British PIAT, and Close Combat given the Gammon bomb SSR. The Panzer IVJ was my only really dependable AFV with unlimited high explosive rounds, Smoke and BU capability.
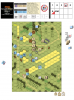
Figure 2 shows the positions at the end of turn 3. The Germans managed to enter successfully, the only real casualty was the GSW 39H(f) which managed to malfunction and subsequently break its 105mm howitzer causing vehicle recall. Although I lost out on my best SPG for dealing with infantry, I, fortunately, did not lose any VP because German AFVs may exit the board without being counted as eliminated (SSR 4). My attack had stalled on the western flank because of some stout defending by the Brits behind the bocage. However, the HIP 6 pounder AT gun had failed to destroy the GSW 39H(f) Panzerabwehrkanone and the AT crew was subsequently broken by the supporting infantry. We learnt two things here. Don’t wait until an AFV enters or bypasses your hex before firing a HIP AT gun, and always accompany your SPGs with supporting infantry, especially if the AFVs have no machine guns. The eastern side was now open to push some German infantry through for exiting the board.
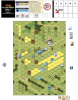
Figure 3 shows the positions at the end of the game and a German win. I had worked my vehicles around the flank, broken the British defence in the town to capture one stone (3 VP) and two wooden (1 VP each) buildings, and exit a squad and 8-1 leader (2 VP each) to give 9 VP in total. All of my remaining AFVs had worked their way around the British flank and were pounding away at the infantry and cutting rout paths. I think this is a difficult scenario to win as the Brits despite the fairly even ROAR record because of the mixed victory conditions. It was still close and went right to the end before the Germans could win. Overall, this was another enjoyable scenario from the Winter Offensive Pack #10.
Any other ideas for apporaching this scenario would be very welcome. Cheers, Adrian
- British advantages: elite squads, HIP AT gun, PIAT, foxholes and concealment counters
British disadvantages: No vehicles, no MMG/HMG - German advantages: dmMMG, Panzer IVJ
German disadvantages: All three SPGs have no MGs, two of them have limited HE
Figure 1 shows the starting positions. The Brits opted for an upfront defence taking full advantage of the bocage and concealment, looking to fall back to the victory buildings. The Germans attacked broadly, thereby ready to adapt to taking victory buildings and/or exiting personnel off the northern edge between Q4 and Q17. I wanted to keep my AFVs well away from the British PIAT, and Close Combat given the Gammon bomb SSR. The Panzer IVJ was my only really dependable AFV with unlimited high explosive rounds, Smoke and BU capability.
Figure 2 shows the positions at the end of turn 3. The Germans managed to enter successfully, the only real casualty was the GSW 39H(f) which managed to malfunction and subsequently break its 105mm howitzer causing vehicle recall. Although I lost out on my best SPG for dealing with infantry, I, fortunately, did not lose any VP because German AFVs may exit the board without being counted as eliminated (SSR 4). My attack had stalled on the western flank because of some stout defending by the Brits behind the bocage. However, the HIP 6 pounder AT gun had failed to destroy the GSW 39H(f) Panzerabwehrkanone and the AT crew was subsequently broken by the supporting infantry. We learnt two things here. Don’t wait until an AFV enters or bypasses your hex before firing a HIP AT gun, and always accompany your SPGs with supporting infantry, especially if the AFVs have no machine guns. The eastern side was now open to push some German infantry through for exiting the board.
Figure 3 shows the positions at the end of the game and a German win. I had worked my vehicles around the flank, broken the British defence in the town to capture one stone (3 VP) and two wooden (1 VP each) buildings, and exit a squad and 8-1 leader (2 VP each) to give 9 VP in total. All of my remaining AFVs had worked their way around the British flank and were pounding away at the infantry and cutting rout paths. I think this is a difficult scenario to win as the Brits despite the fairly even ROAR record because of the mixed victory conditions. It was still close and went right to the end before the Germans could win. Overall, this was another enjoyable scenario from the Winter Offensive Pack #10.
Any other ideas for apporaching this scenario would be very welcome. Cheers, Adrian
") . I was not very familiar with American football positions, but it seems that the European football equivalent would be a centre-half in English or Vorstopper in German. On reflection I would probably think a sweeper in English or Libero (German uses an Italian word) would be a better term to describe this task. This is the player at the back behind the defence that is not marking a man (hence free man or Libero) whose job it is to react to breakthroughs and clear up at the back. I vote to introduce the term Libero into ASL defence jargon
. I was not very familiar with American football positions, but it seems that the European football equivalent would be a centre-half in English or Vorstopper in German. On reflection I would probably think a sweeper in English or Libero (German uses an Italian word) would be a better term to describe this task. This is the player at the back behind the defence that is not marking a man (hence free man or Libero) whose job it is to react to breakthroughs and clear up at the back. I vote to introduce the term Libero into ASL defence jargon