J152 Messenger Boys - AAR

von Marwitz

Forum Guru
Joined
Nov 25, 2010
Messages
14,358
Reaction score
10,209
Location
Kraut Corner
Country
llUkraine
J152 Messenger Boys - AAR

16126

Set in August 1944, this scenario has some 'Bocage' feeling to it, but it is nevertheless not one of the 'full-scale' Bocage scenarios. Basically, an Elite British force supported by tanks and halftracks has to push back and root out a smaller German SS force to and out of some buildings. Not all the Germans are SS, but those who are not are Fanatic and have a commissar-type Leader by SSR. The Germans receive reinforcements which are small but powerful in the form of a pair of Pz IVs and two SS-laden halftracks, that should arrive in the nick of time just when the Germans need them most.


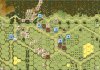
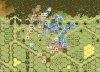
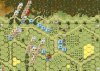
Situation at Game Start:

16231

[I say! I feel indisposed as I had worked on this After Action Report for almost an hour and was to save it, as the connection failed and the effort has been lost. I could have hunted a fox or two within this time. Well, all over again...]

The objective is to Control one of the 'big' buildings and three of the 'small' ones, which means that one of the 'small' ones will be on the 'other side' of the road. For that reason, I thought it prudent to divide my force as the attacking Britons. The Huns around the 54U5 area are 2nd Line but Fanatic troops led by a Leader which has 'Commissar-like' qualities only wor this group. That means, they will rally on a 9 or less which is bad if you want to clear someone out quickly. The rest of the German force is 548s which have more punch, but they are few and only have a single other Leader, which means that they can hardly cover all approaches. The Bocage terrain will slow down the British movement significantly, so it is important to find a quick way forward.

The basic plan of Infantry movement was as follows:
Red: In the north (top) approach and overwhelm the speed-bumps. In the middle bring forward a recce force. to seek out the enemies Dummies and impede his movement options later. In the south move forward as quickly as possible across an area seemingly not covered by the enemy.
Blue: In the north push head on through 54O1 towards 54R1 supported by armor. In the middle seek out the enemy's Dummies and impede his movement options later. In the south take the 'castle' of 54P6/Q7 and a firing position for PIAT/MTR in 54P8 and then proceed to jumping-off points in 54R4, R5, and R6.
Green: In the north depending on the situation either hold on to 54R1, grab the 'big' building 54T1 or fork off across the road to 54T3. In the middle just be a PITA and run to places to restrict enemy fire options. In the south, supported by a SMOKE screen created by tanks and MTRs, cross the road in 54S4, S5, S6 and grab all buildings in the area with some units hooking around to get at the 'big' building from the rear and to take up position in 54V3 to check possible German counterattacks.

This is what Lt. Whitaker, a red haired, buck toothed officer with a limey complexion outlined with the obligatory upper class accent to his troopers: "Gentlemen, it will be quite a cake-walk, will it not?" His kerchief in regimental colours neatly set in his breast pocket, he waved them with his umbrella to follow his lead.


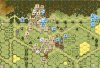
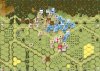
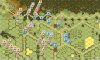
Situation at the End of British Turn 1:

16239

In the first British Turn, everything went according to plan.

In the north, the British rushed forward through the woods, no one got hurt, the jump-off position was fine for next turn, merely the CC could not be won. However, this was not to be expected as it was a 1:1 @+1, which was indecisive and turned into a Melee. Fair enough - that German HS would be firing PFs at no one and even if eventually victorious in Melee, it would find itself in a precarious position.
In the middle, it was acertained that the 54J2 position had been Dummies and would be no delay for vehicle or man alike. From 54H3, a MTR set up shop with a splendid view down the road out of range by the German position in 54Q8 but in turn very well in range with the MTR themselves.
In the south, the British were poised to take on 54M5 and P6 and with another MTR on Q8. Lt. Whitaker had nicely advanced across the Bocage and would be able to reach the 54P6/P7 'castle' or P8 position. Dabbing his brow with his kerchief, he inquired of his batman Bowden-Heseltine: "Please, do say: Will we have reached our objective by tea-time?" Mortimer Bowden-Heseltine whipped out his heavy sterling silver pocket watch which had been handed down the ancestry line since mid pleistocene: "Sir, I believe we will not by the frog's reckoning which have their habitat in this country and are one hour off. But if we go by Greenwich Mean Time, we will be just fine." "Excellent!" exclaimed Lt. Whitaker, "Excellent!"


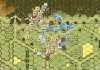
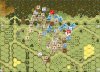
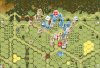
Situation at the End of German Turn 1:

16240

Not much transpired during German Turn 1.

In the north, not a thing moved. It was unfortunate, that the Melee was still inconclusive, but maybe the Huns were just kind enough to wait until the British CX halfsquad had caught its breath before trading blows in earnest.
In the middle, the unit in 54M5 suspiciously withdrew to O5, fortifying my impression of dealing with a phantom there.
In the south while our MTR team assembled its tube, the enemy relinquished its Foxhole in 54Q8 to occupy the 'castle' position just to the north of it.

From a westerly direction, the noises of heavy engines could be discerned, which Bowden-Heseltine acknowledged with a pleased glance at his pocket watch. Lt. Whitaker had come up with a shrewd ruse of war having most of his armoured reinforcements enter on the right side of the British front whilst it was known to the Germans that on the isle they would usually conduct their vehicles on the left. That would show them!


To be continued at a future date...

von Marwitz
 
Last edited:

von Marwitz

Forum Guru
Joined
Nov 25, 2010
Messages
14,358
Reaction score
10,209
Location
Kraut Corner
Country
llUkraine
Situation at the End of British Turn 2:

16258

In my British Turn 2 I began with recce activities resulting in the elimination of all Dummies the Germans had had in their OoB. As a result, I knew that - apart from the still hidden ATG - the path was clear for the entry of the armoured reinforcements.

In the north, the troopers engaged the second German speed-bump position and broke the squad in it. The Melee was decided in favour of the British, despatching the enemy halfsquad. Yet, the speedbumps had served their purpose. The next position to engage would be the 54O1 building, which was acquired by one of the tanks in 54J1.

In the middle, as all German Dummies had been cleared and the ATG position seemed unlikely in that area, the armoured support moved to the L-hexrow, being covered by the Bocage. From there, it would be possible to shoot SMOKE and benefit from the protective position until the whereabouts of the German ATG could be established.

In the south, the neccessity to cross Bocage and recovery from CX status prevented any quick advances, yet, the 'castle' position of 54P6/Q7 could be secured, a protective PIAT installed in 54Q8, and some armoured support called up. The German resident 548 in the area decided to voluntarily break to avoid being bottled up.

Still, except for malfing one MTR in 54H3 (and wasting the chance for SMOKE in the process), everything worked according to plan.


Situation at the End of German Turn 2:

16259

In their Turn 2, the Germans did not do much. Rather, they lurked in their positions, of the dispositions of which the British had a pretty precise idea, to be attacked. What they did, unfortunately, was to self-rally the broken 548 in 54S6, which scurried away to V5. Furthermore, they pulled back what must be their 8-1, 548+MMG combo from 54O1 to P1. With one 548 speed-bump in 39O9 still in position and a brokie in 54O1 blocking the approach into 54O1, making headway on this flank would be difficult and quick audacious rushes forward either impossible or very perilous. On the other hand, I had my tanks in 54J1 and 54O7 along with a MTR in 54N6 in positions to lay down some SMOKE to have a go at the northern German defensive position.


Situation at the End of British Turn 3:

16260

British Turn 3 went well in a way and then did not.

I wanted to prepare my assault across the S-hexrow road by placing some SMOKE with my MTR in 54P9, but did not have any. So two out of three of the MTRs did not yield a single round of SMOKE - not catastrophic yet, but not encouraging either, as of course, if the MTRs can place SMOKE this is much preferrable than tying up the tanks with the task. Against this background, I decided not to fire any SMOKE with any of the tanks as I felt I should not risk it yet but rather save it for later.

In the north, I could break the third speed-bump in 39O9, however, the terrain was too difficult to bottle it up. One halfsquad that could have helped in the process and which had rallied in my previous turn in 39K10, was broken again by the German Sniper. Unfortunately, I could not eliminate the German broken HS in 54O1 during Prep Fire. This was irritating, because this prevented me to enter that building during the MPh and tho threaten the important and strong German key-position of 54P1 with his 8-1, 548+MMG in a Foxhole.
Could I have moved ADJACENT into that building, this would have forced the Germans to fire and probably some British would have survived to initiate a CC afterwards. However, moving ADJACENT to expose oneself to a 20 @-3 or @-2 Point Blank shot to get next to them would have been suicidal even for the 8 Morale British troops. Using a large sized tank for the purpose with three chances for the Germans to find a PF and not in need to fear any Backblast seemed not a good idea either - especially since its likely Burning Wreck would have hindered the LOS from 54M1 to S4, which I had earmarked for a SMOKE shot in my next MPh to help crossing the S-road into the eastern building complex.
The Germans in 54P1 did not take the bait of a 'volunteer HS' in 54P2 either. To make matters worse, from 54P1 they could interfere badly with my planned deployment to 54R4, R5, R6. To cover that somewhat, I was luckily able to pop a sD into 54P4 but found it necessary to stop the tank in 54Q5 instead of 54R6 to provide some future cover. No luck to unconceal 54P1 during AFPh either. That German position was extremely irritating in every conceivable way - at least I had it covered from 54M2 to SMOKE it out in my next turn.

Despite having moved and exposed my tank which had stopped in 54Q5, still the German ATG had not made its appearance. This puzzled me because it stood to reason that it had to be somewhere in the northern German area - the middle had been 'moved through', in the south, it would have fired at the halftrack on the road as there was no other target. Besides that, no positions seemed to be favorable. Because of this, I held back my Sherman VC(a) in 54L3 for another turn, as he also had a reasonable LOS should the German tanks consider moving up in the center.

In the south, despite 54P1 and the still hidden ATG, I decided that I could not afford to lose any time. Thus I moved Infantry to R4, R5, and R6. More Infantry followed up and I abandoned the halftrack removing the AAMG as a dm .50Cal (this was not allowed by SSR, but we only realized this later in the game).

As a bottomline, I was set for the upcoming assault into the eastern group of buildings, but not as good as I had planned. However, the German 54P1 position was unscathed, even still Concealed. It had advanced a Fanatic squad+LMG next to it in +2 TEM, so it might keep the Germans busy/threatened. Still, the 'friction of war' was kicking in. And the quite powerful German reinforcements were about to arrive...


Situation at the End of German Turn 3:

16263

Much to my chagrin, German Turn 3 brought me no gain whatsoever but only more troubles.

The broken 548 in 39P8 self-rallied and would be an additional block in the north. All German reinforcements entered the north, so I had to deal with three 548+LMG combinations one 548+MMG combination, a single 548, two -1 Leaders and both Pz VIs across terrain which provided my troops no good cover or was blocked. This made it clear, that I would have to capture the more southern patch of buildings completely and would go for only one 'small' building in the north.

The Germans broke my HS next to the 54P1 position. In turn, no matter what I tried, I could not harm, not even unconceal 54P1 despite it had by now received a large number of attacks. The 8-1, 548+MMG just fell back one Foxhole to 54Q2, which was still a formidable position with excellent fall-back options, powerfully covered and forcing me to move ADJACENT into Leader directed 20FP. In the south, I could effect nothing with my fire either.

The upcoming British Turn would be rife with difficulties...


To be continued in a subsequent post...

von Marwitz
 
Last edited:

von Marwitz

Forum Guru
Joined
Nov 25, 2010
Messages
14,358
Reaction score
10,209
Location
Kraut Corner
Country
llUkraine
Situation at the End of British Turn 4:

16264

In British Turn 4, I was in for some frustration. But it began well with my tank in 54M1 successfully placing SMOKE into S4. But there ended the best laid plans: My tank in M2 did not have SMOKE to shroud 54P1. And finally, my tank in 54Q6 did not have any to SMOKE the key German position of 54Q2, either - but he malfed its MA as a bonus, thus depriving me of the only alternative I would have had to punch that hex this turn during Prep Fire.

The Germans had abandoned 54T4 before, falling back to the stone building behind, but a 447+PSK was guarding the open road of 54S5 and S6 which I had to cross to get into the buildings - along with a 548+LMG in 54S2 and in part another such combo in 54T1. My MTRs were of no relief, as they were either malfed, never brought SMOKE or out of position. So, to neutralize the German 447+PSK (Fanatic in Foxhole...) I drove over the halftrack all the way from 39M10, went for ESB to drive into the hex of the Germans squad, where it was blazed by its PSK. This use was really a shame, but the smoke was now there.

So into the road in R5 and R6 they went, led by Lt. Withaker who was beginning to get irritated about tea-time. Altogether, two German Fanatic 2nd Liners were broken, and routed back. Withaker and company advenced into 54T5, where his fire would be inhibited by the burning wreck, but on the other hand, in a cumulative +4 TM/SMOKE it was likely that they would not really be harmed by the attentions of a 14FP @+4 shot by the ADJACENT enemy in the upcoming German Turn. Meanwhile Sgt. Boyden had helped lugging the .50Cal into a good spot in 54R4 so that soon it would be able to deal out serious FP from there (still, we had not realized that the removal of the .50Cal was N/A by SSR).

In the north, the accursed 8-1, 548+MMG combo sat as fat and happy as ever in his Foxhole, now in 54Q2. But at least O1 was empty now. So what did it help - I moved Lt. Joyce (9-1, DSO, MC) with some jolly chaps from the woods in 39N10 through the 54O1 building into P1 in the hope of being able to enter the Foxhole and later into CC with the evil Huns - and of course drawing fire to free some more of my units up for less deadly movement. The plan worked just perfectly. Well, the 'drawing fire' part, that is. Lt. Joyce, his batman Oakleigh Henderson-Brackenborough (having cautioned against it), and the whole lot of jolly chaps were shot up to rout back all the way to 39M10. But only after having been bounced back, revealing the HIP AT Gun in 54P1. Remember, my attempts to strip concealment there in well over a half dozen attacks vs. the Infantry now in Q2 never had yielded as much as even a Pin result. Well, superb! I knew the position of the ATG - and as well that there would be no chance to get into CC with the 8-1, 548+MMG just to neutralize it. Instead a fanatic squad led by the heroic Higgins and another HS had to contend with taking out the Gun Crew in CC. A cake-walk as Lt. Withaker had reminded them before commencing the assault. 3:1 @-1 odds, needing a 9 or less to dispose of it with no chance of escaping via prior Ambush, so 83.3% success probability. What could possibly go wrong? Well, the other 16.7% could. Every single one of them and fraction thereof - rounded up! So my deft plan pressing the ADJACENT Germans with 9 morale troops in +2 Foxholes, grabbing the enemy ATG with my HS outside the Foxhole (and thus gaining Emplacement TEM) to turn it vs. the Pz IVs went to naught. Instead they could be pasted by the Germans with a 20FP @+1 attack. That is if the enemy tanks had not taken care of the matter before that.
Lt. Whitaker, as later related by his batman Mortimer Bowden-Heseltine, lost his temper and went in a rage, remarking: "I say! What a mucking misfortune."

So progress in the north was not only nil, the situation was worse than before and time running against the British. In the middle, they had a foothold beyond the road but with a 'Commissar-type' officer on the German side ready to bring back the two fanatic brokies on a 9 or less, it was tenuous at best.


Situation at the End of German Turn 4:

16271

German Turn 4 was frustrating for the British. The German broken Fanatics were immediately sent back into action by their 'Commissar'. On the bright side, I rolled snakes while rallying a HS, creating a second Hero, named Magnum - maybe to form a team with Higgins (needless to say by far the cooler one of the two...). What Higgins was in coolness, the HS outside the Foxhole made up in stupidity - these stooges contrieved to overlook the German ATG they were sitting on and did not retrieve it.

The inevitable happened: The 8-1, 548+MMG combo shot up the stooges HS, the Fanatics and wounded Higgins before they could fire at the Huns. For the umpteenth time all defensive fire vs. that German group from hell did absolutely nothing.

In the north, the German infantry formed an incredibly strong front to run up against: 8-1, 548+MMG in Q2 Foxhole, 548+LMG in R1 Stone Building, 548+LMG in S2 behind wall, and 9-1, 548+LMG in Wooden Building in U2. Not to forget, backed by two Pz IVs and two SPWs, which my opponent for some reason left BU.

In the middle, all four building hexes had been occupied by German Fanatics and one 548. Just to drive home the urgency of the situation, the wreck blaze in T5 spread a flame into the Orchard where Lt. Whitaker lay in position with his two squads. By now, finally in position to do damage after removing it from the halftrack, assembling it and moving it around, we had realized that the .50Cal could not be removed from the halftrack by SSR. Just fine. We agreed to teleport it back to its halftrack as if nothing had happened.

With two British Turns left, I still believed that my chances to get the 'middle' patch of buildings were reasonably good. But to Control even only one 'small' building in the northern patch would be a real challenge.


Situation at the End of British Turn 5:

16282

In British Turn 5 with not a single of the necessary buildings under my control yet, things needed to happen and they would need to happen fast.

To have a chance to get at my menace, the invulnerable 8-1, 548+MMG in Q2, I went for SMOKE with my tank in M1. What I got was no SMOKE and boxcars to malfuction the MA as a bonus. A déjà vu. However, meanwhile I was lacking people to throw at that meatgrinder... Or to shoot at them. What might have been there needed to move to somehow get past that breakwater. From 39M10 I hooked around to 54O3 with my 9-1, Hero Magnum and 1.5 squads. The Sherman VC(a) moved there, too, but could not take out one the Pz IVs in the AFPh. Two concealed halfsquads managed to reach Hero Higgins in 54P1 in the APh, but there was not much hope that they could achieve anything. Basically, in the north I set up everything as best as I could manage for the crazy 'last dash' towards the objective.

In the middle patch of buildings, I had to force my way in somehow now. As to reduce the amount of German FP to be exposed to in the process, Lt. Whitaker ordered: "Well, I suppose our armoured forces have to accept scant chances to survive. Everything must burn to create cover!" And indeed the British tankers were true to the old cavalry tradition: Their's is not to question why, their's is but to do and die. The first Sherman moved off from Q6 into bypass of T3 and was duly blazed by a Panzerfaust, shrouding the German HS within the building. Then the halftrack with the 'reinstalled' .50Cal was put to a short and single purpose, freezing U5, but was also blazed in the process. Now an 'impressive concealed stack' Assault Moved into S4 and into T4. Some more guys to V5 and U6. The 9-2 Whitaker with by now 3 squads, 2 LMGs and a PIAT was to advance out into U6 into CC, ambush the squad there @ -2 Concealed -2 Leadership, kill it and infiltrate further.

German Defensive Fire luckily did not do much damage this time. During the RtPh, the Germans decided to voluntary break more or less everybody in the middle compound, planning to rally on the far side of the road and rallying again with a 7 or even 9 or less to form an impenetrable wall of bodies and firepower. As my British units in T3 and T4 and V5 were all concealed, he could not get out of the building but had to rout to U4.

It was very late at this time and our concentration was beginning to lapse which resulted in mistakes. We had forgotten to check for spreading fire, which we noticed only during the APh. The DR was again high enough to spread in the Orchard of T5 again from Flame to Blaze. So we pulled out Lt. Whitaker and his 3 squads and stuff from U5 to T6 broken.
Had we noticed at the correct time, then the Germans might not have voluntarily broken all their guys. Anyhow, now these key units were broken and hanging out in the open...

At this point it did not seem to make much of a difference because the chances for the British to bring this home seemed not very good.


Situation at the End of German Turn 5:

16283

German Turn 5 saw mixed fortunes for the Huns. Neither their 'Commissar' nor their 9-1 could rally the unit needing a 9 or 7. Nor could the British - at much lesser chances - their Fantatics and a HS in 39M10. But my 9-2 recovered, alas none of the three squads.

During Movement, one of the German halftracks moved to 54T6 to screw up the rest of that stack in T6 but remained BU overly cautious. This would later allow the squads to rout away to U6, where they (legally) ended their RtPh next to broken Germans, which they had not seen before and thus not broken the rule to rout towards known enenmy units. The German Fanatics had had to lose DM during their Rally Phase and did not regain it until the British Routs, which - it being the German half-turn - happened after the German RtPh, when they were still without DM. As a consequence I could prevent these 1.5 German squad equivalents+LMG to escape across the road. The would have to rout in my last British turn, though, so it was clear that I would Control the middle patch of buildings - unless the Germans would opt for a counter attack with Infantry which he did not. At this point I knew that to win, I 'merely' needed only one 'small' building of the northern patch of buildings.

This would be easier said then done. Especially looking at what happened in the north. First, the Germans attempted to extricate the Pz IV in 39S9 which was in the beads of my potent Sherman VC(a). The PzIV sucessfully used his Smoke Dispenser but nevertheless was just hit by the Sherman to burn. Next, he moved the second halftrack towards the bridge in 39P9 with the plan to re-DM by guys in 39N10. I decided I could not let this happen, thus I fired a low odds shot from 54P1 with a PIAT and just hit to destroy the halftrack. My opponent was probably focused on the belief that I would attempt to Control the 54R1 building in my last turn. To make that all but impossible, he even kicked me you of my 54P1 Foxhole again, at last killing the Hero Higgins who went down to his 6th (!) wound. R1 advanced into Q2 and S2 into R1. The second Pz IV did not move in 39T9, providing additional coverage as did the 548 in 39R9, which had at long last emerged from the woods again. An absolutely impenetrable protection for 54R1. Not moving the 39S9 tank was a grave mistake, though, IMHO, as this left the 54V1 building protected comparably light, though it was probable that for my final British Turn, both 54T1 and U2 would have recovered. Furthermore it was not clear, how many of my broken squads in 54U6 would rally.

Many, many if's for the British and Lt. Whitakers hope to have a cuppa tea on time...


To be continued in a subsequent post...

von Marwitz
 
Last edited:

von Marwitz

Forum Guru
Joined
Nov 25, 2010
Messages
14,358
Reaction score
10,209
Location
Kraut Corner
Country
llUkraine
Situation at the End of British Turn 6 - Game End:

16284


The last half-turn - British Turn 6 - and this game comes to a most dramatic end...

The good news was that every last British unit rallied. So did all Germans, too [EXC: those 1.5 squads in 54U4 who could not self rally and were eventually eliminated.

Now, how to pull this off?
As mentioned before, I was convinced that there was no chance for me to Control 54R1. So it had to be 54V1 way in the back. As Lt. Whitaker - hellbent on his tea - had rallied everyone in his hex to the cause, I had plenty of squads and units at hand. But moving ADJACENT to be fired at with 16FP @-2? This would not do. Counting my remaining AFV, I had 3 left. And I needed either to freeze or shroud in SMOKE most importantly 54U2 and 54V1. MPs were sufficient to theoretically arrive there. If I did, then I could swarm 54V1 with infantry and Lt. Whitaker (9-2) and finish off the defending 548 for the win. What could possibly go wrong?

So to be able to move my AFVs as safely as possible, I first had to exhaust as much German fire as possible by other means. It a bloody affair, I ran all sorts of Infantry right, left, and center around my menace, the German 8-1, 548+MMG now back in 54P1. Gleefully, and I might say out of habit, they and his fellows killed, broke, and pinned my troopers all over the place. Some shots they could not ignore to prevent me from getting ADJACENT to 54R1, some others they could have passed up. The only British unit that managed to get ADCACENT to 54R1 was a HS with a PIAT. Up to this point, I had moved all of my infantry in the north except for a 9-1 with 1.5 squads which sat in 54O3 beneath the tank.

Now it was time for the tanks to get going. First, I moved the one from 54M1 with the target of VBM freezing 54U2. It didn't quite get there but was blazed by the PSK from 54T2 in 54T3. Next came my valuable Sherman VC(a)in 54O3: It managed to pop its sM into 54R1 to create more cover for potential PF shots and trundled off to 54U2. It did indeed arrive there and was duly shot by a PF, shrouding the hex in its Wreck Blaze. Last came the Sherman from 54R4, which, most importantly VBM froze 54V1, the crucial hex which I needed to take in CC for the win... Phew! This AFV part worked out as planned!

I was pretty confident now, that I would indeed be able to turn what I had already marked off as a loss...
So, first of all, I garrisoned the 54U4 building with a halfsquad in 54U5 to prevent any freakish events of losing Control of it by some Germans somehow routing into that patch of buildings without being eliminated for failure to rout or forced out again - we all know, HoB can do mean things... Next, Lt. Joyce took off from 54O3 with his batman Oakleigh Henderson-Brackenborough (who cautioned against it). Indeed, it was Lt. Joyce alone who arrived ADJACENT to 54V1 with the rest of his 1.5 squad equivalents - and his batman - along the way. Next came Sgt. Boyden who joined Lt. Joyce with a jolly good number of halfsquads - three of them - in 54W2. Now it was time to move my joker: From 54U5 Lt. Whitaker (9-2), Sgt. Rawlings (8-1) and three 458 squads with 2 LMG and a PIAT readied themselves for the short run to 54U1. There was even hot water for tea, hastily heated in the Wreck Blaze of 54U5 by the old trusty subedar Venkata Narasimha Rajuvaripet who accompanied Lt. Whitaker since his Indian station.

I told my opponent: "All right, now let me take two mintues to check if I have not overlooked anything or if there is any way you can conceivably harm me..." I didn't find one, so this 'mother of all stack' took off to arrive in 54W1 to advance into CC vs. the Pinned 548 with -3 DRMs for Ambush and at 3:1 odds @ 0 despite my tank, needing a 9 to eliminate the German squad for the win with the extra chance of the CC attack by tank - if I did not break it before by a 16 flat Advancing Fire shot, a 6+2 shot and the tank firing within hex. Lt. Whitaker in his mind was already turning the silver spoon in his cup of tea in 54V1, when I was torn out of my fantasies by my opponent's announcement: "Hold there in 54X2. I will fire at you 5 @ -3 from U2." He rolled low and my entire stack except for a single squad broke, Lt. Whitaker's china cup blasted into a 1000 pieces by as many bullets from the German MG42. OH NOOOOO! How could I have overlooked that?! I cursed myself! Well, I late CX'ed the surviving squad to mote to W2, which would still leave me with a CX 9-1+458 and a non-CX 8-0+ 3x248 to finish the job along with the tank. Not as sure, but not impossible either.

As it was around 2 a.m. I now considered stupid things: I might fire my PIAT on a low odds shot from 54R2 vs 54R1 and with crazy luck hit and break the 548 in there, forcing him out to rout. Since my PIAT HS was Pinned, this would not help me to get into the R1 building, but I figured, sometimes Snipers are activated. They might hit the HS to battle harden it or somehow un-Pin it, so that I might advance in for an additional chance for a win. Or course, this was all bollocks of the most splendid and elaborate sort. But what shall I say, my plan worked. I could not harm the German squad in 54R1 but the enemy Sniper did get activated and found a crucial unit - not my PIAT HS to battle harden it, but instead my CX 458+LMG in 54W2 to break it. Doh! So my CC odds vs the German pinned 548 were significantly lessend. I cursed myself again for this folly!

The final CC Phase came. Neither my Infantry nor the tank could kill the German 548, so I was one building short. German win. I had managed to grab defeat from the jaws of victory by the virtue of my extreme stupidity exposing my crucial shot to a -3 shot.

After we had concluded our session and ended the game, I was still wondering how I could have been so stupid to overlook such a risk after the extra precaution to check everything for an extra two minutes before I made the move. Then it occurred to me, that I had not overlooked anything and there was no real danger. Tired as my opponent and I were, he had overlooked that the 5 @-3 shot from 54U2 vs 54X2 would indeed have been a 5 @+1 shot, as the Germans were firing out of Smoke by the burning tank wreck. I checked the rolls made: No unit in my killer stack would have broken. On top of that, the Germans were marked with First Fire because they had fired a PF to kill the tank and Lt. Joyce was ADJACENT to them. Looking at our CC rolls, these would have been sufficient to kill the German 548 because nothing could have prevented my killer stack to enter CC. So actually, Lt. Whitaker would have won the game with the British, had his cup of tea and drunken it.

That's what can happen if you get too tired and lose concentration. But as the game was so exciting, we wanted to finish it. And so it did finish with a German victory.

No matter the outcome, it was a fun game. And this is what matters.


Review:
The British need to move fast in this one, because once the German reinforcements are in position, they can make any one flank exceedingly difficult for the British to overcome, which requires time. SMOKE is very important for the British. Some overlays have been placed so that the British don't have a completely covered approach to the two building compounds. Still, Bocage will cost them time to maneuver across and around. But the British will need the SMOKE to cross roads or to shroud the German defenders in buildings. I was quite unlucky with SMOKE, getting only a single or two SMOKE rounds out despite being theoretically quite lavishly equipped with it. Whatever the case, the British need to make their SMOKE count. Out of dire need, I created SMOKE the 'Russian way' by sacrificing AFV, of which all but one went up in flames.

With their extremely high broken Morale and the Commissar, the Germans are likely to come back immediately. And they are difficult to break in the first place. So the British will probably face situations in which the Germans have to be overcome in CC - despite the 548s being better at that than the British 458s.

The bd39 woods seem to provide a safer route of approach as the woods provide cover. However, speedbumps work very well in that area for the Germans and with the placement of units in Foxholes they can create a covered Rout Path all the way back to 54R1. Of course, in our game the German 8-1, 548+MMG proved extremely resilient withstanding close to 20 attacks without harm. Still this AAR shows what challenge it would be in any case to bypass it.

The way through bd54 is the alternative. Actually I believe I was very lucky in the first three British turns to get forward this quickly. After having eliminated all enemy Dummies and being convinced that the HIP ATG would not be in the south, I could more or less rush forward as I pleased. Still, it took me until Turn 5 until I had a firm grip on the 'middle' patch of buildings. If the British are held up along the way along the way across bd54, this might get back at them with a vengeance.

Altogether, this is an interesting and exciting scenario which according to ROAR seems quite balanced with 41 British wins vs. 44 German ones inclusive of our playing as of January 2021.


von Marwitz
 
Last edited:

Actionjick

Forum Guru
Joined
Apr 23, 2020
Messages
7,468
Reaction score
4,996
Location
Kent, Ohio
First name
Darryl
Country
llUnited States
Situation at the End of British Turn 6 - Game End:

View attachment 16284


The last half-turn - British Turn 6 - and this game comes to a most dramatic end...

The good news was that every last British unit rallied. So did all Germans, too [EXC: those 1.5 squads in 54U4 who could not self rally and were eventually eliminated.

Now, how to pull this off?
As mentioned before, I was convinced that there was no chance for me to Control 54R1. So it had to be 54V1 way in the back. As Lt. Whitaker - hellbent on his tea - had rallied everyone in his hex to the cause, I had plenty of squads and units at hand. But moving ADJACENT to be fired at with 16FP @-2? This would not do. Counting my remaining AFV, I had 3 left. And I needed either to freeze or shroud in SMOKE most importantly 54U2 and 54V1. MPs were sufficient to theoretically arrive there. If I did, then I could swarm 54V1 with infantry and Lt. Whitaker (6-2) and finish off the defending 548 for the win. What could possibly go wrong?


A full AAR will follow step by step, when I find the time to complete it.

von Marwitz
If these are examples of what you can put out when you are busy your output when you have a few minutes spare time must be remarkable. Well done Sir!🤗
 
Top