von Marwitz
Forum Guru
J150 The Sangshak Redemption - AAR
Scenario Overview:
This is a fine small PTO action which I can readily recommend to play. The the Japanese basically overrun a village and be done with it when Gurkha reinforcements appear on the scene who have to take it back. So both sides will have to attack and to defend in this one.
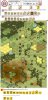
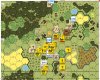
The action is set in the border region of India in March 1944 as part of the major Japanese operation against Imphal. PTO with Light Jungle is in effect, all buildings are Huts with the exception of 42oI3, which is a Stone Building with a Steeple Location. Importantly, Flames cannot exist in a Hut. We forgot about this but luckily before it could have a major impact - which is not unlikely - we noticed and could still fix it with no harm done yet. Due to the date, No Quarter is in effect. To bolster the reinforcing Gurkhas, these have an underscored Morale Factor (A19.13).
The objective for the Japanese it to capture and hold on to a number of buildings at game end within 3 hexes of the sole Stone Building after at least Controlling the latter temporarily. Note: I am a bit hazy on the VC to respect copyright.
Preliminary Assessment:
The scenario begins with a British defending on-board force of 2.5 squad equivalents of 2nd Line troops along with two crews manning a 57L AT Gun with a HE Depletion of 8 in this no-vehicle action and a 76mm MTR (yes 76mm, not 81mm) which can fire WP (Depletion 7) and Smoke (Depletion 8) as special ammo. This outfit is led by a single 8-0 Leader. The whole lot wish for sure they had more than a single LMG, two Foxholes and 8 Concealment counters to save themselves from the attacking Japanese. As the British setup area is limited to within 3 hexes of 42I4, there will not be much hide & seek.
The attackers begin with 9 squad equivalents (2x Elite, 7x 1st Line) plus a 228 for an MMG. Two LMGs and 50mm MTRs each complete the SW allotment, which is decent for a force of this size. The Leadership is good, consisting of a 10-1 and a 9-0 Leader.
As the Japanese set up on-board and only have to cover 4 hexes to the Stone Building with Steeple and 6 hexes to the furthest potential Victory Building, the at-start British force has all reasons to be concerned. The British receive powerful reinforcements in British Turn 2, but by then, they might already be completely wiped out.
Said British Turn 2 reinforcements consist fo a tough Gurkha force of 10 squad equivalents of roughly equal parts of 648s, 458s and 457s with an underscored Morale Factor. The Leadership to go with it is fine, consisting of a 9-2, a 8-1 and a 8-0. The SW complement is rather light: 3x LMG and 2x 51mm Airborne MTRs, which can fire Smoke (Depletion 7).
These reinforcements can reach the village within a Turn, so things will get close and personal in short order. It needs to, as the British have only until the end of Turn 5 to prevent a Japanese victory.
The Japanse also get some reinforcements in the form of 2x 447, and LMG led by a 9-0 in their Turn 3. This small force might plug a gap in an emergency or be used for a local counter attack when it is the Japanese who will be hard pressed.
Despite the playing area consisting of two half-boards, the action will be almost exclusively limited to board 42. The only effect of board 50 is the 'lenthening' the very short approach path by the at-start Japanese forces by one measly hex. The board 50 hill is not even very well suited for the 50mm MTRs in order to shoot SMOKE as their range to do so to cover an assault is quite limited. This can also be done for the first Japanese charge from Ground Level.
As this scenario is short and the Japanese will want to get hold of a substantial number of buildings before the Gurkha reinforcements arrive, there is no time for subtlety for that initial assault. I'd be surprised if the Japanese would not opt for some sort of Banzai Charge.
Once the Japanese 'own' the village - and they'd better be done with it before the Gurkhas show up - they have to fight a delaying action in order to hold on to sufficient victory buildings. Of course, if they have a unit in the ground level and Steeple location of the sole Stone Building, this will cost the British time if they attempt to recapture it and provides the 'best TEM in town'. Besides that building, there is not much good TEM to be had. The Japanese have their usual resilience under attack, but striping and whittling them down will tilt their odds in CC against them.
That said, CC might become an interesting issue: Both the Japanese and the Gurkhas can initiate Hand-to-Hand CC. While the Japanese must do so, the Gurkhas have the option. This might be of importance, because the vicious H-t-H CC numbers can make up for inferior odds, which will likely more favor the Japanese than the Gurkhas. If a Japanese unit is held in normal CC/Melee, then it will not be firing out of its hex. Perhaps this can be the 'safer' way to open a path for other Gurkhas than hoping for killing the Japanese in H-t-H outright. If the Japanese have enough units left, they can attempt to form a 'wall of bodies' as their last ditch attempt to hold on to the required number of buildings.
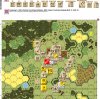
Situation at Game Start - Japanese Turn 1:
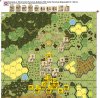
The Battle Plan:
It is a bit sobering for the British to set up his 3.5 squad equivalents. You just know that you'll not be able to fend off the Japanese.
My basic plan was to attempt to survive at least with some units until the Gurkhas arrived.
I was expecting a Japanese Banzai Charge as an opening move and placed my heavy weapons in positions where they were unlikely to be reached in Japanese Turn 1. The ATG went into the Bamboo in 42K6 with the two ADJACENT Huts as extra 'cover'. Note that in Bamboo, Guns are not Emplaced but may normally still set up HIP. Since an attack from the flank would be unlikely, the Gunshield would provide the 'normal' protection but the vulnerability to Air Bursts would be greater. On the positive side, Bamboo was difficult to enter. I wanted to keep the ATG HIP until really juicy shots presented themselves and liked the option of advancing out to retake a Hut.
On the other hand, I planned on firing the MTR in any case because it has a minimum range of 3 hexes and it is the asset with the most punch of the at-start force and ROF 2 to boot. To have an effect with it at all, there was no point in waiting until it got overrun.
My 'killer-stack' - a 447+LMG and the 8-0 Leader were positioned in a Foxhole in 42G5. From there, they might be able to rout to the F6 Jungle.
An empty Foxhole was placed in I6 which I found to be a good position to place my reinforcements in.
The 'bulk' of my troops was placed in the center. Expecting a Banzai Charge, I deployed the squad I could in the hope of taking advantage of the more vicious H-t-H numbers if my units would make it into the CCPh in Good Order. The Dummy in 42H1 was placed to siphon off a Banzai unit, the HS in 42G3 rested its hopes on Bamboo being difficult to enter as did the Dummy in 42L3. Maybe the forward units could stripe a Japanese unit or two and take someone with them when going down in H-t-H CC.
Basically, though, I wrote off everything east of (towards the bottom) of the non-existant road through the village outright and hoped that someone of my 'second line of resistance' would make it through.
Beyond that, there was no further plan and the deployment of the reinforcements would be determined when they were due to enter.
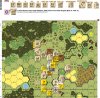
Situation at the End of Japanese Turn 1:
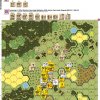
As I had anticipated, the Japanese Banzai Charge came after the 50mm MTRs first both attempted to put down WP (unsuccessfully) and then SMOKE (successfully).
I was a bit disappointed by my Defensive First Fire as I could not take advantage of the opportunities I had with the sole exception being the wounding of the Japanese 9-0 Leader and the striping of one 447 to a 347.
On the bright side of it, my 'second line of defence' remained unharmed with my ATG retaining its HIP.
In H-t-H CC I lost two 237 HS and one 447 in the church, in other words close to 50% of my entire force. In one of these CCs, I contrieved to Ambush the Japanese, Lax by Banzai, and killed a Japanese 447 in the process.
The Japanese fulfilled the part of the VC of at least temporarily Controlling the church building. Altogether, it could have been worse, but the outlook looked grim for my at-start force nevertheless.
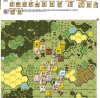
Situation at the End of British Turn 1:
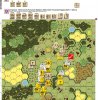
In my British Turn 1, I had not exactly much to shoot with. The 76mm MTR tried, even kept ROF but had no effect. My 'killer-stack' tried to finish off the wounded Japanese Leader in 42I1, but no luck.
My 237 HS in 42G3 was lucky to survive Defensive Fire by the ADJACENT Japanese units. Else the Japanese Defensive Fire was much hindered by their own SMOKE with which they had covered their initial assault. So my 'second line of defence' was still unharmed.
My valiant 237 HS advanced from 42G3 into CC with a CX Japanese 447 in 42F3. I concluded that it would be dead meat if it remained in G3 anyway. There was a 50/50% chance to Ambush the Japanese, conceivably allowing my Infiltration into 42F4 with Wall Advantage. If no Ambush occurred by either side, the HS might end up in normal Melee which would at least tie down the Japanese squad from turning my flank and the Melee would block the passage for possible follow up Japanese units. This is exactly what happened.
To be continued in a subsequent post.
For directly jumping to the continuation of the AAR, use this link.
von Marwitz
Scenario Overview:
This is a fine small PTO action which I can readily recommend to play. The the Japanese basically overrun a village and be done with it when Gurkha reinforcements appear on the scene who have to take it back. So both sides will have to attack and to defend in this one.
The action is set in the border region of India in March 1944 as part of the major Japanese operation against Imphal. PTO with Light Jungle is in effect, all buildings are Huts with the exception of 42oI3, which is a Stone Building with a Steeple Location. Importantly, Flames cannot exist in a Hut. We forgot about this but luckily before it could have a major impact - which is not unlikely - we noticed and could still fix it with no harm done yet. Due to the date, No Quarter is in effect. To bolster the reinforcing Gurkhas, these have an underscored Morale Factor (A19.13).
The objective for the Japanese it to capture and hold on to a number of buildings at game end within 3 hexes of the sole Stone Building after at least Controlling the latter temporarily. Note: I am a bit hazy on the VC to respect copyright.
Preliminary Assessment:
The scenario begins with a British defending on-board force of 2.5 squad equivalents of 2nd Line troops along with two crews manning a 57L AT Gun with a HE Depletion of 8 in this no-vehicle action and a 76mm MTR (yes 76mm, not 81mm) which can fire WP (Depletion 7) and Smoke (Depletion 8) as special ammo. This outfit is led by a single 8-0 Leader. The whole lot wish for sure they had more than a single LMG, two Foxholes and 8 Concealment counters to save themselves from the attacking Japanese. As the British setup area is limited to within 3 hexes of 42I4, there will not be much hide & seek.
The attackers begin with 9 squad equivalents (2x Elite, 7x 1st Line) plus a 228 for an MMG. Two LMGs and 50mm MTRs each complete the SW allotment, which is decent for a force of this size. The Leadership is good, consisting of a 10-1 and a 9-0 Leader.
As the Japanese set up on-board and only have to cover 4 hexes to the Stone Building with Steeple and 6 hexes to the furthest potential Victory Building, the at-start British force has all reasons to be concerned. The British receive powerful reinforcements in British Turn 2, but by then, they might already be completely wiped out.
Said British Turn 2 reinforcements consist fo a tough Gurkha force of 10 squad equivalents of roughly equal parts of 648s, 458s and 457s with an underscored Morale Factor. The Leadership to go with it is fine, consisting of a 9-2, a 8-1 and a 8-0. The SW complement is rather light: 3x LMG and 2x 51mm Airborne MTRs, which can fire Smoke (Depletion 7).
These reinforcements can reach the village within a Turn, so things will get close and personal in short order. It needs to, as the British have only until the end of Turn 5 to prevent a Japanese victory.
The Japanse also get some reinforcements in the form of 2x 447, and LMG led by a 9-0 in their Turn 3. This small force might plug a gap in an emergency or be used for a local counter attack when it is the Japanese who will be hard pressed.
Despite the playing area consisting of two half-boards, the action will be almost exclusively limited to board 42. The only effect of board 50 is the 'lenthening' the very short approach path by the at-start Japanese forces by one measly hex. The board 50 hill is not even very well suited for the 50mm MTRs in order to shoot SMOKE as their range to do so to cover an assault is quite limited. This can also be done for the first Japanese charge from Ground Level.
As this scenario is short and the Japanese will want to get hold of a substantial number of buildings before the Gurkha reinforcements arrive, there is no time for subtlety for that initial assault. I'd be surprised if the Japanese would not opt for some sort of Banzai Charge.
Once the Japanese 'own' the village - and they'd better be done with it before the Gurkhas show up - they have to fight a delaying action in order to hold on to sufficient victory buildings. Of course, if they have a unit in the ground level and Steeple location of the sole Stone Building, this will cost the British time if they attempt to recapture it and provides the 'best TEM in town'. Besides that building, there is not much good TEM to be had. The Japanese have their usual resilience under attack, but striping and whittling them down will tilt their odds in CC against them.
That said, CC might become an interesting issue: Both the Japanese and the Gurkhas can initiate Hand-to-Hand CC. While the Japanese must do so, the Gurkhas have the option. This might be of importance, because the vicious H-t-H CC numbers can make up for inferior odds, which will likely more favor the Japanese than the Gurkhas. If a Japanese unit is held in normal CC/Melee, then it will not be firing out of its hex. Perhaps this can be the 'safer' way to open a path for other Gurkhas than hoping for killing the Japanese in H-t-H outright. If the Japanese have enough units left, they can attempt to form a 'wall of bodies' as their last ditch attempt to hold on to the required number of buildings.
Situation at Game Start - Japanese Turn 1:
The Battle Plan:
It is a bit sobering for the British to set up his 3.5 squad equivalents. You just know that you'll not be able to fend off the Japanese.
My basic plan was to attempt to survive at least with some units until the Gurkhas arrived.
I was expecting a Japanese Banzai Charge as an opening move and placed my heavy weapons in positions where they were unlikely to be reached in Japanese Turn 1. The ATG went into the Bamboo in 42K6 with the two ADJACENT Huts as extra 'cover'. Note that in Bamboo, Guns are not Emplaced but may normally still set up HIP. Since an attack from the flank would be unlikely, the Gunshield would provide the 'normal' protection but the vulnerability to Air Bursts would be greater. On the positive side, Bamboo was difficult to enter. I wanted to keep the ATG HIP until really juicy shots presented themselves and liked the option of advancing out to retake a Hut.
On the other hand, I planned on firing the MTR in any case because it has a minimum range of 3 hexes and it is the asset with the most punch of the at-start force and ROF 2 to boot. To have an effect with it at all, there was no point in waiting until it got overrun.
My 'killer-stack' - a 447+LMG and the 8-0 Leader were positioned in a Foxhole in 42G5. From there, they might be able to rout to the F6 Jungle.
An empty Foxhole was placed in I6 which I found to be a good position to place my reinforcements in.
The 'bulk' of my troops was placed in the center. Expecting a Banzai Charge, I deployed the squad I could in the hope of taking advantage of the more vicious H-t-H numbers if my units would make it into the CCPh in Good Order. The Dummy in 42H1 was placed to siphon off a Banzai unit, the HS in 42G3 rested its hopes on Bamboo being difficult to enter as did the Dummy in 42L3. Maybe the forward units could stripe a Japanese unit or two and take someone with them when going down in H-t-H CC.
Basically, though, I wrote off everything east of (towards the bottom) of the non-existant road through the village outright and hoped that someone of my 'second line of resistance' would make it through.
Beyond that, there was no further plan and the deployment of the reinforcements would be determined when they were due to enter.
Situation at the End of Japanese Turn 1:
As I had anticipated, the Japanese Banzai Charge came after the 50mm MTRs first both attempted to put down WP (unsuccessfully) and then SMOKE (successfully).
I was a bit disappointed by my Defensive First Fire as I could not take advantage of the opportunities I had with the sole exception being the wounding of the Japanese 9-0 Leader and the striping of one 447 to a 347.
On the bright side of it, my 'second line of defence' remained unharmed with my ATG retaining its HIP.
In H-t-H CC I lost two 237 HS and one 447 in the church, in other words close to 50% of my entire force. In one of these CCs, I contrieved to Ambush the Japanese, Lax by Banzai, and killed a Japanese 447 in the process.
The Japanese fulfilled the part of the VC of at least temporarily Controlling the church building. Altogether, it could have been worse, but the outlook looked grim for my at-start force nevertheless.
Situation at the End of British Turn 1:
In my British Turn 1, I had not exactly much to shoot with. The 76mm MTR tried, even kept ROF but had no effect. My 'killer-stack' tried to finish off the wounded Japanese Leader in 42I1, but no luck.
My 237 HS in 42G3 was lucky to survive Defensive Fire by the ADJACENT Japanese units. Else the Japanese Defensive Fire was much hindered by their own SMOKE with which they had covered their initial assault. So my 'second line of defence' was still unharmed.
My valiant 237 HS advanced from 42G3 into CC with a CX Japanese 447 in 42F3. I concluded that it would be dead meat if it remained in G3 anyway. There was a 50/50% chance to Ambush the Japanese, conceivably allowing my Infiltration into 42F4 with Wall Advantage. If no Ambush occurred by either side, the HS might end up in normal Melee which would at least tie down the Japanese squad from turning my flank and the Melee would block the passage for possible follow up Japanese units. This is exactly what happened.
To be continued in a subsequent post.
For directly jumping to the continuation of the AAR, use this link.
von Marwitz
Last edited:

") ) Would be nice indeed to play at Grenadier (already looking forward to it)
) Would be nice indeed to play at Grenadier (already looking forward to it)