Ahriman667
Senior Member
Howdy fellow ASL'ers.
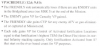
Re Mission #9 of Hans Mielants Barbarossa campaign, and the three artillery strikes he gives the RU in lieu of 1/2 of the Advance attitude S? counters. Is this SASL HC version of the mission winnable? I contend that it is not, because of the VP Schedule below...
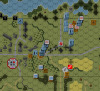
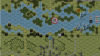
With three artillery strikes and I would say average rolls, you will have a lot of casualties on the GE side. (Let alone bad ones, like my first play through where the RU amassed 30VP, I had zero, was chased off the board, and lost two leaders and all but one full MMC). And that is not accounting for other EN fire phases, so right off the bat they will be getting VP. Unless you can spawn fortifications on the River Board, or activate Guns/AFV from the Hold S? and Advance S?, you will not generate any VP at all. You can have a cleared bridgehead area, but you will still lose on VP on average I would say. And this is all do to the randomness of your die rolls and absolutely zero to do with tactics (unless you want to spread out all your forces across the length of the river to avoid bunching up). Maybe the mapboard configuration (pic below shows beginning of GE Turn 2 when they just landed) I used requires spreading out, but then you risk activating upto 15 S? across the board without the combined FG strength to deal with them most likely. Hardly ideal.
I've played through the first few turns of this mission three/four times now, and only on the last one did the artillery prove less effective, but still the EN has 7 VP and I have bubcus, and we are only at turn 3, when the EN S? begin to enter the map. That means I have to pray for an AFV (at least two or even three I would think), which I then have to kill to get more VP then the RU without incurring anymore losses. Bearing in mind I only have ATR's to deal with any armour...hopefully I don't get KV's.
What do you think? Is there any other experience with this mission you guys would like to share? How did it turn out for you?
Re Mission #9 of Hans Mielants Barbarossa campaign, and the three artillery strikes he gives the RU in lieu of 1/2 of the Advance attitude S? counters. Is this SASL HC version of the mission winnable? I contend that it is not, because of the VP Schedule below...
With three artillery strikes and I would say average rolls, you will have a lot of casualties on the GE side. (Let alone bad ones, like my first play through where the RU amassed 30VP, I had zero, was chased off the board, and lost two leaders and all but one full MMC). And that is not accounting for other EN fire phases, so right off the bat they will be getting VP. Unless you can spawn fortifications on the River Board, or activate Guns/AFV from the Hold S? and Advance S?, you will not generate any VP at all. You can have a cleared bridgehead area, but you will still lose on VP on average I would say. And this is all do to the randomness of your die rolls and absolutely zero to do with tactics (unless you want to spread out all your forces across the length of the river to avoid bunching up). Maybe the mapboard configuration (pic below shows beginning of GE Turn 2 when they just landed) I used requires spreading out, but then you risk activating upto 15 S? across the board without the combined FG strength to deal with them most likely. Hardly ideal.
I've played through the first few turns of this mission three/four times now, and only on the last one did the artillery prove less effective, but still the EN has 7 VP and I have bubcus, and we are only at turn 3, when the EN S? begin to enter the map. That means I have to pray for an AFV (at least two or even three I would think), which I then have to kill to get more VP then the RU without incurring anymore losses. Bearing in mind I only have ATR's to deal with any armour...hopefully I don't get KV's.
What do you think? Is there any other experience with this mission you guys would like to share? How did it turn out for you?
Last edited: