Stephen Frum
Member
Preparing for next month's Human Wave 2023 (details HERE), Bob S. and I had a fun playing of this gem from HazMo.
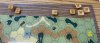
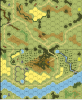
The action takes place a few days into Barbarossa, my favorite time of war. German landsers, left behind, find themselves threatened by the 3rd Soviet mechanized corps. Ten defending German squads without ATGs defend against 20 Soviet squads and 3 KV-1E monsters. The Soviet objective is to seize a wooded hill on board 40, they enter on the south edge of board 18. Image below from ASL Scenario Archive. ASLers should become patrons of their excellent site.
I took the role of the defending Germans. Without ATG or armor to help keep Bob's terrible KVs away, I would have to rely upon the clever bundles of A-T mines given by the scenario designer. Though the Germans have two light mortars, these are almost useless against the heavily armored beasts, requiring an effects roll of 2.
Knowing that the Soviet infantry would have to do the difficult task of prying the Germans off the hill, the task seems to be to kill as many squads as possible.
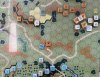
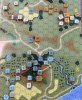
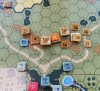
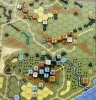
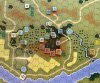
The hill that is the victory target for this scenario is a bit awkward to defend. Woods and in-season orchard block much of the outgoing LOS. I spread my folks around and placed a line of trenches on the backside of the hill for a final stand. Photo of my set up:
A few comments about the set up:
The action takes place a few days into Barbarossa, my favorite time of war. German landsers, left behind, find themselves threatened by the 3rd Soviet mechanized corps. Ten defending German squads without ATGs defend against 20 Soviet squads and 3 KV-1E monsters. The Soviet objective is to seize a wooded hill on board 40, they enter on the south edge of board 18. Image below from ASL Scenario Archive. ASLers should become patrons of their excellent site.
I took the role of the defending Germans. Without ATG or armor to help keep Bob's terrible KVs away, I would have to rely upon the clever bundles of A-T mines given by the scenario designer. Though the Germans have two light mortars, these are almost useless against the heavily armored beasts, requiring an effects roll of 2.
Knowing that the Soviet infantry would have to do the difficult task of prying the Germans off the hill, the task seems to be to kill as many squads as possible.
The hill that is the victory target for this scenario is a bit awkward to defend. Woods and in-season orchard block much of the outgoing LOS. I spread my folks around and placed a line of trenches on the backside of the hill for a final stand. Photo of my set up:
A few comments about the set up:
- A-T bundles are shown as mine counters in this set up, though kept off board until actually used.
- Dummies are shown as concealment counters (though there are real units under the ? in 40I10 and 40O8. Everyone sets up concealed as the Soviets start offboard.
- I really feared a strong Soviet rush down my left side - through hexrow T, the gully, etc.
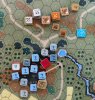
- The squad in 18K3 can, I believe, hit Soviets running across the 18S9-18T9 road.
- The LMG squad in 18K1 can, I think, at very long range hit bypassers of the woods in 18S10. A stack with a leader hoping to get to 18S7 could be surprised by a 1 down 2. This unit can also throw a FL out to 18S5 if needed on turns 2 and 3.
- I placed a HIP HS in 18O4 to play mischief with any KVs who pass nearby.
- The 9-1, MMG, squad in 40I8 can effectively cut down any Soviets trying to run across the 18D4-18A5 road.
- The 228 and Lt MTR in 40I7 are good back up to the 9-1 and can drop meatballs onto 40J8 and 40K7 as needed late in the game.
- The dummies in the foxhole in 40C7 are intended to scare any pesky KVs from trying to probe the rear from this direction.
- The roadblock in 40O3 was intended to make it more time consuming for KVs to roam around on the backside of the hill.
- The 8-1, MMG, HS in 40J9 intended to blast any Soviets running around on the many level 1 hills of board 18. This position also likely has a few clever LOS over the half level marsh in 40K10. The HS and Lt MTR in 40L8 and LMG Squad in 40K9 were also placed to mess with Soviets running over the level 1 hills.
- In addition to the 4 HS permitted by SSR 1, I deployed two more squads in turn 1 to help create a wall of bodies to slow down the Soviet juggernaut.
Attachments
-
 888.5 KB Views: 11
 -
 883.5 KB Views: 10