von Marwitz
Forum Guru
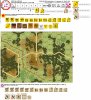
AAR - BFP-67 Coke Hill
One of the best PTO scenarios I have ever played!
In 1945, ANZAC Australians with an elite force double the size of the defending Japanese and supported by 3 late version Matilda II tanks, one of which is a 'Matilda Frog' i.e. a flamethrower tank. For good measure, they also have a HE only 80mm OBA directed by an offboard observer. The Japanese have an assortment of Pillboxes, Trenches, Panjis and AP Mines to build some formidable "castles". The year 1945 means, that the Japanese can get the fullest of their complement of THHs, especially since they also have 2 DCs in their OoB. The Japanese also have plenty of MGs including a .50Cal and a 75 ART. Oh, and there is Level C Booby Trap Capability, meaning any TC of 10,11, AND 12 will harass the attackers, while making Searching attempts hazardous. And last but not least, they have a 10-2 "King Kong hisself" to form some "supermorale" Japanese.
The objective for the Australians is to exit a significant number of EVP across a line within the playing area and they need to at least temporarily capture all Level 2 hill hexes along the way.
A cumulative number of 26 squad equivalents which set upon each other on not more than a single half-board assures some vicious action.
I played the Japanese Scenario Defender in this one and took some time to think up nice defensive positions and a number from the deep trove of Japanese dirty tricks, which was fun even before the game started. While doing that, I decided, that I like Panjis. All right - they have almoste 3 pages of rules which is probably the reason why most people don't even look at them. But it is a mistake - Panjis are really fun! Try them out!
In our playing, the Australians attacked along the Japanese left and the center. Albeit the scenario allows the Attacker a full 7 turns to cover merely 13 hexes to reach the victory line, he has to carefully consider how much caution he can afford.
For the first turns, the Australians advanced cautiously and certainly with a feeling of dark forboding. But at this time not much happened to them.
This changed, when they came to the line of resistance. A combination of Mines, Panjis, moving uphill in Light Jungle against a thoroughly entrenched Japanese enemy, a significant part of which was lurking HIP with boresighted locations is just as tough as it can get.
As such, I was able to stop the Australian advance cold. They stepped into every Minefield and were harassed by Panjis. But this did not end but start the Attacker's toubles as they often ended up ADJACENT to Japanese defenders now opening up at Point Blank range, forcing Routs back into terrain which the Attackers had just so laboriously left. SAN 4 and Booby Trap Level C ensured that the "rear" out of LOS of the defenders was by no means a safe place.
The Australians knew that time would run out if nothing happend to their favor quickly. Enter the 'Matilda Frog' Flamethrower tank... The weakness of the Japanese is their scarcity of anti-tanks assets. They can create and/or set up 4 THHs, they do have 2 DCs, and they don't need to take PAATCs, but that's pretty much it.
So the said FT-tank boldy drove forward into a Pillbox hex and stopped next to my King Kong Kill Stack of 10-2, 228+.50Cal, 228+MMG holed up in a Trench. Clash of titans, so to say. My Japanese shrugged off the 32FP flat attack causing a 3MC unharmed. Too close for comfort...
In the next Japanese turn, that Matilda Frog HAD to go! To get rid of it, I had two Japanese Squads capable of attempting 4 times to create a THH (2 were left of the allotment). Additionally, one HIP THH was IN the Pillbox beneath the Matilda along with a 8-0, 228+MMG. And my King Kong kill stack was ADJACENT.
Alas, disaster marked the entire Japanese half-turn. After the 75 Gun having hit but failed to affect a fanatic ANZAC Halfsquad for no less than 4 times, the Gun went down in CC despite its crew having a slight advantage vs. the CX assailants. Before that, two combos of 447+LMG rolled consecutive boxcars to malf their MGs and to botch their attacks. This was followed by both squads marked for creating THHs to roll a 6 on the attempt, Pinning them and precluding the second attempt. Finally, the HIP THH which emerged from the Pillbox during the MPh beneath the FT-tank did not find an ATMM and missed its attack by one. (We are not sure, if we played the latter THH right because he might have had no LOS to the Matilda despite being ADJACENT). So the Matilda Frog survived to be able to Defensive Fire. And it did rolling a 4 on the 32FP flat vs. my King Kong kill stack for a 2 KIA. The 10-2 was killed along with a 228, its .50Cal destroyed. The second 228+MMG striped.
Unsurprisingly, these cumulative events turned the tide. The Matilda Frog continued to wreak havoc until the end of the scenario. Japanese losses began to mount as now openings had been created to allow the ANZAC infantry to close in.
Nevertheless, I fought on like only the Japanese in 1945 can, inflicting high losses on the Australians. But by now it was impossible to plug all the gaps in the line which allowed the Attackers to pass through toward the victory line. After their last turn, they had brought 14 more Good Order VP beyond that line than they needed. Of my entire order of battle, I had only 4 Japanese Halfsquads left.
I did not give up!
I calculated, that if EVERYTHING went my way and at the same time EVERYTHING went wrong for the Australians, I could still win by a single point. It would "merely" require to kill two tanks with a single HS and a THH that same HS would need to create after closing in against enemy fire. And to get a single enemy leader into CC, dodging a DC he might lob at me.
It didn't happen.
Australian win.
Nevertheless, a superb game of awesome fun. One of the best PTO scenarios I have ever played!
von Marwitz
Last edited:


