von Marwitz
Forum Guru
A25 Cold Crocodiles - AAR
Scenario Overview:
Well, 'Cold Crocs' is one of the classics of the classics I suppose. As of May 2021, ROAR has it at 188 British wins vs. 162 German ones, so it has seen a lot of play. The Excitement Rating is an incredible 7.61, which ranks it at no less than 4th place of the all-time best ROAR ratings for scenarios with 100+ playings.
As my opponent, who had somehow never played it, poposed this one, I jumped at the opportunity. Myself, I have played it once a very loooong time ago but all that I remember of that playing was that I had the Germans and the position of one of my 88LL ATGs. Needless to say, I had but the highest expectations for this game. This time, I would try my hand as the attacking British.
The action is set in Holland in January 1945, so the Germans are so full ASL-wise of inherent AT capability in the form of PF and ATMM, that it is hard to imagine them to move borne down by that 'burden'.
To reflect the winter and possibly historically frozen ground, Entrechment attempts are NA and all Water Obstacles are Frigid, which means that there is no trickery Swimming through the Canal to grab some buildings. All buildings are Ground Level only, the Board 24 valley does not exist (nicely reflected in VASL) but other Terrain stays normally (including the 24F6 Bridge, which might be of some importance). The only Bridge crossing the Canal is 23P6.
Besides that, the British get 80mm OBA directed by an Offboard Observer at Level 3 along the playing area's south edge (left) west (above) the Canal, which is secretly recorded prior to setup. The Offboard Observer frees the British from the fear of not establishing/maintaining Radio Contact, as this is automatic for Offboard non-Aerial Observers. The Germans can HIP one squad-equivalent plus SMC/SW stacked with it. The two reinforcing German Jagdpanzers have Schürzen - by the way, it is supposed to be Schürzen, not Schuerzen. I am German, believe me...
The objective for the British is to amass more VP than the Germans, while CVP are collected in the normal manner but additionally for each side, the Control of each Stone Buildings yields a certain number of VP. As the British enter from offboard, the Germans are initially in Control of all Stone Buildings of which there are 21.
Preliminary Assessment:
Yay! It gots lots of goodies: A 10-2 vs. a 9-2 Leader, a pair of bad-ass long range 'Crocodile' FT tanks with an X# of 12 for this SA. A British 9-2 AL for good measure. An Offboard Observer for the OBA, a pair of 88LL 'ultimate punch' ATGs that can put a hole in any of the opposing armor several times over and also rocks vs. Infantry.
For the details of the OoB's just refer to the first picture, no need to reiterate here. It should be mentioned, that all British AFV have sM8 and sD7 and the Crocodiles and Cromwells can fire s8 and WP6 as Ordnance on top of that. With a SAN of 5, the German Sniper is to be reckoned with. A maybe important detail on the Challengers, which only have HE7: Acquisition can not be gained with AP ammo while using the Area Target Type, so there is no zeroing in on empty hexes except if you would risk your valuable HE7 for the purpose.
While the playing area consists of two boards (23 and 24), the area east of (below) the Canal will likely see not much action. As aforementioned, there's no antics of swimming through the Canal and grabbing buildings with unarmed units because the water is Frigid. Merely the pair of German Jagdpanzers enter from that area. Depending on the deployment of the Challengers, they might be more or less be pinned down there forever. On the other hand, it seems rather unlikely for the British to get on the eastern (bottom) side of the Canal, which means that consequently the four Stone Buildings in the area will probably always remain under German Control.
As the value of Stone Building Control is high, the British cannot afford to bypass areas where numbers of Stone Buildings are located. Depending on how the game plays or maybe even with his HIP units, the Germans might get the opportunity for a counter-grabbing attack.
The initial forces of Infantry are roughly equal in number (8 British squad-equivalents vs. 9 German ones), but the Germans have an edge in Firepower, Morale and TEM. Furthermore as the British will have to assign some of his initial forces to Board 23, he will feel short of Infantry for his Board 24 push, which will likely be his initial Schwerpunkt. Of course, he has the Cromwell tanks, which are fine for support vs. enemy Infantry and the OBA to help him out. Still, I deem the Germans perfectly capable to slow down or hold up the British on Board 24 until the reinforcements arrive.
Talking about the 80mm OBA. The Draw Pile is normal (i.e. 8 Black / 2 Red), Accuracy on a 1 or 2. As nothing else is specified, HE Concentration, SMOKE, and Harassing Fire are all possible. Each are viable options: A HE Concentration is strong enough to make an impression on the Germans or to take out the fearful 88LL AT-Guns once located and provided they can be reached by OBA. SMOKE can be used to blind these very AT-Guns or the area close to the Bridge crossing the Canal to help the British attackers across that difficult patch of ground. Harassing Fire is just fine to impede the repositioning of the German forces and to pin them in place - especially, if Woods are involved. Best of all, since the British have an Offboard Observer, they do not need to roll for Radio Contact, the failure of which is otherwise a frequent cause of frustration with OBA. Here you will likely see it coming down (unlike in a recent game where it took me no less than 14 (!) Fire Phases to bring down an FFE for the first time - which did win me the game, though, because it killed a HS which advanced into the blast area...).
What might become a problem for the Germans and a chance for the British is that the Jerries only have three leaders. If any one of these is taken out or cut off from retreat or reaching his brokies for rallying them, things will get difficult. And the chances for this to happen certainly exist.
Another tricky question for the German is just where to place his 88LL AT-Guns. They pack an awesome punch against anything, but they are so cumbersome that it is unlikely to see them being pushed around. Obviously, their prime targets appear to be the Crocodiles. These hellish British contraptions are a serious psychological weapon by themselves even if they don't fire a shot. If they get to bring their flamethrowers to bear, then the Germans will be - literally - roasted. So the Germans need to get rid of them and the pair of ATGs is by far the best means at hand. Hitting a moving Crocodile with a Panzerfaust at range 3 (i.e. the range of the beast's FT) needs a DR of 3 (if seen long enough) even despite being a Large target. If stopped, at that range this goes up to a TH of 5, which is still only a 27.8% chance - after previously finding a PF. The Jagdpanzers are not of immediate help, because they would need a minimum of two, more likely three turns to come to grips with them. And this means they first have to cross the single Bridge across the Canal that the British have likely covered by at least one Challenger tank.
On the other hand, the British have to think about how best to deploy the Crocodiles as well. The main problem will be to bring their awesome weapons to bear without being shot up before they can do anything. These Crocodiles are about just as fast as a Dodge Ram 3500 with half a dozen flat tyres pushed by a granny. Basically, the British have three theoretical areas where they could enter them. The first is South of (left) of hexrow V. There, they will be very likely safe from the German ATGs as he will be reluctant to set them up that far up front. However, doing so would mean that they have to spend a couple of turns reaching a place where they could have an effect - taking them effectively out of the game. The British could still select that option by disconnecting the trailer at the price of disabling that powerful exciting FT at the benefit of increased MPs. Even without the FT, the Crocodiles are useful and powerful. But as they are 'the attraction' of the game, I do not see many British players contemplating that. The second option would be to enter in 'the center', i.e. on/between hexrows S and N. This has the benefit that they would quickly reach terrain in which some Germans are still likely to hang on in Turn 4 and that the British OBA has some opportunity to find/clear up some potential AT-gun positions by fire before. Taking this path, the Crocodiles might be able to pry open the area around the Bridge across the Canal or be occupied with 'something' useful getting there. The third option is to enter via the I10 road. If the Crocodile punks are feelin' lucky, they could get as far as 24D2 if CE, posing a serious PITA in Turn 4 already. That is if they contrieve to reach that area in one piece. Needless to say, it is highly likely that the Germans will take at least some precautions against such a move. Maybe it is a good idea to set up the Crododiles in a way that the second one can switch from the 'central' area to one of the others in case the first one gets shot up right after entry.
One thing I like are the British PIATs. Since they don't have a Backblast, they can be pretty useful being fired from buildings vs. Infantry in ADJACENT buildings - despite deductions for TEM to the TH roll, chances for a Hit and a subsequent 8FP flat effects roll are something worth to be considered.
It becomes apparent that this scenario is quite old: The at minimum the first Turn will be spent by the British moving forward without the Germans being able to do anything - except if the latter would elect to set up in absurdly unfavorable positions. Basically, you could have made the Y or X hexrow the board edge, deduct a turn from the scenario length and rule by SSR that the Offboard Observer would still have to be setup at the GG hexrow (as not do decrease potential Blind Hexes to his LOS).
Situation at the Start of British Turn 1 - Game Start:

The Battle Plan:
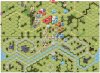
The German defensive setup was more or less what I expected: The board 24 village would be defended by some troops to fight a delaying action. Some Germans (or Dummies posing as such) would guard the 'rear door' in the 24L6 area. Then the 23O10 area had some defenders to prevent any quick push into the board 23 town to the North-East (bottom-right) to it with its valuable and numerous Stone Buildings. The big question was - where were the German AT-Guns? But this question would unlikely be solved during the first Turn.
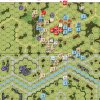
The red arrows show the intended paths for Infantry, the green arrows those for armor. The areas encircled in blue had been earmarked as options for the initial British OBA. I settled to try for 24R7 for a Spotting Round, provided LOS existed which seemed to be the case after some eye-balling. My Offboard Observer was located in 24GG7.
In the East (bottom), I would attempt to deploy and then Double time to 23Z5 with the foot-sloggers. A Challenger would carry a squad with the assembled MTR and unload in the same spot, thus reaching it without being CX nor slowed down by that heavy SW.
Later, tanks would take up positions in Y9, X8, and/or W8 to shoot at the Woods area of 24N1 (where an AT-Gun might hide) or the Building of 23O10 from a HD position. From W8, I'd keep watch for the Jagdpanzers due later and pop a sM to cover further Infantry progress to 23U9. This building was important as it had an excellent field of fire all the way to 24K4 which could cut off paths of retreat from the board 24 village towards the area of the board 23 town West of (above) the Canal. The 23S9 building would be secured for the same purpose and to paste 23O10. I'd try to reach 23R8 or 23Q9 with a PIAT vs. the crossing of the Jagdpanzers and those buildings would be a jumping-off point to get into the 23O10 building after having smoked the gap in between that could be covered by the Jagdpanzers East of (below) the Canal or from the board 24 village. Once the crucial 23O10 building was secured, the British would pour in the town beyond to take the Stone Buildings there up for grabs. Possibly aided by Crocodiles and Infantry reinforcements coming in from behind.
In the West (top) I would use the fastest route along the road with foot-sloggers and tanks with riders to reach the area around 24X5 in force. Advancing Infantry would screen the tanks from PFs while the tanks would cover the Infantry if the Germans decided to get close & personal. The OBA would hopefully see and bring down a Harrassing Mission in 24R7 to fix the forward German defenders between the FFE and my Infantry/Tanks closing in from the other side. Any enemy brokies would have a difficult time getting back and thus taking them Prisoner would get me some extra CVP.
With the first line of defence overcome, the OBA would switch targets to the 24M9 area or 24P7 in an attempt to flush out any enemy AT-Gun as to pave the way for my Crocodiles entering in the center from the western (top) board edge. The Crocs would be supported by most of the reinforcing Infantry entering from the West edge (top) through the L10 Woods area, while some foot-sloggers would flesh up my Infantry attacking towards the center of the Board 24 village.
The Crocodiles would mop up what remained of the Germans in the village center, while the Cromwells would swing around 24V3 into the village with Infantry support to cut off any retreats and gobble up the Germans caught between them and the Crocodiles. That done, additional points would be earned by taking Control of the board 24 village Stone Buildings. Meanwhile, the OBA would switch its attentions elsewhere, either to suppress any Germans posing an issue, or, preferrably, SMOKING the 23O10 area to get my Infantry from board 23 safely aross the Open Ground.
Situation at the End of British Turn 1:

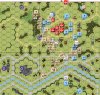
British Turn 1 went almost exactly according to plan. No wonder, because the Germans really couldn't do anything yet. Unfortunately, I did not manage to Deploy as planned and I drew a Red Chit for the OBA (LOS to 24R7 was fine, though, which was good to know). And I made one stupid mistake: In all their dash, the board 23 Infantry forgot to let one unit enter the 23CC7 building while passing, so I would have to send back some men to amend for that later.
Situation at the End of German Turn 1:
German Turn 1 was a very quick one. The enemy merely shuffled some units around the 24U6 area and the 23U9 area. My Observer brought down a Spotting Round in 24O9, somewhat off the intended target hex of 24R7, but nevertheless well suited to threaten the Germans in the 24M9 area.
To be continued in a subsequent post...
von Marwitz
Scenario Overview:
Well, 'Cold Crocs' is one of the classics of the classics I suppose. As of May 2021, ROAR has it at 188 British wins vs. 162 German ones, so it has seen a lot of play. The Excitement Rating is an incredible 7.61, which ranks it at no less than 4th place of the all-time best ROAR ratings for scenarios with 100+ playings.
As my opponent, who had somehow never played it, poposed this one, I jumped at the opportunity. Myself, I have played it once a very loooong time ago but all that I remember of that playing was that I had the Germans and the position of one of my 88LL ATGs. Needless to say, I had but the highest expectations for this game. This time, I would try my hand as the attacking British.
The action is set in Holland in January 1945, so the Germans are so full ASL-wise of inherent AT capability in the form of PF and ATMM, that it is hard to imagine them to move borne down by that 'burden'.
To reflect the winter and possibly historically frozen ground, Entrechment attempts are NA and all Water Obstacles are Frigid, which means that there is no trickery Swimming through the Canal to grab some buildings. All buildings are Ground Level only, the Board 24 valley does not exist (nicely reflected in VASL) but other Terrain stays normally (including the 24F6 Bridge, which might be of some importance). The only Bridge crossing the Canal is 23P6.
Besides that, the British get 80mm OBA directed by an Offboard Observer at Level 3 along the playing area's south edge (left) west (above) the Canal, which is secretly recorded prior to setup. The Offboard Observer frees the British from the fear of not establishing/maintaining Radio Contact, as this is automatic for Offboard non-Aerial Observers. The Germans can HIP one squad-equivalent plus SMC/SW stacked with it. The two reinforcing German Jagdpanzers have Schürzen - by the way, it is supposed to be Schürzen, not Schuerzen. I am German, believe me...
The objective for the British is to amass more VP than the Germans, while CVP are collected in the normal manner but additionally for each side, the Control of each Stone Buildings yields a certain number of VP. As the British enter from offboard, the Germans are initially in Control of all Stone Buildings of which there are 21.
Preliminary Assessment:
Yay! It gots lots of goodies: A 10-2 vs. a 9-2 Leader, a pair of bad-ass long range 'Crocodile' FT tanks with an X# of 12 for this SA. A British 9-2 AL for good measure. An Offboard Observer for the OBA, a pair of 88LL 'ultimate punch' ATGs that can put a hole in any of the opposing armor several times over and also rocks vs. Infantry.
For the details of the OoB's just refer to the first picture, no need to reiterate here. It should be mentioned, that all British AFV have sM8 and sD7 and the Crocodiles and Cromwells can fire s8 and WP6 as Ordnance on top of that. With a SAN of 5, the German Sniper is to be reckoned with. A maybe important detail on the Challengers, which only have HE7: Acquisition can not be gained with AP ammo while using the Area Target Type, so there is no zeroing in on empty hexes except if you would risk your valuable HE7 for the purpose.
While the playing area consists of two boards (23 and 24), the area east of (below) the Canal will likely see not much action. As aforementioned, there's no antics of swimming through the Canal and grabbing buildings with unarmed units because the water is Frigid. Merely the pair of German Jagdpanzers enter from that area. Depending on the deployment of the Challengers, they might be more or less be pinned down there forever. On the other hand, it seems rather unlikely for the British to get on the eastern (bottom) side of the Canal, which means that consequently the four Stone Buildings in the area will probably always remain under German Control.
As the value of Stone Building Control is high, the British cannot afford to bypass areas where numbers of Stone Buildings are located. Depending on how the game plays or maybe even with his HIP units, the Germans might get the opportunity for a counter-grabbing attack.
The initial forces of Infantry are roughly equal in number (8 British squad-equivalents vs. 9 German ones), but the Germans have an edge in Firepower, Morale and TEM. Furthermore as the British will have to assign some of his initial forces to Board 23, he will feel short of Infantry for his Board 24 push, which will likely be his initial Schwerpunkt. Of course, he has the Cromwell tanks, which are fine for support vs. enemy Infantry and the OBA to help him out. Still, I deem the Germans perfectly capable to slow down or hold up the British on Board 24 until the reinforcements arrive.
Talking about the 80mm OBA. The Draw Pile is normal (i.e. 8 Black / 2 Red), Accuracy on a 1 or 2. As nothing else is specified, HE Concentration, SMOKE, and Harassing Fire are all possible. Each are viable options: A HE Concentration is strong enough to make an impression on the Germans or to take out the fearful 88LL AT-Guns once located and provided they can be reached by OBA. SMOKE can be used to blind these very AT-Guns or the area close to the Bridge crossing the Canal to help the British attackers across that difficult patch of ground. Harassing Fire is just fine to impede the repositioning of the German forces and to pin them in place - especially, if Woods are involved. Best of all, since the British have an Offboard Observer, they do not need to roll for Radio Contact, the failure of which is otherwise a frequent cause of frustration with OBA. Here you will likely see it coming down (unlike in a recent game where it took me no less than 14 (!) Fire Phases to bring down an FFE for the first time - which did win me the game, though, because it killed a HS which advanced into the blast area...).
What might become a problem for the Germans and a chance for the British is that the Jerries only have three leaders. If any one of these is taken out or cut off from retreat or reaching his brokies for rallying them, things will get difficult. And the chances for this to happen certainly exist.
Another tricky question for the German is just where to place his 88LL AT-Guns. They pack an awesome punch against anything, but they are so cumbersome that it is unlikely to see them being pushed around. Obviously, their prime targets appear to be the Crocodiles. These hellish British contraptions are a serious psychological weapon by themselves even if they don't fire a shot. If they get to bring their flamethrowers to bear, then the Germans will be - literally - roasted. So the Germans need to get rid of them and the pair of ATGs is by far the best means at hand. Hitting a moving Crocodile with a Panzerfaust at range 3 (i.e. the range of the beast's FT) needs a DR of 3 (if seen long enough) even despite being a Large target. If stopped, at that range this goes up to a TH of 5, which is still only a 27.8% chance - after previously finding a PF. The Jagdpanzers are not of immediate help, because they would need a minimum of two, more likely three turns to come to grips with them. And this means they first have to cross the single Bridge across the Canal that the British have likely covered by at least one Challenger tank.
On the other hand, the British have to think about how best to deploy the Crocodiles as well. The main problem will be to bring their awesome weapons to bear without being shot up before they can do anything. These Crocodiles are about just as fast as a Dodge Ram 3500 with half a dozen flat tyres pushed by a granny. Basically, the British have three theoretical areas where they could enter them. The first is South of (left) of hexrow V. There, they will be very likely safe from the German ATGs as he will be reluctant to set them up that far up front. However, doing so would mean that they have to spend a couple of turns reaching a place where they could have an effect - taking them effectively out of the game. The British could still select that option by disconnecting the trailer at the price of disabling that powerful exciting FT at the benefit of increased MPs. Even without the FT, the Crocodiles are useful and powerful. But as they are 'the attraction' of the game, I do not see many British players contemplating that. The second option would be to enter in 'the center', i.e. on/between hexrows S and N. This has the benefit that they would quickly reach terrain in which some Germans are still likely to hang on in Turn 4 and that the British OBA has some opportunity to find/clear up some potential AT-gun positions by fire before. Taking this path, the Crocodiles might be able to pry open the area around the Bridge across the Canal or be occupied with 'something' useful getting there. The third option is to enter via the I10 road. If the Crocodile punks are feelin' lucky, they could get as far as 24D2 if CE, posing a serious PITA in Turn 4 already. That is if they contrieve to reach that area in one piece. Needless to say, it is highly likely that the Germans will take at least some precautions against such a move. Maybe it is a good idea to set up the Crododiles in a way that the second one can switch from the 'central' area to one of the others in case the first one gets shot up right after entry.
One thing I like are the British PIATs. Since they don't have a Backblast, they can be pretty useful being fired from buildings vs. Infantry in ADJACENT buildings - despite deductions for TEM to the TH roll, chances for a Hit and a subsequent 8FP flat effects roll are something worth to be considered.
It becomes apparent that this scenario is quite old: The at minimum the first Turn will be spent by the British moving forward without the Germans being able to do anything - except if the latter would elect to set up in absurdly unfavorable positions. Basically, you could have made the Y or X hexrow the board edge, deduct a turn from the scenario length and rule by SSR that the Offboard Observer would still have to be setup at the GG hexrow (as not do decrease potential Blind Hexes to his LOS).
Situation at the Start of British Turn 1 - Game Start:
The Battle Plan:
The German defensive setup was more or less what I expected: The board 24 village would be defended by some troops to fight a delaying action. Some Germans (or Dummies posing as such) would guard the 'rear door' in the 24L6 area. Then the 23O10 area had some defenders to prevent any quick push into the board 23 town to the North-East (bottom-right) to it with its valuable and numerous Stone Buildings. The big question was - where were the German AT-Guns? But this question would unlikely be solved during the first Turn.
The red arrows show the intended paths for Infantry, the green arrows those for armor. The areas encircled in blue had been earmarked as options for the initial British OBA. I settled to try for 24R7 for a Spotting Round, provided LOS existed which seemed to be the case after some eye-balling. My Offboard Observer was located in 24GG7.
In the East (bottom), I would attempt to deploy and then Double time to 23Z5 with the foot-sloggers. A Challenger would carry a squad with the assembled MTR and unload in the same spot, thus reaching it without being CX nor slowed down by that heavy SW.
Later, tanks would take up positions in Y9, X8, and/or W8 to shoot at the Woods area of 24N1 (where an AT-Gun might hide) or the Building of 23O10 from a HD position. From W8, I'd keep watch for the Jagdpanzers due later and pop a sM to cover further Infantry progress to 23U9. This building was important as it had an excellent field of fire all the way to 24K4 which could cut off paths of retreat from the board 24 village towards the area of the board 23 town West of (above) the Canal. The 23S9 building would be secured for the same purpose and to paste 23O10. I'd try to reach 23R8 or 23Q9 with a PIAT vs. the crossing of the Jagdpanzers and those buildings would be a jumping-off point to get into the 23O10 building after having smoked the gap in between that could be covered by the Jagdpanzers East of (below) the Canal or from the board 24 village. Once the crucial 23O10 building was secured, the British would pour in the town beyond to take the Stone Buildings there up for grabs. Possibly aided by Crocodiles and Infantry reinforcements coming in from behind.
In the West (top) I would use the fastest route along the road with foot-sloggers and tanks with riders to reach the area around 24X5 in force. Advancing Infantry would screen the tanks from PFs while the tanks would cover the Infantry if the Germans decided to get close & personal. The OBA would hopefully see and bring down a Harrassing Mission in 24R7 to fix the forward German defenders between the FFE and my Infantry/Tanks closing in from the other side. Any enemy brokies would have a difficult time getting back and thus taking them Prisoner would get me some extra CVP.
With the first line of defence overcome, the OBA would switch targets to the 24M9 area or 24P7 in an attempt to flush out any enemy AT-Gun as to pave the way for my Crocodiles entering in the center from the western (top) board edge. The Crocs would be supported by most of the reinforcing Infantry entering from the West edge (top) through the L10 Woods area, while some foot-sloggers would flesh up my Infantry attacking towards the center of the Board 24 village.
The Crocodiles would mop up what remained of the Germans in the village center, while the Cromwells would swing around 24V3 into the village with Infantry support to cut off any retreats and gobble up the Germans caught between them and the Crocodiles. That done, additional points would be earned by taking Control of the board 24 village Stone Buildings. Meanwhile, the OBA would switch its attentions elsewhere, either to suppress any Germans posing an issue, or, preferrably, SMOKING the 23O10 area to get my Infantry from board 23 safely aross the Open Ground.
Situation at the End of British Turn 1:
British Turn 1 went almost exactly according to plan. No wonder, because the Germans really couldn't do anything yet. Unfortunately, I did not manage to Deploy as planned and I drew a Red Chit for the OBA (LOS to 24R7 was fine, though, which was good to know). And I made one stupid mistake: In all their dash, the board 23 Infantry forgot to let one unit enter the 23CC7 building while passing, so I would have to send back some men to amend for that later.
Situation at the End of German Turn 1:
German Turn 1 was a very quick one. The enemy merely shuffled some units around the 24U6 area and the 23U9 area. My Observer brought down a Spotting Round in 24O9, somewhat off the intended target hex of 24R7, but nevertheless well suited to threaten the Germans in the 24M9 area.
To be continued in a subsequent post...
von Marwitz
Last edited:


")


