Doug Leslie
Elder Member
(Continued from previous post due to excessive verbiage)
The Germans only had four turns to achieve their victory target. At this point they had only accumulated 4 CVP and the south edge looked a long way away. The attack now started to pick up steam, however. The Elefant with the malfunctioned gun charged 42I3 to freeze the 57LL ATG and was eliminated following a successful intensive fire shot. The follow up attack cleared the hex and the gun was captured. My HIP units on board 43 emerged and headed towards the battle which they had been watching from a distance but, apart from killing a broken 838 on the German left flank for failure to rout, they were not destined to achieve much. My 57LL in H5 fired on the killer stack in J3 but achieved nothing beyond the placement of an acquisition counter. The hill defenders tried to retreat from the oncoming assault which resulted in one KIA and a berserk unit which somehow survived withering German defensive fire before entering close combat with a 468 in 42D0. Looking at the situation at the start of Turn 9, it is difficult to believe that it was destined to survive to the end of the game but the reality is that the Germans didn’t have enough time to stop and kill it.

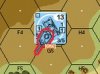
Instead, they continued to roll forward. An Elefant fell victim to a side shot from the 45LL in 42B4 and was immobilised. This was a bad break for Marc, given that the TK number of the 45LL was a 12 after adjustment and the AF that it was aiming at was 8/11 (hull/turret). It would be fair to say that this was symptomatic of how things were going for the Germans at this point. That was three AFVs lost to attacks which ranged from being against the odds to highly improbable. On the other hand, my ATG gun in I6 managed to retain ROF after pivoting to fire at the HD AFV in E4 and rolled three consecutive hull hits before the gun malfunctioned. A turret hit would likely have been game ending at this stage. This was the position at the start of German Turn 10 with only one and a half turns to go.
Marc: I hate to complain about luck in such a manner that it reflects poorly on the skill of the enemy commander. So let me say this: Doug put his units in position to do damage and for that reason he was able to get the somewhat lucky outcomes he needed in virtually every single case where my targeted AFVs were either immobilized or taken out. Given the 50% chance to hit them and 50% chance to kill them, I would expect some losses but not as many as I wound up taking. My vehicles, starting with the super-goliaths, just never cut the mustard in this scenario when it came to survival. Hey – sometimes you have Hanna luck, sometimes you don’t! It’s not cool when the enemy steals my Hanna luck away from me, I can tell you….
We adjourned at this point and I had the chance to study the position at my leisure. At this stage, the Germans had accumulated 13 CVP and had 63 exit VPs at their disposal. They needed 75 VP to win. They could expect to capture the ATG in E4, which would add 4 VP to their total if I didn’t recapture it. Clearly there was little margin for error.
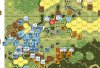
The turn started with Marc rolling his customary six when attempting to recover the ATG in H5. He followed this less than spectacular start by prep firing both AFVs behind the hill wall at the ATG and missing with everything including intensive fire. This was typical of what had been happening in general up to that stage in the game. At this point however, his fortunes turned. The 838 in F5 broke the 447 in the F6 trench. The 338 in E5 successfully searched and found the mines in D5 with a dr of 5 (low by the German search standards to this point). An 8-0 carrying a FT headed towards the ATG in B4. Originally, I had intended to use the ATG to shoot at either of the assault guns that tried to cross the road from behind the wall but, given that they had now both prep fired and I was conscious of the fact that the ATG and crew represented 6 VPs if the crew was eliminated and the ATG was captured, I decided that the FT SMC had to go. Instead, my first point blank shot resulted in its battle hardening to an 8-1. I now intensive fired and rolled a 12 to disable the ATG. This was not the worst outcome to be honest, since it at least averted the possibility of its being captured. Marc followed this up by running a vehicular crew from G4 to D6, shrugging off fire as it went. A 237 made it to C5 and the ATG crew broke while using FPF. The ATG in H5 was successfully recovered and later destroyed in the AFPh (I think it would have been better to preserve it since it was unlikely that I could recapture it even if the capturing squad headed for the exit). The rest of the German infantry charged forward to leave the following position at the start of the Russian Turn 10.
Marc: I have to say I felt somewhat more enthusiastic about my chances at this point as I had run up the casualties and every point destroyed was one less point I needed to exit. But my run of fortune needed to continue…
At this point, the Germans had amassed 16 CVP. They had 28 VPs of armor, all of which could reach the exit edge if they didn’t bog. By my calculation (not clear at the time) they also had 28 VP of infantry within reach of the board edge with a following wind for a total of 72. To win, the Germans needed to eliminate 3 CVPs in the DFPh and exit everything that could exit. This slim possibility effectively became beyond reach when the 447 in F7 managed to self-rally and made it impossible for a good chunk of the German force to exit. This led to a German concession.
Overall, the German problems in this scenario stemmed from the delay in clearing the minefields at the start. An additional two turns of combat would have made a huge difference to their prospects. Instead, they were forced to take big risks to blast through the Russian positions and the cost to their armor created a CVP hole that was ultimately too much to overcome.
Marc. Yes, that 447 under DM managed to rally right when and where it needed to with a snake eyes roll and this hung up the exit of my troops when I couldn’t break it and/or kill some of the other broken enemy sitting there blocking my exit. This is where I absolutely needed those two turns that I had lost at the beginning trying to cross those mines. So yes, in retrospect, one could argue all four super-goliaths should target one hex row. But I didn’t like that idea as it channels my entire force moving through a single corridor on the far edge of the board, hence my approach of creating two channels through the mines.
The Germans only had four turns to achieve their victory target. At this point they had only accumulated 4 CVP and the south edge looked a long way away. The attack now started to pick up steam, however. The Elefant with the malfunctioned gun charged 42I3 to freeze the 57LL ATG and was eliminated following a successful intensive fire shot. The follow up attack cleared the hex and the gun was captured. My HIP units on board 43 emerged and headed towards the battle which they had been watching from a distance but, apart from killing a broken 838 on the German left flank for failure to rout, they were not destined to achieve much. My 57LL in H5 fired on the killer stack in J3 but achieved nothing beyond the placement of an acquisition counter. The hill defenders tried to retreat from the oncoming assault which resulted in one KIA and a berserk unit which somehow survived withering German defensive fire before entering close combat with a 468 in 42D0. Looking at the situation at the start of Turn 9, it is difficult to believe that it was destined to survive to the end of the game but the reality is that the Germans didn’t have enough time to stop and kill it.
Instead, they continued to roll forward. An Elefant fell victim to a side shot from the 45LL in 42B4 and was immobilised. This was a bad break for Marc, given that the TK number of the 45LL was a 12 after adjustment and the AF that it was aiming at was 8/11 (hull/turret). It would be fair to say that this was symptomatic of how things were going for the Germans at this point. That was three AFVs lost to attacks which ranged from being against the odds to highly improbable. On the other hand, my ATG gun in I6 managed to retain ROF after pivoting to fire at the HD AFV in E4 and rolled three consecutive hull hits before the gun malfunctioned. A turret hit would likely have been game ending at this stage. This was the position at the start of German Turn 10 with only one and a half turns to go.
Marc: I hate to complain about luck in such a manner that it reflects poorly on the skill of the enemy commander. So let me say this: Doug put his units in position to do damage and for that reason he was able to get the somewhat lucky outcomes he needed in virtually every single case where my targeted AFVs were either immobilized or taken out. Given the 50% chance to hit them and 50% chance to kill them, I would expect some losses but not as many as I wound up taking. My vehicles, starting with the super-goliaths, just never cut the mustard in this scenario when it came to survival. Hey – sometimes you have Hanna luck, sometimes you don’t! It’s not cool when the enemy steals my Hanna luck away from me, I can tell you….
We adjourned at this point and I had the chance to study the position at my leisure. At this stage, the Germans had accumulated 13 CVP and had 63 exit VPs at their disposal. They needed 75 VP to win. They could expect to capture the ATG in E4, which would add 4 VP to their total if I didn’t recapture it. Clearly there was little margin for error.
The turn started with Marc rolling his customary six when attempting to recover the ATG in H5. He followed this less than spectacular start by prep firing both AFVs behind the hill wall at the ATG and missing with everything including intensive fire. This was typical of what had been happening in general up to that stage in the game. At this point however, his fortunes turned. The 838 in F5 broke the 447 in the F6 trench. The 338 in E5 successfully searched and found the mines in D5 with a dr of 5 (low by the German search standards to this point). An 8-0 carrying a FT headed towards the ATG in B4. Originally, I had intended to use the ATG to shoot at either of the assault guns that tried to cross the road from behind the wall but, given that they had now both prep fired and I was conscious of the fact that the ATG and crew represented 6 VPs if the crew was eliminated and the ATG was captured, I decided that the FT SMC had to go. Instead, my first point blank shot resulted in its battle hardening to an 8-1. I now intensive fired and rolled a 12 to disable the ATG. This was not the worst outcome to be honest, since it at least averted the possibility of its being captured. Marc followed this up by running a vehicular crew from G4 to D6, shrugging off fire as it went. A 237 made it to C5 and the ATG crew broke while using FPF. The ATG in H5 was successfully recovered and later destroyed in the AFPh (I think it would have been better to preserve it since it was unlikely that I could recapture it even if the capturing squad headed for the exit). The rest of the German infantry charged forward to leave the following position at the start of the Russian Turn 10.
Marc: I have to say I felt somewhat more enthusiastic about my chances at this point as I had run up the casualties and every point destroyed was one less point I needed to exit. But my run of fortune needed to continue…
At this point, the Germans had amassed 16 CVP. They had 28 VPs of armor, all of which could reach the exit edge if they didn’t bog. By my calculation (not clear at the time) they also had 28 VP of infantry within reach of the board edge with a following wind for a total of 72. To win, the Germans needed to eliminate 3 CVPs in the DFPh and exit everything that could exit. This slim possibility effectively became beyond reach when the 447 in F7 managed to self-rally and made it impossible for a good chunk of the German force to exit. This led to a German concession.
Overall, the German problems in this scenario stemmed from the delay in clearing the minefields at the start. An additional two turns of combat would have made a huge difference to their prospects. Instead, they were forced to take big risks to blast through the Russian positions and the cost to their armor created a CVP hole that was ultimately too much to overcome.
Marc. Yes, that 447 under DM managed to rally right when and where it needed to with a snake eyes roll and this hung up the exit of my troops when I couldn’t break it and/or kill some of the other broken enemy sitting there blocking my exit. This is where I absolutely needed those two turns that I had lost at the beginning trying to cross those mines. So yes, in retrospect, one could argue all four super-goliaths should target one hex row. But I didn’t like that idea as it channels my entire force moving through a single corridor on the far edge of the board, hence my approach of creating two channels through the mines.
Last edited: