meddigo
Member
I know that DarkSora has already posted a tutorial on how to do this however I am playing to do a tutorial on how to animate several tags together so I thought I would show you guys how I did mine.
WARNING: There are TWENTYTWO screens in this tut, so please be patient! This is not a dial up friendly tutorial! lol
Right, well you will first need to create a new image;
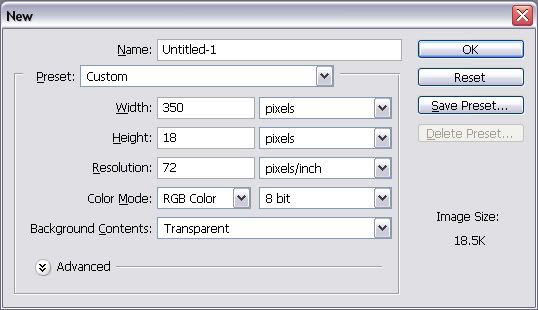
Thats a 350x18 image with a TRANSPARENT background. If you create images with a background it locks that layer, not handy!
Now hit Ctrl+D to reset your colours and then Ctrl+X to swap the black and white so White is the foreground colour. Now fill your layer with white. (It can be any colour, but that can be changes at any time, so just go white for now!). You will also need to create a new layer;

Now get an image you want to use in your tag, open it up in a new area. Here's mine
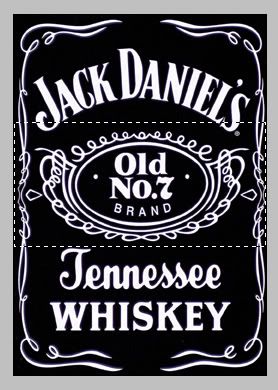
You can see that I have put a selection across the part I want to use in my sig. Do that same, hit Ctnl+C to copy it and then close the image.
Now Paste it (Ctnl+V) into the new layer you just made. Of course it is WAAAY too big to actually see what it is, so lets scale it;
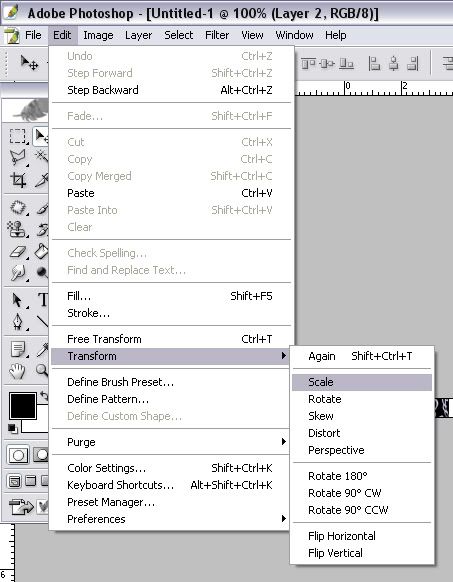
Thats Edit > Transform > Scale in case you can't see it.
Now drag a corner handle (while holding shift to keep relative sizes on both the Y and X axis) down to a size you want, here's what I got;

you can see that I have re-filled the bottom layer black to work with the picture I have added, you do the same.
OK, now we need to add in text! But first you need a pixel font!
This is a link to the page you can download the one I use, Squaredance. In there is four different version of it, I use the last version, SquareDance10.
This is a Google search for free pixel fonts in case you want to find your own but too lazy to load up google and type!
Now grab the text tool;

Click somewhere on your image to start typing. Make sure the colour (changeable on the top tool bar) is something you can see and type in what you want, in my case "Jack Daniels Drinker".

Make sure the font you want to use is selected as well, if you do type in a different font just highlite your text and change the font. Also make sure the size is around 9 pt. But that depends on your font. Now, I tent to change the font colour to the same colour as the background, its up to you if you want to do that.
Hit the tick and now we need to put a stroke round it;
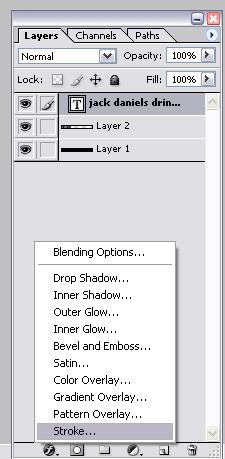
And here are the options;
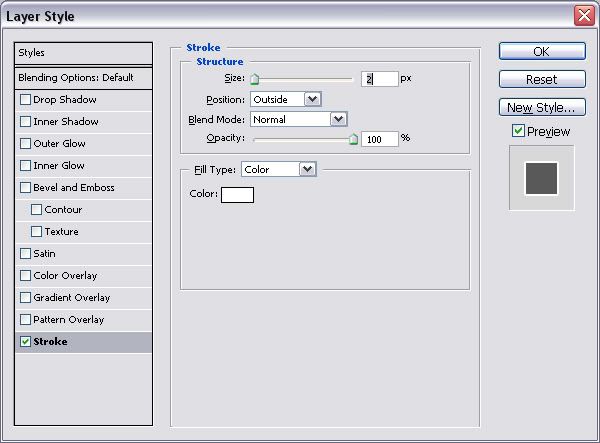
Thats a 2px width and colour of your choice. I tend to use a contrasting colour to the text, i.e. black on white or visa versa. Or I use a stroke colour that is relevant to the image. So I used red for my Devil May Cry tag.
Ok now you need to move the text to where you want it, enter the Move Tool.

You can either click and drag it where you want or just click anywhere once and then use the arrow keys to move it 1 pixel in that direction.
OK, now we are going to so some stripes!!
Create a new layer above your background layer. To do this click the background layer to select it then click the new layer button, it should look like this;
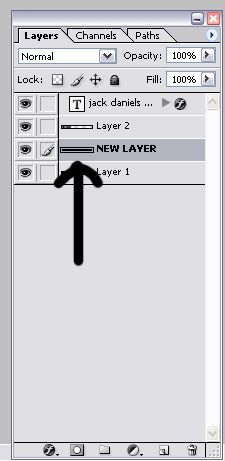
Grab the line tool and a contrasting colour, I'm using white.

Then create a line going to 45 degress across your new layer, holding shift again to get the 45 degrees! Make sure you go way over the image, like a centimeter above and below, just to make sure you get a good line.

My first line...aaaw...
Ok now drag that layer with the line on it down to the new layer button, it will create a copy of the layer for you;
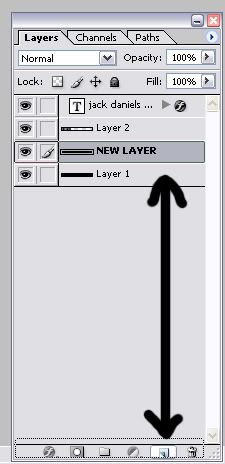
It will put the copy above the original. Now get the move tool again and click anywhere, we won't be dragging. Hit the left or right arrow key to FOUR times to move the line 3 pixels in either direction. Like so;

Now repeat this process of copying the layer and moving the new copy along untill you have four lines and four layers;
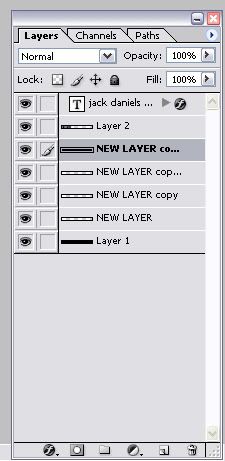
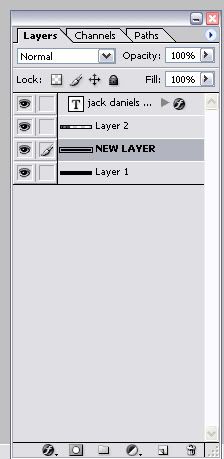
Select the top one of the four layers press Ctrl+E. This merges the layers down. You will have to press it three times untill you are back to one layer;
But still have four lines.
Now keep on repeating all this so build up the lines. Juse duplicate the layer with four lines and you have eight lines, merge the layers and duplicate it, so on and so forth untill you have lines across the whole thing;

Now you need to change the opacity of the lines to 50%,
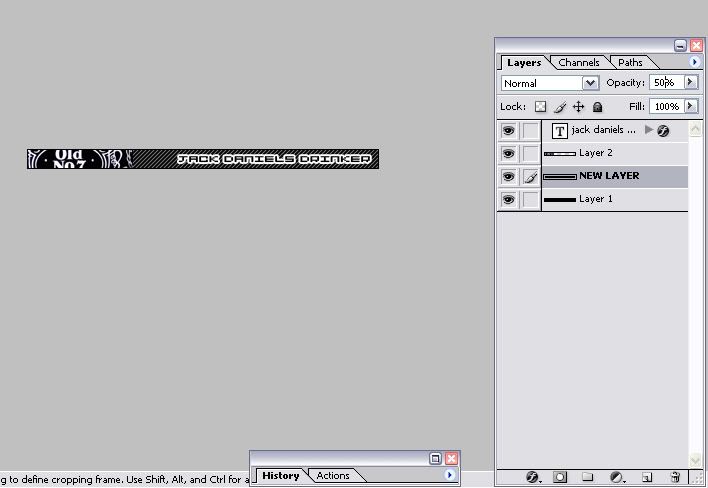
You can see at the top of the layer window is the master Opacity for the selected layer.
Now we need to create the highlite. To do this grab the Circle Marquee tool. If you don't know where this is, click and hold on the Rectangle marquee button untill a sub menu comes up then release the mouse button on the Circle marquee. Then make sure that New Selection mode is on on the top tool bar;
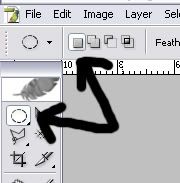
Don't forget to create a new layer on the top of all your other layers for this!
Now, this is a little hard to explain so bear with me. Start your selection about half an inch to an inch above your image but on one side of your screen, then drag it all the way across to the other side of the screen and then slowly drag down untill you can see the edge of the selection circle.
Now you will need to line the circle up so it enters through one top corner of the image and exits through the other top corner. Once you get it, fill it white. Here is a pic;

OK, finally you just need to change the opacity of the highlite to 50% and you are done!!
Here's mine;

Well done guys!!
Here's another example of it with some shading brushed in, so just experiment with your tags!!

Meddigo
WARNING: There are TWENTYTWO
Right, well you will first need to create a new image;

Thats a 350x18 image with a TRANSPARENT background. If you create images with a background it locks that layer, not handy!
Now hit Ctrl+D to reset your colours and then Ctrl+X to swap the black and white so White is the foreground colour. Now fill your layer with white. (It can be any colour, but that can be changes at any time, so just go white for now!). You will also need to create a new layer;

Now get an image you want to use in your tag, open it up in a new area. Here's mine

You can see that I have put a selection across the part I want to use in my sig. Do that same, hit Ctnl+C to copy it and then close the image.
Now Paste it (Ctnl+V) into the new layer you just made. Of course it is WAAAY too big to actually see what it is, so lets scale it;

Thats Edit > Transform > Scale in case you can't see it.
Now drag a corner handle (while holding shift to keep relative sizes on both the Y and X axis) down to a size you want, here's what I got;

you can see that I have re-filled the bottom layer black to work with the picture I have added, you do the same.
OK, now we need to add in text! But first you need a pixel font!
This is a link to the page you can download the one I use, Squaredance. In there is four different version of it, I use the last version, SquareDance10.
This is a Google search for free pixel fonts in case you want to find your own but too lazy to load up google and type!
Now grab the text tool;

Click somewhere on your image to start typing. Make sure the colour (changeable on the top tool bar) is something you can see and type in what you want, in my case "Jack Daniels Drinker".

Make sure the font you want to use is selected as well, if you do type in a different font just highlite your text and change the font. Also make sure the size is around 9 pt. But that depends on your font. Now, I tent to change the font colour to the same colour as the background, its up to you if you want to do that.
Hit the tick and now we need to put a stroke round it;

And here are the options;

Thats a 2px width and colour of your choice. I tend to use a contrasting colour to the text, i.e. black on white or visa versa. Or I use a stroke colour that is relevant to the image. So I used red for my Devil May Cry tag.
Ok now you need to move the text to where you want it, enter the Move Tool.

You can either click and drag it where you want or just click anywhere once and then use the arrow keys to move it 1 pixel in that direction.
OK, now we are going to so some stripes!!
Create a new layer above your background layer. To do this click the background layer to select it then click the new layer button, it should look like this;

Grab the line tool and a contrasting colour, I'm using white.

Then create a line going to 45 degress across your new layer, holding shift again to get the 45 degrees! Make sure you go way over the image, like a centimeter above and below, just to make sure you get a good line.

My first line...aaaw...
Ok now drag that layer with the line on it down to the new layer button, it will create a copy of the layer for you;

It will put the copy above the original. Now get the move tool again and click anywhere, we won't be dragging. Hit the left or right arrow key to FOUR times to move the line 3 pixels in either direction. Like so;

Now repeat this process of copying the layer and moving the new copy along untill you have four lines and four layers;

Select the top one of the four layers press Ctrl+E. This merges the layers down. You will have to press it three times untill you are back to one layer;

But still have four lines.
Now keep on repeating all this so build up the lines. Juse duplicate the layer with four lines and you have eight lines, merge the layers and duplicate it, so on and so forth untill you have lines across the whole thing;

Now you need to change the opacity of the lines to 50%,

You can see at the top of the layer window is the master Opacity for the selected layer.
Now we need to create the highlite. To do this grab the Circle Marquee tool. If you don't know where this is, click and hold on the Rectangle marquee button untill a sub menu comes up then release the mouse button on the Circle marquee. Then make sure that New Selection mode is on on the top tool bar;

Don't forget to create a new layer on the top of all your other layers for this!
Now, this is a little hard to explain so bear with me. Start your selection about half an inch to an inch above your image but on one side of your screen, then drag it all the way across to the other side of the screen and then slowly drag down untill you can see the edge of the selection circle.
Now you will need to line the circle up so it enters through one top corner of the image and exits through the other top corner. Once you get it, fill it white. Here is a pic;

OK, finally you just need to change the opacity of the highlite to 50% and you are done!!
Here's mine;

Well done guys!!
Here's another example of it with some shading brushed in, so just experiment with your tags!!

Meddigo
