Adrian Carter
Senior Member
For our next game from The Magnificent Seven series in ASL Journal #14 we moved to the jungles of New Guinea by choosing J237 Commandos at Kaiapit. The scenario depicts the attack of the Australian 2/6th Independent Company on the village of Kaiapit. Their aim is to clear elements of the Japanese 3rd Battalion, 78th Regiment from the surrounding area and prepare the nearby airfield for use. The Aussies have 5 and a half turns to secure at least 5 hut hexes on board 62. The Japanese must stop the Aussies. I attacked with the Australians and Johan, my regular gaming buddy, defended with the Japanese. This looked to be another very interesting scenario with restricted setups and reinforcements thereby giving both sides plenty to think about.
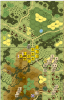
Start of Game. This image shows the starting positions of the two sides with the Australian counters expanded to provide more detail. I decided that the restricted Japanese setup yielded a strong central setup defending the bridge which would have been suicidal for the Australians to attack frontally. My plan was therefore to try a double pincer movement and outflank the Japanese on the east and west of the maps whilst hopefully laying smoke on the Japanese in the centre with my mortars. Each Australian mortar had an s9 for its first smoke attempt. I expected the Japanese to fall back slowly and occupy the village so I needed to hustle my troops.
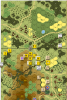
Start of Turn 2. The right Australian hook around the eastern side of the board was working well whereas the left hook was looking to face some tough Japanese opposition. The dice gods were kind to me in the centre because the mortars were able to lay down an effective smoke screen around the bridge that shielded the Australians from Japanese fire.
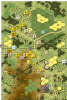
Start of Turn 4. The eastern Australian pincer had successfully taking several hut hexes in the village by this time and were now bracing themselves for the inevitable Japanese counter attack. The Japanese forces defending the bridge were holding their positions and still had a lot of smoke in their eyes. The western Australian pincer was wearing down the Japanese forces and would hopefully be in a position to threaten Kaiapit village form the south.
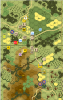
End of Game. By the end of the game the Australians had survived two Japanese banzai attacks and secured 6 hut hexes for victory. I appreciate the Australians were lucky at times. I was able to put down plenty of smoke from the mortars in the opening phases of the game and rolled snake-eyes on a Subsequent First Fire shot to destroy a banzai charge. Overall, however, the DRs were fairly even for both sides. I was pleased with my outflanking tactics and felt that the Japanese could have pulled back earlier from their opening positions. They needed to secure hut hexes and not the bridge crossing for victory. This scenario was another gem from ASL Journal #14 and great fun to play. We’re moving to New Britain for our next scenario in the series. Stay tuned!
- Japanese advantages: Leadership, MMGs, reinforcements
Japanese advantages: Restricted initial setup, not stealthy and no HIP (SSR) - Australian advantages: Elite infantry, leadership, mortars
Australian disadvantages: time
Start of Game. This image shows the starting positions of the two sides with the Australian counters expanded to provide more detail. I decided that the restricted Japanese setup yielded a strong central setup defending the bridge which would have been suicidal for the Australians to attack frontally. My plan was therefore to try a double pincer movement and outflank the Japanese on the east and west of the maps whilst hopefully laying smoke on the Japanese in the centre with my mortars. Each Australian mortar had an s9 for its first smoke attempt. I expected the Japanese to fall back slowly and occupy the village so I needed to hustle my troops.
Start of Turn 2. The right Australian hook around the eastern side of the board was working well whereas the left hook was looking to face some tough Japanese opposition. The dice gods were kind to me in the centre because the mortars were able to lay down an effective smoke screen around the bridge that shielded the Australians from Japanese fire.
Start of Turn 4. The eastern Australian pincer had successfully taking several hut hexes in the village by this time and were now bracing themselves for the inevitable Japanese counter attack. The Japanese forces defending the bridge were holding their positions and still had a lot of smoke in their eyes. The western Australian pincer was wearing down the Japanese forces and would hopefully be in a position to threaten Kaiapit village form the south.
End of Game. By the end of the game the Australians had survived two Japanese banzai attacks and secured 6 hut hexes for victory. I appreciate the Australians were lucky at times. I was able to put down plenty of smoke from the mortars in the opening phases of the game and rolled snake-eyes on a Subsequent First Fire shot to destroy a banzai charge. Overall, however, the DRs were fairly even for both sides. I was pleased with my outflanking tactics and felt that the Japanese could have pulled back earlier from their opening positions. They needed to secure hut hexes and not the bridge crossing for victory. This scenario was another gem from ASL Journal #14 and great fun to play. We’re moving to New Britain for our next scenario in the series. Stay tuned!
