2- Capture Hill 35

George Kelln

Elder Member
Joined
Feb 1, 2003
Messages
1,564
Reaction score
1,600
Location
Victoria, BC, Canada
Country
llCanada
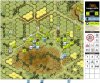
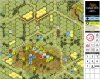
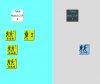
P2 – Capture Hill 35 playtest v. Ernie Cameron: Kraut 81mm Mortar smashes Yank firebase.

Turn 1 the Americans move on to the map spread out and close with east-west road while a 7-0 FOO and 2x HS toting 60mm Mortars climb the hill located in NE corner. Once there, they get set up behind the bocage and start conducting some spec-fire on the level 1 orchards on Hill 192. Germans held their fire during MPh. On the left side, the Americans (9-1, 2x 6-6-6) let loose on a Concealed 7-0, 4-4-7 in the woods in FF4, Pinning the 7-0 and breaking & ELRing the 4-4-7.

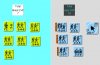
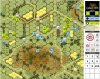
Turn 2, the Americans cross the road and come in contact with the Germans on the right side (9-1, 4-4-7) and the left side (4-4-7) both behind the bocage (Americans find the first minefield on the road). Ineffective shots fired by the German infantry; but it is more than made up for by an 81mm Mortar located in an orchard on Hill 192. It opens fire and in the next 3 fire phases wipes out the American fire base on the level 1 hill in the NE corner (KIA 7-0, 2-3-6) and breaking 2-3-6 which later was eliminated when it returned to attempt to claim the radio. The Germans skulked back leaving very little for the Americans to fire at. An American HS moves up the gully road, finding the second German minefield at the end of it and another HS finds a third minefield on the left side in an orchard.

Turn 3, the Americans continue to press the attack on the left, closing with the 7-0 and the now Berserk 4-3-6 (HoB in RPh); in the middle a 2cm Flak 38 catches an American HS moving on the road and breaks it (the broke HS subsequently routed into the fourth German minefield in the woods); and on the right side, Americans manoeuvre attempting to lay smoke grenades to cover the recovery of the radio and mortars on the hill – the attempts fail. The second German 81mm located in a grain field opened fire catching an American Squad moving along the woodline and scored an ineffective hit; losing ROF and concealment in the process. In the AFPh, the Americans fire at the mortar crew and break it and fire at the 9-1 and 4-4-7, causing the 4-4-7 to go Berserk.

A cat-and-mouse game is developing in the bocage, with the Americans forced to press the attack, risking being caught out in the open or moving safely and running out of time. The Germans are forced to decide whether to stand and fight, facing the American firepower or withdraw back and give up ground to the Americans.

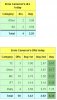
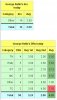
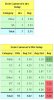
The American squads have 50% chance to place a Smoke Grenade; thus far 10 attempts netted 3 grenades; obviously my troops decided the extra weight would slow them down, and left most of their smoke grenades behind – D’OH!
18028

18029 18030 18031
 

George Kelln

Elder Member
Joined
Feb 1, 2003
Messages
1,564
Reaction score
1,600
Location
Victoria, BC, Canada
Country
llCanada
P2 – Capture Hill 35 playtest v. Ernie Cameron; the cracks in the German defence begin to widen.

German Turn 3: with reinforcement arriving, the German continue to withdraw in the face of overwhelming American Firepower.

On the left side, the Berserk German 4-3-6 charges forth from the woods and is eliminated by the American platoon it charged, allowing the German 7-0 to withdraw back. A (HIP) 2cm FlaK 38 popped up in the (55AA1) woods covering the large open area and managed to CR a 6-6-6 running up the bocage.

In the centre, the German 2cm FlaK 38 opened fire on the broken American HS in the minefield eliminating it before turning his sights on the concealed Americans behind the bocage across the road and let loose a few ineffective 6+3 shots.

On the right side, the Berserk German 4-4-7 jumped the bocage and charged the Americans along either side of the bocage. Half of the squad is eliminated coming over the bocage with the other half being eliminated (18-2) when it entered a 6-6-6’s hex. Again, this action allowed the German 9-1 leader to withdraw and make the long journey to the DM’d mortar crew in the woods.

In the rear, the German 81mm Mortar crew waited and watch to see if anymore Americans attempted to pick up the radio.

Turn 4: The German reinforcements failed to arrive on this turn (rolled a 5 on dr ≤ 4), as the Americans continue to press the German defence, not allowing them to regroup and set up their next defensive line.

On the left side, an American HS is sent out to scout the orchards behind the woods from whence the Berserk squad charged out from. It initially was forced to ground and later eliminated by fire from a 2-3-7 with an HMG and directed by the 7-0 leader in a foxhole in the (84D3) woods. The rest of the American platoon manoeuvred itself along the bocage to face the 2cm Flak 38 in (55AA1) woods. The FlaK gun ineffectively fired at the Americans in the orchard behind the bocage before succumbing to a CH from a Bazooka, eliminating the crew and gun.

In the centre, Americans brought their firepower to bear on the 2cm FlaK 38 in the (55U1) orchard, while other units manoeuvred around it on the left. Faced with a mounting amount of firepower against it, the FlaK crew decided to abandoned its gun and withdraw back into the woods behind it – staving off more American firepower, but also giving it few options.
On the right, the Americans conduct Operation “Reclaim the Radio”; with squads in between the Radio behind the (55J8) bocage and the German 81mm in the (84P3) orchard popping Smoke Grenades to cover the attempt. The operation was successful with 3 of the 5 squads succeeding popping smoke to block the LOS, allowing for the 8-0 leader to move into the hex unseen, recover the Radio, and move out forward into the (I7) orchard. The remainder of the American units along the bocage moved forward, continuing to press the Germans in the woods. Once again that good O’American firepower was brought to bear eliminating the German 2-3-6 HS. Once the Smoke cleared, the German 81mm mortar team realizing there was nothing left to fire at on the NE hill, picked up its mortar and repositioned itself to the road to the east.

The German sniper which has been active on the NE hill once again struck, zeroing in on the American 8-0 with Radio and 3-4-6 with (dm) 60mm Mortar in the (I6) building. The Sniper just missed the 8-0, hitting the HS and breaking it. In the subsequent RtPh; the Leader and the HS seeing that there was no enemy to their front, left the building crossed the gully for the safety of the (55J3) stone building across the road.

American Turn 5: Americans start to ascend the hill as Germans continue to be forced back.

On the left side, the Americans redirect their axis of advance towards the hill, joining up with the central platoon, to begin their assault on the hill. Laying smoke grenades in the (E3) road, the 9-1, 6-6-6 packing a MMG dashed across the orchard lined road and climbed the hill, with HMG bullets biting at their heels.

In the Centre, the Americans are still dealing with Flak crew, which has now brought to bear upon itself a shitload of American firepower. A German 2-3-7 toting an MMG moved up to try and help out, but is quickly finding itself being overwhelmed and along with a couple of broken HS in a shrinking pocket.

On the right side, having dealt with Germans 2-3-6 rearguard, the Americans move forward preparing to deal with the German 81mm Mortar, 2-2-8, and the 9-1 located in the orchard on the right side of the hill. The 8-0 with the radio hustles forward to the join up with and hoping to rally the broken 6-6-6 behind bocage.

German Turn 5: the sound of hurrying jackboots can be heard arriving on the south side of the hill.

It is a race against time; can the Americans with their immense firepower but brittle morale reach Level 2 with enough strength before the Germans reinforcements can get set up atop the hill?

18035

18036 18037 18038
 

George Kelln

Elder Member
Joined
Feb 1, 2003
Messages
1,564
Reaction score
1,600
Location
Victoria, BC, Canada
Country
llCanada
By the way, the American Smoke Grenade counts is 19 Attempts and 9 grenades received (47%). The average is getting close to the 50%, but sure could have used them earlier in the game.
 

George Kelln

Elder Member
Joined
Feb 1, 2003
Messages
1,564
Reaction score
1,600
Location
Victoria, BC, Canada
Country
llCanada
In addition, the Americans during self-rally attempts have created a 7-0 and an 8-0 leader, greatly aiding in the movement of units forward.
 

George Kelln

Elder Member
Joined
Feb 1, 2003
Messages
1,564
Reaction score
1,600
Location
Victoria, BC, Canada
Country
llCanada
P2 – Capture Hill 35 playtest v. Ernie Cameron; American surge on to Level 2 in force, withstanding what German firepower was left to achieve victory.

Turn 5: German reinforcements, a platoon (7-0, 3x 4-4-7, LMG) arrives and fans out and climbs the back side of the hill, moving into position to help prevent the Americans moving on to Level 2 unhindered.

On right side, the 81mm Mortar is reinforced by a 9-1 and 2-2-8 crew and attempts to hold off the American platoon and a half moving up through the orchards.

In the middle, the FlaK crew in (84N0) woods breaks as it withdraws from the woods, routing back into the woods on the hill behind it. The 2-3-7 with the MMG seeing that it is quickly being surrounded attempts to withdraw from the (84J3) crestline, to the woods behind it; but is broken by an American Squad with a MMG in behind the (84L3) bocage.

On the left side, the 7-0 and 2-3-7 toting a HMG attempts to move across the road, drawing fire from an American squad. The leader passes the NMC, but the HS breaks and is forced to drop the HMG and rout back the (84A5) woods, while the leader continues towards the top of the hill.

Turn 6: the Americans fan out and continue to climb the hill, keeping the pressure on the Germans. The Left side platoon, having joined up with the centre platoon in the (84I3) woods climb to Level 2. The strategy is to overwhelm the Germans with too many targets; if the Germans stand and fight in PFPh, whoever is left standing will plaster the Germans back in DFPh.

In the centre, reinforcing the (84L3) foothold, the Americans, behind the cover provided by smoke grenades, close with the German strongpoint in the (84N4) woods, uncovering the last HIP 2cm FlaK 38 in the process. The FlaK crew was in so much of a hurry to get the gun into action that it Malf’d its first shot. The Americans laying down suppressive fire on the Flak gun and the adjacent crew in the woods moved into CC. Other American units continued to surmount the Level 2 crest, bringing to bear the enormous American firepower with them.

On the right, the American platoons moved up to the 81mm mortar, getting into position to assault it. Concealed Americans advance next to the mortar ready to assault it next turn. Meanwhile other American units move to the base of the hill and advanced up it in force during the APh. The 8-0 leader with the radio made contact and called in a SR. The radio, which has been out action for most of the game, its original leader and two HS of the firebase located on the hill in the NE corner, were eliminated on Turn 2 by a German 81mm Mortar.

With dwindling forces, the Germans attempt to stay out of the way of the American firepower. On the right side, as the Americans have closed with the 81mm mortar, the crew abandons it, hoping to withdraw back, following the 9-1. Unfortunately, it is Pinned on the road next to the bocage. The other crew moving with 9-1 was broken on the road and forced to rout back to the building in SE corner of map.

Turn 7: On the American right side, the assault on the remaining mortar crew happens, first some ineffective fire from the 8-1, 6-6-6 with HMG (12FP+0) on the 2-2-8; however, a nearby squad fires and manages to Pin the crew. Next a squad advances and throws a smoke grenade on the crew, after which a 6-6-7 moves up through the woods and places a DC on the crew. Surrounded by 3 squads, the crew fires ineffectively against the 6-6-7 (DR=11) and in the subsequent AFPh is encircled and broken, forcing it to surrender in the RtPh.

Centre, the American firepower continues to sweep the Germans back from the front side of the hill. Squads continue to move up through the (84M3) woods and up the hill. Units from the right side have moved up and joined with the centre units.

American units manoeuvred around the left side of the hill, trying to outflank the Germans. In the left centre, 8-0 leader rallies units that broke the last turn on the hill. Other units climb on to Level 2 forcing the Germans to choose to stand and fight and face the American firepower from 4x 6-6-6, 3-4-6, 2x MMG spread out in hexes 84H5-H3-I4-J3 or skulk back and survive a bit longer. The Germans chose the latter.

With not many units left, the Germans skulk back trying to conserve their forces, which total (9-1, 7-0, 4-4-7, 3x 2-3-7, 2x 2-2-8) 12 points.

Turn 8: The Americans’ final push, on the left side American units manoeuvre back not wanting to give the Germans any targets in the DFPh, in the centre, Americans next to the 9-1 and 2-2-8 in the (N4) woods managed to break the 9-1 leader and the 6-6-6 with MMG in L3 fires at the 2-2-8 and Pins it. The 6-6-6 with Bazooka fires at the 2-2-8 in O5 and breaks it, opening the right side for the Americans to move up and climb on to Level 2. All other American units move up to the crestline ready to move up in the APh. At this point, Germans seeing the writing on the wall, conceded the Game, as the Americans would, at the end of this player Turn have no less than twice the VP of the Germans.

FYI – final American Smoke Grenade count: Attempts 24, Received 14 (58.3%); so, in the end a bit better than 50%. However, these grenades could have been better used in the earlier turns.

A good game that had the Germans in position at the end of Turn 6 to prevent the Americans from getting to the top of the hill in time. But American firepower opened the way for their ascent to victory. Good game Ernie – now off to Italy for our next game.

18069

18070 18071 18072
 
Top