The Purist
Elder Member
- Joined
- Aug 16, 2004
- Messages
- 2,917
- Reaction score
- 1,480
- Location
- In my castle by the sea, Trochu, AB
- First name
- Gerry
- Country
-

U14 Sacrifice of Polish Armor
Or, Never Say Die in the Face of Low DRs
Or, Never Say Die in the Face of Low DRs
A couple of weeks ago I issued a call to the forum for opponents to play the “Turning of the Tide” and “Rivers to the Reich” scenario packs that came out back in 2019 or there about. Jim B (Sparafucil3) responded and between 31 March and 07 April we met in three sessions to tackle U14, “Sacrifice of Polish Armor”, a large-ish nine (9) turn (!!) scenario that pits early war German panzer and motorised troops against the (supposed) cream of the Polish mechanised cavalry reinforced by their heavy tanks and assault guns.
The Poles begin with 8 elite squads, a 9-1, 8-0, two 37 AT guns (AP only), an MMG, ATR and 46* mortar. Due to balance issues the Poles may HIP one SE and the usual SW and SMCs stacked with them. The Poles need to defend three of four buildings spread around on board 2. The Polish reinforcements are split into two groups who enter via random chit draw beginning on turn 2. These troops need to cross board 6 in order to help out the at start force.
The Germans are no slouches in this scenario and posses 15 first line squads, a 9-2, two 9-1s, two 8-0s, 4 LMGs, 2 MMGs, three Pz IB, two Pz IIA, two Pz IIID and partridge in a – erm,…. make that a Pz IVC. These troops are carried into battle on a mix of motorcycles and sidecars along with four Opel Blitz light trucks. This juggernaut must navigate board 5 while being overlooked from the board 2 heights and drive across the board 2 hills to capture their objectives. Essentially the Germans have the option of a right hand or left hand approach but the board 5 woods road does provide good lateral movement.
Out story begins
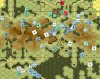
Gerry: In my view I saw the Poles as having two options for this scenario. The first is to defend along the ridgeline with most of the heavy weapons and fall back on 2T1 for the final stand, the intent being to slow the German approach and buy time for the Polish reinforcements to arrive. The second is to deploy more in depth and allow the Germans a more unopposed crossing of board 5 while the defence focuses on the wooden building in 2T1. I opted for the first defence as the randomness or the Polish reinforcements could spell trouble if the chit picks came up with duds early. My defence and Jim’s opening move is below.
Jim: When I first looked at this, my initial thought is this is like so many scenarios from long ago, longer than it needs to be. IMO, the Germans have more than enough time to get to wherever they need to be. I also think the only real Polish defense is to try and strongly hold the mandatory VC building in their rear. I do not think the buildings on the wings will be particularly tough to capture so I am not too worried about that. My only real concern at setup is all my MA’s are B11. I plan on coming on and seeing what Gerry let’s me have and I will go from there.
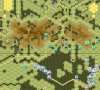
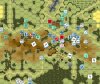
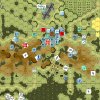
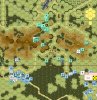
Gerry: The pincer attack came as no real surprise but in the first two turns my gunnery was less then stellar. It took five shots to kill the lead Pz IB (final TK# of 8) who was out playing scout on the German right. I didn’t realise it at the time but this was to be portent of things to come. By the end of turn 2 (below), with the smaller of two groups of reinforcements arriving (two heavy tanks, two squads and a new 8-0), I had begun to pull back off the ridgeline in the centre to avoid the heavy weight of German firepower. The forces on my left (37L AT, 3 squads, an ATR and the 8-0) were to also fall back across the face of Hill 538 but the 8-0 fell dead to a sniper and the gun only managed to move one hex despite a M# of 12. This meant the infantry had to hang back to help the gun. All the same, the ROF of the gun, an ATR and the FP from three squads should have been able to make things difficult for the Germans.
Meh! Not so much.
Jim: I look to try and push Gerry off the hill on my right. I am surprised by the Gun being there. In the pre-game, it is one place I considered it might be but I did not think it would be that forward or I might not have massed so many AFV’s to that side. Still, I seem to get away with it and I am in a position to push him off the hill with massed armor. I have limited Infantry on that side and they are at least a turn away from being available to help with the hill so I will likely opt to wait for them. I have a lot of time left so I am in no hurry right now.
Gerry: Well,… Jim wasn’t having any of that and up onto Hill 538 he charged with his right hook. My AT gun immediately malf’s and the squad firepower did bupkus. The saving grace was the ATR bagged a Pz II but then had to scamper. In response Jim broke one squad that routed east, killed a second squad and the gun crew. I tried to take advantage of an ambush advantage vs a CX is 2S9 but ended up in a melee while the rest of the centre force moved into positions to either dig in or delay the advance.
I drew a blank for the second reinforcement group, which was a pity as I could have used the extra squads, 9-1 and MMG in the 2T1 area before thing got too hot. Jim seemed a bit more cautious on his left, which I figured was due to his not knowing where my HIPsters were. Then again, there was no rush,… nine turns .
Jim: The Gun breaking was pretty big but Gerry killed a PzII in return. I am not in any real hurry here, just giving my Infantry time to catch up and taking shots as they become available.
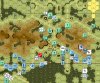
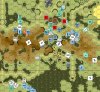
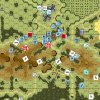
Gerry: The session ended at the start of Polish turn 4 (no screenshot) with the Germans beginning to climb Hill 621 and clear the pass. German troops also massed on the front and south sides of Hill 538. I popped a HIP 248 onto the map with the hope drawing off some German infantry and it did divert one 467 who made sure he didn’t get into position to block rout paths or otherwise cause mischief.
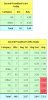
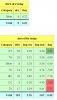
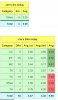
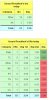
I didn’t manage to capture a screen shot of Jim’s dice but mine speak for themselves. So far, the 8 morale troops in my force were not doing well against Jim’s rather remarkable shooting. I’ll let Jim discuss that bit of fun.
Jim: So the story of much of this game was my SMOKING dice and Gerry’s decidedly not. Gerry’s dice were terrible and to be fair, terrible things everywhere were ashamed of the association because they were that bad. To be fair, I think in the first session I rolled nearly 150 times on IFT as I recall. With all of that rolling, I was destined to roll my share of low DR’s but I seemed to roll those low DR’s when it really mattered. I don’t think I have lost any Infantry to this point and very little are broken.
My Infantry has arrived at this point so I can begin to push forward a little bit. Still, I am in no real rush and I need to clean up the center of the board. Gerry has fallen back or been driven off the hill tops so I have some pretty good freedom of movement. I know at this point that he has 1 HS HIP’d still and I am not sure where. I do make a point to push into the areas he could have a HIP’ster but I have not discovered him yet. The plan from here is to push platoon-sized elements to the wing buildings as I need one of them. I will take whichever proves to be the least defended. Everything else will seek to collapse on the last mandatory VC building. I have a ton of Infantry and a ton of tanks and no CVP cap. Personally, I don’t like these types of scenarios where one side or the other is free to “sleaze-freeze” at will. With so many tanks and early 1PAATC’s, there is limited risk and little downside to freezing at will.
To be continued...
Last edited: