Tuomo
Keeper of the Funk
OK, trying something different for Tuomofest 3 - rather than subject everyone to my horrible video ramblings (aka Turgid Tuomo), let's just stick to the written word, where the Backspace key is your friend and you can edit until it all comes out smooth. Smoothly. Whatever.
FWIW, I'm just going to post to but not read this thread until the game is done, so feel free to offer advice and criticism without feeling like you're kibitzing. I wouldn't listen to you mugs anyway. I always think it's interesting to hear someone's thinking about how they set up; it's fascinating to see what people prioritize and how each person deals with the challenges put forth on the scenario card. Second-guessing someone else's thinking is great entertainment, and I'm sure to offer many opportunities for that.
Tuomo (Lukkari) has played this one before, many moons ago, while I haven't (or at least don't recall), and it seemed appropriate for me to take the Russians and get to have the KV-2s since he had them when we played BoF4 About His Shadowy Sides. Now I get to sit back and enjoy having two invincible tanks that will surely dominate the scenario. Why are we even playing this out?
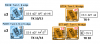
This scenario offers the Russians a frankly weird OB, given the time frame. We're used to seeing crappy Russian tanks in 1941, and the occasional KV-2 comes along to play the role of elephant-among-the-hyenas, but the things that really stole my focus were the GAZ-4M AA truck and the 76LL AA Gun:
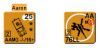
Tim Reade's Critical Moments segment should start right now, because I basically spent 90% of my time trying to figure out a smart thing to do with that AA Truck. I know better, but I couldn't help it. Just look at that thing! SIXTEEN FP! But unarmored! How in the world am I supposed to use THAT?
And so, "preparing a defense" was shelved in favor of "figuring out what the heck to do with the AA Truck". This is absolutely not the way to win an ASL game, but, as Khan would say:

So let's talk about this stupid thing. First let's set the scene, though:
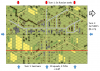
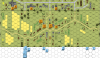
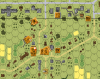
It's June 1941. The Russians set up a mixed bag of stuff on board 49 or board 56 to the west of the red line. On turn 1 the Germans get 10x squads (with leaders and SW and stuff, including a 9-2) plus three PzIVEs, coming in on the east (bottom) edge. On Russian turn 1, they get three crappy tanks coming in on the top edge. On German turn 2, they get three PzIIIH's coming in on either the north or south side.
The game has five full turns. The Germans need to amass more VP than the Russians. CVP count, and each multi-hex building Controlled gets you 2 VP.
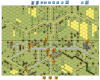
I like to read AARs. I'm not proud, and I hate to miss things that I could have picked up by reading someone else's AAR. So going from what one could Google about this one, it seems that an up-front Festung around 56Q5 is a popular thing to do. Makes sense; the Russians only get 8 squads to start with, and that's not enough to defend the thin line of VC buildings running N-S along board 49. Better to bend that long straight line into an L shape extending forward to 56Q5 where each leg can kinda support the other and possibly denying the Germans some good cover on the assault. Mmkay fine.
With that in mind, one would normally design the defense around one's strongest units, the KV-2s. No, not me. I figure I know what those guys can do. What tasked me was: WHERE to put that stupid AA truck? Critical Moments, indeed.
Begin the Pregame Staring Phase. Wherein you print the map and stare at it. Stare, stare, stare. Waiting for that moment of inspiration.
...
Ayup.
So let's fast forward to the many finalists for where to put this guy.
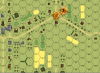
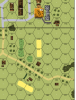
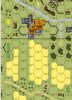
AA1: right out in the open where he'll get one good shot in before dying ingloriously. Look, this guy's destined to lead a short life, and it's stupid to waste so many thought cycles trying to get around that. So why not just Let It Go, put him right up front where maybe he can influence something on turn 1 before he becomes Tuomo's first 4 CVP.
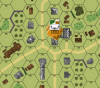
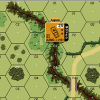
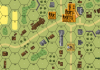
AA2: Hmm. This guy's great against infantry but will draw tanks like flies... how about HIPping the AA Gun nearby and spring an amazing trap! That 76LL AA Gun has a TK of 16 and can chew through any German tank in the game. Won't Your Opponent Be Surprised. Sure, he might suspect a trap, but what's he gonna do about it - ignore it?
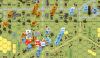
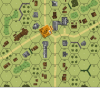
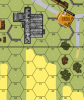
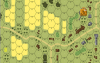
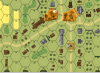
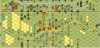
AA3: My personal favorite. Taking a cue from an old DASL Series Replay from The General, you hide a powerful vehicle in Bypass behind a building. Nobody can see this guy at the Q4/Q5/R4 vertex unless they're in the open (from N4) or adjacent (Q5, R4), and neither one is a healthy place to be staring down the barrel of a 16FP AAMG. Massive Style Points, probably prolongs the life of the truck, but does it really aid the defense much?
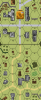
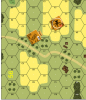
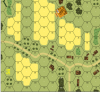
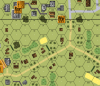
AA4: Hide him in the back far enough to where he could maybe survive all of turn 1. Give the crappy Russian tanks (two 45L and one 76* BT-7s) a chance to come onboard and maybe offer some protection during German turn 2. Downside is, an AAMG has a Normal Range of 8, so you're probably "only" hitting the German infantry with 8 FP.
FWIW, I'm just going to post to but not read this thread until the game is done, so feel free to offer advice and criticism without feeling like you're kibitzing. I wouldn't listen to you mugs anyway. I always think it's interesting to hear someone's thinking about how they set up; it's fascinating to see what people prioritize and how each person deals with the challenges put forth on the scenario card. Second-guessing someone else's thinking is great entertainment, and I'm sure to offer many opportunities for that.
Tuomo (Lukkari) has played this one before, many moons ago, while I haven't (or at least don't recall), and it seemed appropriate for me to take the Russians and get to have the KV-2s since he had them when we played BoF4 About His Shadowy Sides. Now I get to sit back and enjoy having two invincible tanks that will surely dominate the scenario. Why are we even playing this out?
This scenario offers the Russians a frankly weird OB, given the time frame. We're used to seeing crappy Russian tanks in 1941, and the occasional KV-2 comes along to play the role of elephant-among-the-hyenas, but the things that really stole my focus were the GAZ-4M AA truck and the 76LL AA Gun:
Tim Reade's Critical Moments segment should start right now, because I basically spent 90% of my time trying to figure out a smart thing to do with that AA Truck. I know better, but I couldn't help it. Just look at that thing! SIXTEEN FP! But unarmored! How in the world am I supposed to use THAT?
And so, "preparing a defense" was shelved in favor of "figuring out what the heck to do with the AA Truck". This is absolutely not the way to win an ASL game, but, as Khan would say:
So let's talk about this stupid thing. First let's set the scene, though:
It's June 1941. The Russians set up a mixed bag of stuff on board 49 or board 56 to the west of the red line. On turn 1 the Germans get 10x squads (with leaders and SW and stuff, including a 9-2) plus three PzIVEs, coming in on the east (bottom) edge. On Russian turn 1, they get three crappy tanks coming in on the top edge. On German turn 2, they get three PzIIIH's coming in on either the north or south side.
The game has five full turns. The Germans need to amass more VP than the Russians. CVP count, and each multi-hex building Controlled gets you 2 VP.
I like to read AARs. I'm not proud, and I hate to miss things that I could have picked up by reading someone else's AAR. So going from what one could Google about this one, it seems that an up-front Festung around 56Q5 is a popular thing to do. Makes sense; the Russians only get 8 squads to start with, and that's not enough to defend the thin line of VC buildings running N-S along board 49. Better to bend that long straight line into an L shape extending forward to 56Q5 where each leg can kinda support the other and possibly denying the Germans some good cover on the assault. Mmkay fine.
With that in mind, one would normally design the defense around one's strongest units, the KV-2s. No, not me. I figure I know what those guys can do. What tasked me was: WHERE to put that stupid AA truck? Critical Moments, indeed.
Begin the Pregame Staring Phase. Wherein you print the map and stare at it. Stare, stare, stare. Waiting for that moment of inspiration.
...
Ayup.
So let's fast forward to the many finalists for where to put this guy.
AA1: right out in the open where he'll get one good shot in before dying ingloriously. Look, this guy's destined to lead a short life, and it's stupid to waste so many thought cycles trying to get around that. So why not just Let It Go, put him right up front where maybe he can influence something on turn 1 before he becomes Tuomo's first 4 CVP.
AA2: Hmm. This guy's great against infantry but will draw tanks like flies... how about HIPping the AA Gun nearby and spring an amazing trap! That 76LL AA Gun has a TK of 16 and can chew through any German tank in the game. Won't Your Opponent Be Surprised. Sure, he might suspect a trap, but what's he gonna do about it - ignore it?
AA3: My personal favorite. Taking a cue from an old DASL Series Replay from The General, you hide a powerful vehicle in Bypass behind a building. Nobody can see this guy at the Q4/Q5/R4 vertex unless they're in the open (from N4) or adjacent (Q5, R4), and neither one is a healthy place to be staring down the barrel of a 16FP AAMG. Massive Style Points, probably prolongs the life of the truck, but does it really aid the defense much?
AA4: Hide him in the back far enough to where he could maybe survive all of turn 1. Give the crappy Russian tanks (two 45L and one 76* BT-7s) a chance to come onboard and maybe offer some protection during German turn 2. Downside is, an AAMG has a Normal Range of 8, so you're probably "only" hitting the German infantry with 8 FP.
")