von Marwitz
Forum Guru
SP195 Retreat From Hannut - AAR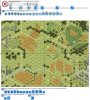
A while ago I came across this early war Westfront scenario, which looked quite interesting. So I gave it a go as the defending French.
By the way:
If you wonder why I always initially merely post the beginnings of AAR's, here is the reason.The games are looged to ROAR and the ASL Scenario Archive webstite. The Scenario Archive allows you to comment on games. As the forum provides better means as simple text, when registering the game into the Archive, I provide a link to the AAR in this forum - for which that link needs to exist. For which I have to create a thread. To prevent forgetting registering the games, this means registration first, full AAR later.
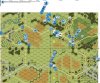
Situation at Game Start:
First, let us have a look at the situation and objectives. The French need to exit at least one of five French H39/H39(L) tanks off the west edge (left) AND if they have a certain number of VP of unbroken Infantry in Stone Buildings on board(s) 59/63 for winning immediately at the end of any player turn.
So, this is the classical 'fall-back defence' scenario. There is a lot of open ground in the center and in the south (bottom) of the playing area. The northern (upper) part of the playing area is somewhat secluded by a strech of Woods and not as open with Brush and Orchards around. The Germans have not less than seven tanks, all with good or even powerful MG armament plus one AC which can move about just as lightning. The French have the aforementioned mix of five H39 and H39(L) at start but get reinforced by two powerful S-35 Soumas in their Turn 2. The Infantry forces are roughly equal in power, but the French are burdened by an ELR of 2.
Basically, the French can set up to avoid most of the Germans in their Turn 1. This is the reasonable thing to do, as they want as many of their forces as possible to reach the Stone Buildings and to allow the exit of the required tank. The German tanks will be faster than the French Infantry can hope to run, so it needs to be protected. The first way on how I determined to do this was to stay out of sight, i.e. to take the 'northern' (upper) route, forfeiting the southern half of the playing area altogether. Personally, I can't see how splitting up the French in an attempt to reach Stone Buildings on both bd 59 and 63 will have any benefit. The southern area is very open and French Infantry will get caught there by German tanks with not many places to Rout to without resorting to Inderdiction.
Instead, I concentrated everything in the north to provide my Infantry with tank cover and to have the flank protected by the woods line. This would allow the Germans to speed along in the south (bottom) freely, but still, it would be a long haul for the Landsers - Riders are not yet allowed. The French 81mm MTR set up in 59M1 waiting for some too careless German Infantry hasting across the open. Its Crew could as well fall back to add to the Infantry within Stone Buildings.
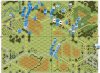
You can see the basic French plan of movement in the above illustration indicated by arrows (red for tank movement, blue for infantry movement) with the turn number added:
If German Infantry and tanks would enter via bd62, they'd need to move partly into the valley, thus no longer being able to harm my French. If German tanks were to emerge on the other side, my tanks or even MG could target them with all the vagaries this entails in these French-German tank duels.
Turn 1 would see my French fall back as fast as possible with some infantry in the Woods line to threaten the German infantry with some long-range shots. Three tanks would move north of the Woods line, two south of it - again to serve as a bit of a speed bump.
In Turn 2 my French would cross the hill or move around it with three tanks. The other two tanks would move up onto the hill either overlooking the eastern side, the western side or stay mostly out of German LOS in the middle. By now, the Germans would probably have reached an area behind the bd59 hill and the village to threaten and to cut off its approaches for my Infantry. So my two Souma S-35 tanks would move into the area, posing a lethal threat to any German vehicle in the area and to provide some cover/ eliminating 'Open Ground' modifiers. When the Germans would close in in their Turn 3, my French would hopefully be concentrated in one area to make them pay for it.
In their Turn 3, the French would either ward off the German AFV or move with the French Infantry using Armored Assault towards the village crossing the dangerous open area in between the village and the hill, and some infantry might even reach a Stone Building and a H39 might drive off for an early French instant win.
My opponent set up to enter most of the German forces via bd53. I welcomed that as it meant my retreat in French Turn 1 would not be much meddled with.
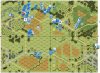
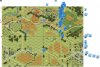
Situation at the End of German Turn 1:

In German Turn 1, my French were completely unharmed by the Germans and beside the German Pz IV in 53P4 there was nothing which could dangerously interfere with my pulling back. Despite the German vehicles having spent 1/4 of their MF at start, I underestimated how quickly they actually can move about on the roads. This would mean they could seriously screw up the area behind the bd59 hill & village which the French would have to cross one turn later. I had furthermore overlooked the possiblilty of Germans moving a MG into the Steeple Location on the bd53 board edge for some long range fire which could cover many Open Ground Locations, albeit at 16+ hexes range which would treat my units as if Concealed due to that range.
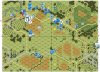
Situation at the End of French Turn 1:
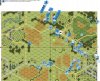
During my French Turn 2, the fall-back proceeded pretty much as planned. Luckily for me the German MMG in the Steeple of 53P3 led by an 8-1 had no effect. Unfortunately, my tank in 62D6 was taken out by a somewhat low odds shot from 63EE5. That was bad, because it makes a big differnce having a single tank face all these German one instead of the Platoon - and I would have to make a TC to attempt non-Platoon movement as well. This meant, that my plan to install this (former) platoon as a flank guard on the hill was in doubt.
To be continued in subsequent post...
von Marwitz
A while ago I came across this early war Westfront scenario, which looked quite interesting. So I gave it a go as the defending French.
By the way:
If you wonder why I always initially merely post the beginnings of AAR's, here is the reason.The games are looged to ROAR and the ASL Scenario Archive webstite. The Scenario Archive allows you to comment on games. As the forum provides better means as simple text, when registering the game into the Archive, I provide a link to the AAR in this forum - for which that link needs to exist. For which I have to create a thread. To prevent forgetting registering the games, this means registration first, full AAR later.
Situation at Game Start:
First, let us have a look at the situation and objectives. The French need to exit at least one of five French H39/H39(L) tanks off the west edge (left) AND if they have a certain number of VP of unbroken Infantry in Stone Buildings on board(s) 59/63 for winning immediately at the end of any player turn.
So, this is the classical 'fall-back defence' scenario. There is a lot of open ground in the center and in the south (bottom) of the playing area. The northern (upper) part of the playing area is somewhat secluded by a strech of Woods and not as open with Brush and Orchards around. The Germans have not less than seven tanks, all with good or even powerful MG armament plus one AC which can move about just as lightning. The French have the aforementioned mix of five H39 and H39(L) at start but get reinforced by two powerful S-35 Soumas in their Turn 2. The Infantry forces are roughly equal in power, but the French are burdened by an ELR of 2.
Basically, the French can set up to avoid most of the Germans in their Turn 1. This is the reasonable thing to do, as they want as many of their forces as possible to reach the Stone Buildings and to allow the exit of the required tank. The German tanks will be faster than the French Infantry can hope to run, so it needs to be protected. The first way on how I determined to do this was to stay out of sight, i.e. to take the 'northern' (upper) route, forfeiting the southern half of the playing area altogether. Personally, I can't see how splitting up the French in an attempt to reach Stone Buildings on both bd 59 and 63 will have any benefit. The southern area is very open and French Infantry will get caught there by German tanks with not many places to Rout to without resorting to Inderdiction.
Instead, I concentrated everything in the north to provide my Infantry with tank cover and to have the flank protected by the woods line. This would allow the Germans to speed along in the south (bottom) freely, but still, it would be a long haul for the Landsers - Riders are not yet allowed. The French 81mm MTR set up in 59M1 waiting for some too careless German Infantry hasting across the open. Its Crew could as well fall back to add to the Infantry within Stone Buildings.
You can see the basic French plan of movement in the above illustration indicated by arrows (red for tank movement, blue for infantry movement) with the turn number added:
If German Infantry and tanks would enter via bd62, they'd need to move partly into the valley, thus no longer being able to harm my French. If German tanks were to emerge on the other side, my tanks or even MG could target them with all the vagaries this entails in these French-German tank duels.
Turn 1 would see my French fall back as fast as possible with some infantry in the Woods line to threaten the German infantry with some long-range shots. Three tanks would move north of the Woods line, two south of it - again to serve as a bit of a speed bump.
In Turn 2 my French would cross the hill or move around it with three tanks. The other two tanks would move up onto the hill either overlooking the eastern side, the western side or stay mostly out of German LOS in the middle. By now, the Germans would probably have reached an area behind the bd59 hill and the village to threaten and to cut off its approaches for my Infantry. So my two Souma S-35 tanks would move into the area, posing a lethal threat to any German vehicle in the area and to provide some cover/ eliminating 'Open Ground' modifiers. When the Germans would close in in their Turn 3, my French would hopefully be concentrated in one area to make them pay for it.
In their Turn 3, the French would either ward off the German AFV or move with the French Infantry using Armored Assault towards the village crossing the dangerous open area in between the village and the hill, and some infantry might even reach a Stone Building and a H39 might drive off for an early French instant win.
My opponent set up to enter most of the German forces via bd53. I welcomed that as it meant my retreat in French Turn 1 would not be much meddled with.
Situation at the End of German Turn 1:
In German Turn 1, my French were completely unharmed by the Germans and beside the German Pz IV in 53P4 there was nothing which could dangerously interfere with my pulling back. Despite the German vehicles having spent 1/4 of their MF at start, I underestimated how quickly they actually can move about on the roads. This would mean they could seriously screw up the area behind the bd59 hill & village which the French would have to cross one turn later. I had furthermore overlooked the possiblilty of Germans moving a MG into the Steeple Location on the bd53 board edge for some long range fire which could cover many Open Ground Locations, albeit at 16+ hexes range which would treat my units as if Concealed due to that range.
Situation at the End of French Turn 1:
During my French Turn 2, the fall-back proceeded pretty much as planned. Luckily for me the German MMG in the Steeple of 53P3 led by an 8-1 had no effect. Unfortunately, my tank in 62D6 was taken out by a somewhat low odds shot from 63EE5. That was bad, because it makes a big differnce having a single tank face all these German one instead of the Platoon - and I would have to make a TC to attempt non-Platoon movement as well. This meant, that my plan to install this (former) platoon as a flank guard on the hill was in doubt.
To be continued in subsequent post...
von Marwitz
Last edited: