Larry
Elder Member
Repost from the VASL League Thread ... because it is more of an AAR than a report of the resolution.
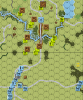
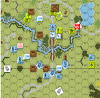
David Rosner's Germans attacked Larry Rohlfing's Americans in SP176 Smiling Albert.
The game started auspiciously enough with Germans entering vehicles firing at two forward locations ... just for acq. The roll, 1,1. That's an improbable hit so let's see what happens, dr 1. Twice. Two HS evaporated into pink mist on a 36 -2 IFT roll. Having exorcised the pro-German rolls on turn 1 enter the M10 GMC. One behind the wall, backing in to avoid bogging in the wrong hex or in the wrong location. One on the bridge. Thought on the little bridge would be HD. I was wrong.
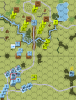
Turn 2 the Germans moved into position with two Tigers facing one M10. Waited too long and should have taken the shot on the stop MP. Deprived myself of an early IF. DFire was just acq. Bottom of two, hull hit and a kill, no rate. Target the second cat, miss. IF shot hit, and bounce. In the DFPh, the cat bears down and misses. He takes the IF shot and secures a hit. The TK roll -- 6,6. He would die at the top of 3 but that is another turn that the Germans did not move that tank.
Turn 3, the Germans skirt off road along the edge. The secret dr 4 and DR 12 - just waiting to spill the bad news. Bog with the side facing the remaining M10. Wait out the MPh and killed it in the DFPh. Infantry movement still behind the stream.
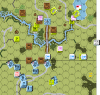
Turn 4, the Germans confess that the SP scenarios are designed to pressure and with three turns to go, the clock is starting to get short. The Germans skip the prep and go to movement. One BAZ with a leader and the M10 are guarding the elevated road. The Germans send one Tiger to the right and stop with the building adjacent to the little bridge in between -- out of LOS. One squad pins on the elevated bridge. Three squads and a leader rush the stream, 4-2 shot from the M10 AAMG, pinned leader, one squad passes, and two break. The other vehicles both dr 2 and DR 10 to bog out. Down to one mobile vehicle and a lot of Americans with angry lead and hard metals left, David tendered his resignation.
Good game. Should have avoided using the little bridge as cover. It did slow the Germans down but both behind the walls for HD is probably the best placement. I used the write-up described placement of the mortar and other units on the German side of the stream. They all died by the end of turn 3 but that was the point, burn the first 3 turns to put serious pressure to motate on the Germans. As with many Schwerpunkt scenarios, the key for either player is to bloody the opponent on turn 1 and then haul tail to the VC. Small scenario but a quick play and fun.
David Rosner's Germans attacked Larry Rohlfing's Americans in SP176 Smiling Albert.
The game started auspiciously enough with Germans entering vehicles firing at two forward locations ... just for acq. The roll, 1,1. That's an improbable hit so let's see what happens, dr 1. Twice. Two HS evaporated into pink mist on a 36 -2 IFT roll. Having exorcised the pro-German rolls on turn 1 enter the M10 GMC. One behind the wall, backing in to avoid bogging in the wrong hex or in the wrong location. One on the bridge. Thought on the little bridge would be HD. I was wrong.
Turn 2 the Germans moved into position with two Tigers facing one M10. Waited too long and should have taken the shot on the stop MP. Deprived myself of an early IF. DFire was just acq. Bottom of two, hull hit and a kill, no rate. Target the second cat, miss. IF shot hit, and bounce. In the DFPh, the cat bears down and misses. He takes the IF shot and secures a hit. The TK roll -- 6,6. He would die at the top of 3 but that is another turn that the Germans did not move that tank.
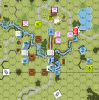
Turn 3, the Germans skirt off road along the edge. The secret dr 4 and DR 12 - just waiting to spill the bad news. Bog with the side facing the remaining M10. Wait out the MPh and killed it in the DFPh. Infantry movement still behind the stream.
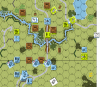
Turn 4, the Germans confess that the SP scenarios are designed to pressure and with three turns to go, the clock is starting to get short. The Germans skip the prep and go to movement. One BAZ with a leader and the M10 are guarding the elevated road. The Germans send one Tiger to the right and stop with the building adjacent to the little bridge in between -- out of LOS. One squad pins on the elevated bridge. Three squads and a leader rush the stream, 4-2 shot from the M10 AAMG, pinned leader, one squad passes, and two break. The other vehicles both dr 2 and DR 10 to bog out. Down to one mobile vehicle and a lot of Americans with angry lead and hard metals left, David tendered his resignation.
Good game. Should have avoided using the little bridge as cover. It did slow the Germans down but both behind the walls for HD is probably the best placement. I used the write-up described placement of the mortar and other units on the German side of the stream. They all died by the end of turn 3 but that was the point, burn the first 3 turns to put serious pressure to motate on the Germans. As with many Schwerpunkt scenarios, the key for either player is to bloody the opponent on turn 1 and then haul tail to the VC. Small scenario but a quick play and fun.