Adrian Carter
Senior Member
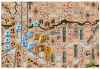
We decided to have some more ASL fun in Stalingrad and move onto RB3 Bread Factory #2. This scenario is set just south of the Barrikady in Stalingrad on 25 Oktober 1942. Elements of the German 64. Kradschützen-Batallion and the 103. Panzergrenadier-Regiment are attempting to take Bread Factory #2 from 768th Russian Rifle Regiment supported by a 45L AT gun. The Germans receive reinforcements from the 14. Panzer-Division on turn 2 and the Russians receive reinforcements from the 62nd Army on turn 3. The support weapons are a mix of machine-guns and DCs. The ROAR database showed 146 (16) Russian wins verses 163 (17) German wins for the original Red Barricades scenario (Red Factories version numbers in parentheses). Thus it appeared to be both balanced and popular. We played the Red Factories' version. I attacked with the Russians and my regular gaming buddy, Johan, defended with the Russians.

Start of Game. The Russians appeared to have the victory buildings in F42 and G43 only relatively lightly defended with the bulk of their forces in the factory itself (H41). I decided to create a 9-2, 2x467w/HMG kill stack in C42 to suppress the Russians in the victory hexes and stack my 9-1 (Wachtmeister Esser) with the 548w/DC in F44. The rest of my forces would advance cautiously from the cover of the railway embankments in the west.
Start of turn 3. The game started in true ASL style. I rolled a 1 at the start of the Prep Fire Phase, thereby immediately activating Wachtmeister Esser. However, every Russian counter was concealed and therefore after a bit of head-scratching and rule book reading we came to the conclusion that, according to A15.44, the berserk result was transmuted to Battle Hardening because no Known enemy units were in LOS. Thus the Germans had a Fanatic 548 and another 9-2 leader. What a start! The HMG kill stack did its duty and supressed the Russians. By the start of turn 3, the Germans had secured both victory hexes, advanced the reinforcements without loss, and located the 45L AT gun which was no pounding the Germans in G43. The ROF 3 is daunting even though a hit is only resolved on the IFT 4 column, CHs notwithstanding. All the Germans now needed to do was silence the Russian 45L gun, secure their flanks and create enfilading fire lanes to defend against the Russian reinforcements.
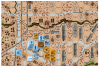
End of Game. Things were apparently looking good for the Germans towards the end of turn 6. Two Heat of Battle DRs had each created German Heroes. The Germans had cleared the Russians (including the pesky Commissar) out from the H41 building. The Russian counterattack with reinforcements from the east had been brought to a crashing halt by German machine-gun fire. Then it all changed in the last Russian APh. Johan announced a HIP Russian MMC in the upper level of G43 to deny German Control of the building. I had somehow missed that both the victory buildings have large centre dots which mean they had upper levels (B3.3). I will not make that mistake again. Nevertheless, this was a nice tight scenario that captured the vicious, close-range combat of Stalingrad.
- German advantages: elite and 1st line MMCs, leadership, HMG, concealment
German disadvantages: open ground - Russian advantages: elite and 1st line MMCs, HMG and MMG, 45L AT gun, concealment
Russian disadvantages: inadequate forces, isolated defensive position
Start of Game. The Russians appeared to have the victory buildings in F42 and G43 only relatively lightly defended with the bulk of their forces in the factory itself (H41). I decided to create a 9-2, 2x467w/HMG kill stack in C42 to suppress the Russians in the victory hexes and stack my 9-1 (Wachtmeister Esser) with the 548w/DC in F44. The rest of my forces would advance cautiously from the cover of the railway embankments in the west.
Start of turn 3. The game started in true ASL style. I rolled a 1 at the start of the Prep Fire Phase, thereby immediately activating Wachtmeister Esser. However, every Russian counter was concealed and therefore after a bit of head-scratching and rule book reading we came to the conclusion that, according to A15.44, the berserk result was transmuted to Battle Hardening because no Known enemy units were in LOS. Thus the Germans had a Fanatic 548 and another 9-2 leader. What a start! The HMG kill stack did its duty and supressed the Russians. By the start of turn 3, the Germans had secured both victory hexes, advanced the reinforcements without loss, and located the 45L AT gun which was no pounding the Germans in G43. The ROF 3 is daunting even though a hit is only resolved on the IFT 4 column, CHs notwithstanding. All the Germans now needed to do was silence the Russian 45L gun, secure their flanks and create enfilading fire lanes to defend against the Russian reinforcements.
End of Game. Things were apparently looking good for the Germans towards the end of turn 6. Two Heat of Battle DRs had each created German Heroes. The Germans had cleared the Russians (including the pesky Commissar) out from the H41 building. The Russian counterattack with reinforcements from the east had been brought to a crashing halt by German machine-gun fire. Then it all changed in the last Russian APh. Johan announced a HIP Russian MMC in the upper level of G43 to deny German Control of the building. I had somehow missed that both the victory buildings have large centre dots which mean they had upper levels (B3.3). I will not make that mistake again. Nevertheless, this was a nice tight scenario that captured the vicious, close-range combat of Stalingrad.

