Doug Leslie
Elder Member
For this AAR, I am doing things slightly differently. I am setting down my thoughts on set up before playing the scenario and we will see how my initial deployment works out. (Marc’s noted were added after the game).
This scenario originally appeared as part of the Gung Ho module and re-appeared unchanged in “Rising Sun”. It has resided unplayed on my bookshelf for over thirty years and is one of only two scenarios in Gung Ho which I have never played (the other being “Bloody Red Beach” which, to date, I have not plucked up the courage to attempt). This is another scenario that my opponent, Marc Hanna, helped to playtest back in the day. I gather that he had the Chinese side and that things didn’t go well! Now is his chance to set the record straight.
[Marc – Thanks Doug, yes, I play-tested this scenario back in the day and I had decided that Panjis were a bit of a joke and I tried to skip right through them and pass normal morale checks. Well, the skip-to-my-lou turned into a bloodbath as I failed morale checks and immediately got hammered by Japanese defensive first fire.
I know Doug is quite a devious and resourceful defender. After my clash with him in Russia where he also had a prepared defence, my guess was that he would make me pay with mines, wire and Panjis right along the initial setup line. His defence will be tenacious and dangerous. Therefore, I resolved to approach the Panjis as cautiously as possible and count on the length of the game to make up for loss of speed due to fortifications.]
If you were to rate the various nationalities that take part in ASL, the Chinese would be somewhere in the relegation zone in the company of the Italians, Axis minors and the African warriors that seem to cause terrible grief to Von Trotta’s forces in his hilarious “Silly AARs” that are one of my favourite features on Game Squad. Since I am playing the Japanese defenders in this scenario, I feel a sense of optimism as I take out the scenario card to inspect what kind of force will be arrayed against my Sons of Nippon. Let’s see now….HOLY CRAP! What kind of denizens from Hell are these? This is no ordinary Chinese force: twenty elite 537s and five HS with great leadership including a 9-2 who will doubtless be directing copious machine gun fire in the direction of my unfortunate troops. In addition, these guys are packing light mortars, bazookas, three flamethrowers and three demo charges. And what is that radio on the scenario card? It’s a module of 100mm OBA, that’s what. Good grief. Let’s check out the SSRs.
No buildings are huts…blah blah blah… canal is a stream…blah blah blah…three buildings have a second level which can accommodate one leader and two PP of SW…blah blah blah…Chinese have one module of 120mm OBA directed by an aerial observer…blah blah blah…wait, what? A second artillery module? With an aerial observer? Are you kidding me? Wait, there’s more. Both modules get pre-registered hexes and therefore an extra black chit apiece. Seriously?
Back to the scenario card. Chinese SWs can set up mantled or dismantled as they see fit (is that not always the case?)…blah blah blah…Chinese receive air support in the shape of 3 FBs with bombs which arrive on turn one and remain until the end of eternity or turn 12, whichever comes first… Oh. My. God.
Better check out what kind of FBs the Chinese have at their disposal although I have a horrible feeling that I know the answer. Yup, just as I thought. Not content with arming and training these monsters, the US of A has also kindly supplied them with aircraft in the shape of 1944 US FBs. All rules pertaining to US FBs apply…blah blah…including the possible use of napalm…blah blah…hold on…NAPALM??? I have never used or been subjected to napalm in any ASL game up until now, but I have watched “Apocalypse Now” often enough to know that it is very nasty stuff which apparently creates a lovely smell in the morning for those of a psychopathic disposition. Does Marc know that this is a possible option? If not, should I remind him? I guess so, since it is the honourable thing to do and whoever designed this scenario presumably felt that this Chinese force might not be up to its task unless napalm were added as a possibility. All it needs is a secret dr of 3.
[Marc- Doug carries on a bit about this Napalm as you will also see later. The fact is, I did know I could roll for it, and I did do it. What I forgot to do was make a secret dr. At least that’s what I remember and I’m sticking to it.
Anyway, Doug is right about many things regarding my OB. It’s definitely a fine collection of assets to take under command. I decided to put my pre-registered hexes in the rear of his defense in the hopes of getting some critical FFEs/Smoke to help me with the crossing of the canal later. 537s are nice but they sleaze to 337s due to ELR and the FTs have a B# of 9. I resolved to ration my firepower to make sure I had stuff for the endgame, especially some fighter bombers. I’d be very cautious using them if there were positive drms to sighting task checks that could lead to an early recall (or worse, a mistaken attack followed by a recall!)]
And what, those of you who are unfamiliar with this scenario are no doubt wondering, is the task set for the Chinese? I will tell you. They actually have two ways to win the game. The first way is to control the stone building at 23W7 (one of the three to which I alluded earlier) by the end of game turn 6. If that doesn’t work, not to worry. They have an additional six turns available to control eight of the twelve buildings located south of the board 23 canal…sorry, canal shaped stream. If, at first, you don’t succeed…
Marc – I hadn’t paid really considered trying to secure the first objective for the win, because I had already decided to approach his defences with extreme caution. I didn’t want to ever witness again 6 full squads impaled on Panjis taken out by Japanese firepower! My preregistered hexes were chosen to help secure the further objective. Of course, Doug didn’t know that so he had to plan to stop me before I could get to the first building win.
As if all of this is not enough, the Japanese command post will be subjected to constant harassment by my cocker spaniel puppy ranging from jumping on top of me, eating the tablecloth and crapping on the carpet. This will be Marc’s secret weapon and here is a picture of the malignant hound in action.

Okay, so let’s look at the force that is supposed to stop this Chinese juggernaut while being subjected to attack by the Hound of the Baskervilles. Basically, the defenders comprise a company of Japanese first line units who are pretty well armed with a .50 cal HMG, a regular HMG, two MMGs, 3 LMGs, two light mortars and two demo charges. They have a 20L AA gun, which needs a DR of two in order to cause any damage to a fighter bomber, and a 70mm INF gun. They also have four pillboxes, four trenches for bunker creation purposes, eight wire counters, 24 Minefield factors and a lot of sharp pointy sticks in the ground called panjis. These can cover twenty hexsides. Not to be left out of the OBA fest, the Japanese receive a relatively puny battery of 70mm OBA directed by an observer with a field phone. This is a good thing because it means that my observer will maintain contact with his OBA battery on any DR apart from a 12 and this is unaffected by the +1 DRM that applies to radio contact attempts in the PTO.
After much thought, I decided on this defensive set up (that is the Chinese OB on the left in case you didn’t believe me).
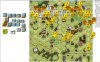
[Marc – I’ll insert a remark here that, whatever his setup, I was going to try for a big push on his left flank through the village rather than the woodsy approach. I was afraid of his artillery hitting me in the jungle. I would send a recon probe on his left to keep him busy, if possible, but the main focus would be on the right.]
All panjis set up HIP as do the 237s in FF4/GG4, 3 of the pillboxes with occupants, both guns, tunnels, minefields and the bunker with contents in V4 and W4. The pillbox in Z7 is in open ground and starts unconcealed by SSR. The only Japanese unit not in view is my field phone observer which starts HIP in the second level of 23Z6, from where it has a splendid view of many of the likely Chinese approach paths. The only unit that starts in the victory building is the INF gun, but there are two tunnels from which it can be reinforced, including the one from the Z7 pillbox. I substituted three fortified locations for tunnels but fortified the victory building for obvious reasons.
The reason that I choose this set up is dictated by the victory conditions. I am forced to defend W8 and this has to take priority over defending the canal/stream against the secondary VC. The defence also has to interact with the panjis which are at their most effective in bamboo and jungle. Every jungle hexside bordering board 17 has a panji that the Chinese will have to cross to enter its location. For those of you (probably the majority) who are not intimately acquainted with the panji rules, the two most important things to understand are these:
Any unit crossing a panji hexside using non-assault movement is subject to a morale check and possible casualty reduction if the MC results in doubles.
More importantly, since I don’t expect Marc to be using non-assault movement very often when entering jungle locations, the act of entering a panji location, whether using NAM or advancing in the APh, leads to immediate loss of concealment. If you look at my set up, there is only one jungle hex that the Chinese can enter and remain concealed, namely 17V10/22V1. Since I cannot set up on any half hex that is shared with board 17 (unless my reading of A2.3 is incorrect) that hex is panji-free. Since this makes it an obvious infiltration point, I put a minefield beneath the wire in V2. The three remaining minefields go into the buildings in Z1, Z2 and AA2. I am hoping that the panji/wire combo on my left flank will slow down any Chinese advance in the sector. If they come down the middle, the mines will deny safe routes and the MG positions in the AA8/Z7 bunker, together with my units in X2 and Z3 will make it difficult for them to move down the road.
On the right flank, I set up two pillboxes supported by DC units to confront any Chinese who try to take that route. The two squads in CC2 are immune to air attack, being surrounded by obstacles. They will blast any units that arrive unconcealed in CC1. If more DC pain is required, the squad in EE3 can move through the bunker to place one.
A couple of HIP HS lie in wait behind panjis at the board edge in case the enemy manage to use OBA smoke cover to infiltrate down that side. I did originally toy with placing these units HIP in the jungle beside the wire locations with the intention of ambushing any newly revealed Chinese units there but decided against it for two reasons.
Firstly, I used a similar tactic in our first playing of “Closing the Net” and it was pretty successful. I suspect that Marc will remember this and use reconnaissance by fire to flush out any hipsters lurking there regardless of my SAN of 6. Secondly, the Japanese are heavily outnumbered in this scenario and can ill afford to trade squad for squad or even squad for HS.
The two mortar HS will conceal in the jungle hexes on the right flank to shoot at any enemy units that make it to the locations currently occupied by my HIP 237s.
[Marc: Doug did use this nasty tactic with great effect the last time we met, it’s true, and I hadn’t forgotten the hard lessons learned! I wasn’t sure he would try it again, but it was always in the back of my mind – sneaky devil!]
To the rear, my AA gun will shoot at any FBs that come into range and hope to get lucky and roll a 2. That will at least be sufficient to damage a target within range and end its involvement in the battle. A DR of 3 will cause it to evade and break off its attack. The biggest danger to the FBs is posed by the .50 cal HMG located in AA8 which will destroy or damage a FB within range with a DR of 4 or less. It doesn’t get ROF though, so it needs to make every shot count.
Notwithstanding my comments about the strength of the Chinese force, this appears to be a well-balanced scenario on ROAR. The Japanese are always tough on the defence, but I think that the extent to which they manage to use their OBA will be a big factor in whether they can hold off the attackers. The attacking force looks overwhelming, but it is not trivial for its air support and OBA to be brought to bear. My experience of air support is that it rarely does as much damage as I expect. Leaving aside the modest danger posed by my AA defences, this is a battle where opposing units are going to be in close proximity, so the chances of mistaken FB attacks are increased (a one in six chance of rolling a sighting TC of 10+). Against a concealed target, the risk of a mistaken attack is greater than the chance of hitting the intended target. Against units moving in the open however, the FBs will be deadly, so I have placed tunnels in locations that will allow forward units to filter back towards the victory building and emerge concealed. The possibility of napalm is a worry. Any successful attack will place a blaze in the target hex and force all occupants to break and rout away. This makes it very effective against pillboxes and the one in the open in Z7 is a particularly juicy target. Let’s hope that Marc doesn’t have any. This placement gambles that he doesn’t.
The Chinese OBA is not without its drawbacks. For the ground observer, there are no obvious good vantage points to use to call in the artillery. Radio contact is problematic (needs a 7 or less to make contact and an 8 or less to maintain it compared to the 11 or less required by the Japanese field phone). By the time that the radio observer has gained radio contact, gained battery access and placed a spotting round in the vicinity of my troops, I intend to have retreated out of sight. The aerial observer needs an 8 or less to make contact and a nine or less to maintain it but also has to pass a sighting TC before it can even ask for battery access. I need to have my troops try to stay in cover and maintain concealment as much as possible. The best way to survive an OBA attack is to avoid it in the first place.
If the Japanese get battery access, it is much more difficult for the Chinese to dodge fire since my observer has a good view of where they are coming from and, as the attackers, pulling back out of sight actually suits the defenders quite well. If they aren’t coming forward, they aren’t threatening to win. This is where the field phone gives the Japanese the edge. Barring a double six, my observer is guaranteed to being down fire when the opportunity presents itself. This could be crucial.
Okay, time to save my set up and hit the “send” button to my opponent. Let battle commence!
[Marc – one remark here about Napalm – it’s slightly easier to hit with it, and it does leave a nice smoky fireball, but regular bombs hit with more impact. It was novel having Napalm, for sure, but I didn’t make any adjustments to my strategy for the magic of having Napalm. If it were me setting up, I wouldn’t have worried about whether he had it or not, because there would have been nothing I could about it other than suffer the consequences. However, I am not the greatest defender in the world, and I am sure I am missing something crucial here.]
(To be continued)
This scenario originally appeared as part of the Gung Ho module and re-appeared unchanged in “Rising Sun”. It has resided unplayed on my bookshelf for over thirty years and is one of only two scenarios in Gung Ho which I have never played (the other being “Bloody Red Beach” which, to date, I have not plucked up the courage to attempt). This is another scenario that my opponent, Marc Hanna, helped to playtest back in the day. I gather that he had the Chinese side and that things didn’t go well! Now is his chance to set the record straight.
[Marc – Thanks Doug, yes, I play-tested this scenario back in the day and I had decided that Panjis were a bit of a joke and I tried to skip right through them and pass normal morale checks. Well, the skip-to-my-lou turned into a bloodbath as I failed morale checks and immediately got hammered by Japanese defensive first fire.
I know Doug is quite a devious and resourceful defender. After my clash with him in Russia where he also had a prepared defence, my guess was that he would make me pay with mines, wire and Panjis right along the initial setup line. His defence will be tenacious and dangerous. Therefore, I resolved to approach the Panjis as cautiously as possible and count on the length of the game to make up for loss of speed due to fortifications.]
If you were to rate the various nationalities that take part in ASL, the Chinese would be somewhere in the relegation zone in the company of the Italians, Axis minors and the African warriors that seem to cause terrible grief to Von Trotta’s forces in his hilarious “Silly AARs” that are one of my favourite features on Game Squad. Since I am playing the Japanese defenders in this scenario, I feel a sense of optimism as I take out the scenario card to inspect what kind of force will be arrayed against my Sons of Nippon. Let’s see now….HOLY CRAP! What kind of denizens from Hell are these? This is no ordinary Chinese force: twenty elite 537s and five HS with great leadership including a 9-2 who will doubtless be directing copious machine gun fire in the direction of my unfortunate troops. In addition, these guys are packing light mortars, bazookas, three flamethrowers and three demo charges. And what is that radio on the scenario card? It’s a module of 100mm OBA, that’s what. Good grief. Let’s check out the SSRs.
No buildings are huts…blah blah blah… canal is a stream…blah blah blah…three buildings have a second level which can accommodate one leader and two PP of SW…blah blah blah…Chinese have one module of 120mm OBA directed by an aerial observer…blah blah blah…wait, what? A second artillery module? With an aerial observer? Are you kidding me? Wait, there’s more. Both modules get pre-registered hexes and therefore an extra black chit apiece. Seriously?
Back to the scenario card. Chinese SWs can set up mantled or dismantled as they see fit (is that not always the case?)…blah blah blah…Chinese receive air support in the shape of 3 FBs with bombs which arrive on turn one and remain until the end of eternity or turn 12, whichever comes first… Oh. My. God.
Better check out what kind of FBs the Chinese have at their disposal although I have a horrible feeling that I know the answer. Yup, just as I thought. Not content with arming and training these monsters, the US of A has also kindly supplied them with aircraft in the shape of 1944 US FBs. All rules pertaining to US FBs apply…blah blah…including the possible use of napalm…blah blah…hold on…NAPALM??? I have never used or been subjected to napalm in any ASL game up until now, but I have watched “Apocalypse Now” often enough to know that it is very nasty stuff which apparently creates a lovely smell in the morning for those of a psychopathic disposition. Does Marc know that this is a possible option? If not, should I remind him? I guess so, since it is the honourable thing to do and whoever designed this scenario presumably felt that this Chinese force might not be up to its task unless napalm were added as a possibility. All it needs is a secret dr of 3.
[Marc- Doug carries on a bit about this Napalm as you will also see later. The fact is, I did know I could roll for it, and I did do it. What I forgot to do was make a secret dr. At least that’s what I remember and I’m sticking to it.
Anyway, Doug is right about many things regarding my OB. It’s definitely a fine collection of assets to take under command. I decided to put my pre-registered hexes in the rear of his defense in the hopes of getting some critical FFEs/Smoke to help me with the crossing of the canal later. 537s are nice but they sleaze to 337s due to ELR and the FTs have a B# of 9. I resolved to ration my firepower to make sure I had stuff for the endgame, especially some fighter bombers. I’d be very cautious using them if there were positive drms to sighting task checks that could lead to an early recall (or worse, a mistaken attack followed by a recall!)]
And what, those of you who are unfamiliar with this scenario are no doubt wondering, is the task set for the Chinese? I will tell you. They actually have two ways to win the game. The first way is to control the stone building at 23W7 (one of the three to which I alluded earlier) by the end of game turn 6. If that doesn’t work, not to worry. They have an additional six turns available to control eight of the twelve buildings located south of the board 23 canal…sorry, canal shaped stream. If, at first, you don’t succeed…
Marc – I hadn’t paid really considered trying to secure the first objective for the win, because I had already decided to approach his defences with extreme caution. I didn’t want to ever witness again 6 full squads impaled on Panjis taken out by Japanese firepower! My preregistered hexes were chosen to help secure the further objective. Of course, Doug didn’t know that so he had to plan to stop me before I could get to the first building win.
As if all of this is not enough, the Japanese command post will be subjected to constant harassment by my cocker spaniel puppy ranging from jumping on top of me, eating the tablecloth and crapping on the carpet. This will be Marc’s secret weapon and here is a picture of the malignant hound in action.
Okay, so let’s look at the force that is supposed to stop this Chinese juggernaut while being subjected to attack by the Hound of the Baskervilles. Basically, the defenders comprise a company of Japanese first line units who are pretty well armed with a .50 cal HMG, a regular HMG, two MMGs, 3 LMGs, two light mortars and two demo charges. They have a 20L AA gun, which needs a DR of two in order to cause any damage to a fighter bomber, and a 70mm INF gun. They also have four pillboxes, four trenches for bunker creation purposes, eight wire counters, 24 Minefield factors and a lot of sharp pointy sticks in the ground called panjis. These can cover twenty hexsides. Not to be left out of the OBA fest, the Japanese receive a relatively puny battery of 70mm OBA directed by an observer with a field phone. This is a good thing because it means that my observer will maintain contact with his OBA battery on any DR apart from a 12 and this is unaffected by the +1 DRM that applies to radio contact attempts in the PTO.
After much thought, I decided on this defensive set up (that is the Chinese OB on the left in case you didn’t believe me).
[Marc – I’ll insert a remark here that, whatever his setup, I was going to try for a big push on his left flank through the village rather than the woodsy approach. I was afraid of his artillery hitting me in the jungle. I would send a recon probe on his left to keep him busy, if possible, but the main focus would be on the right.]
All panjis set up HIP as do the 237s in FF4/GG4, 3 of the pillboxes with occupants, both guns, tunnels, minefields and the bunker with contents in V4 and W4. The pillbox in Z7 is in open ground and starts unconcealed by SSR. The only Japanese unit not in view is my field phone observer which starts HIP in the second level of 23Z6, from where it has a splendid view of many of the likely Chinese approach paths. The only unit that starts in the victory building is the INF gun, but there are two tunnels from which it can be reinforced, including the one from the Z7 pillbox. I substituted three fortified locations for tunnels but fortified the victory building for obvious reasons.
The reason that I choose this set up is dictated by the victory conditions. I am forced to defend W8 and this has to take priority over defending the canal/stream against the secondary VC. The defence also has to interact with the panjis which are at their most effective in bamboo and jungle. Every jungle hexside bordering board 17 has a panji that the Chinese will have to cross to enter its location. For those of you (probably the majority) who are not intimately acquainted with the panji rules, the two most important things to understand are these:
Any unit crossing a panji hexside using non-assault movement is subject to a morale check and possible casualty reduction if the MC results in doubles.
More importantly, since I don’t expect Marc to be using non-assault movement very often when entering jungle locations, the act of entering a panji location, whether using NAM or advancing in the APh, leads to immediate loss of concealment. If you look at my set up, there is only one jungle hex that the Chinese can enter and remain concealed, namely 17V10/22V1. Since I cannot set up on any half hex that is shared with board 17 (unless my reading of A2.3 is incorrect) that hex is panji-free. Since this makes it an obvious infiltration point, I put a minefield beneath the wire in V2. The three remaining minefields go into the buildings in Z1, Z2 and AA2. I am hoping that the panji/wire combo on my left flank will slow down any Chinese advance in the sector. If they come down the middle, the mines will deny safe routes and the MG positions in the AA8/Z7 bunker, together with my units in X2 and Z3 will make it difficult for them to move down the road.
On the right flank, I set up two pillboxes supported by DC units to confront any Chinese who try to take that route. The two squads in CC2 are immune to air attack, being surrounded by obstacles. They will blast any units that arrive unconcealed in CC1. If more DC pain is required, the squad in EE3 can move through the bunker to place one.
A couple of HIP HS lie in wait behind panjis at the board edge in case the enemy manage to use OBA smoke cover to infiltrate down that side. I did originally toy with placing these units HIP in the jungle beside the wire locations with the intention of ambushing any newly revealed Chinese units there but decided against it for two reasons.
Firstly, I used a similar tactic in our first playing of “Closing the Net” and it was pretty successful. I suspect that Marc will remember this and use reconnaissance by fire to flush out any hipsters lurking there regardless of my SAN of 6. Secondly, the Japanese are heavily outnumbered in this scenario and can ill afford to trade squad for squad or even squad for HS.
The two mortar HS will conceal in the jungle hexes on the right flank to shoot at any enemy units that make it to the locations currently occupied by my HIP 237s.
[Marc: Doug did use this nasty tactic with great effect the last time we met, it’s true, and I hadn’t forgotten the hard lessons learned! I wasn’t sure he would try it again, but it was always in the back of my mind – sneaky devil!]
To the rear, my AA gun will shoot at any FBs that come into range and hope to get lucky and roll a 2. That will at least be sufficient to damage a target within range and end its involvement in the battle. A DR of 3 will cause it to evade and break off its attack. The biggest danger to the FBs is posed by the .50 cal HMG located in AA8 which will destroy or damage a FB within range with a DR of 4 or less. It doesn’t get ROF though, so it needs to make every shot count.
Notwithstanding my comments about the strength of the Chinese force, this appears to be a well-balanced scenario on ROAR. The Japanese are always tough on the defence, but I think that the extent to which they manage to use their OBA will be a big factor in whether they can hold off the attackers. The attacking force looks overwhelming, but it is not trivial for its air support and OBA to be brought to bear. My experience of air support is that it rarely does as much damage as I expect. Leaving aside the modest danger posed by my AA defences, this is a battle where opposing units are going to be in close proximity, so the chances of mistaken FB attacks are increased (a one in six chance of rolling a sighting TC of 10+). Against a concealed target, the risk of a mistaken attack is greater than the chance of hitting the intended target. Against units moving in the open however, the FBs will be deadly, so I have placed tunnels in locations that will allow forward units to filter back towards the victory building and emerge concealed. The possibility of napalm is a worry. Any successful attack will place a blaze in the target hex and force all occupants to break and rout away. This makes it very effective against pillboxes and the one in the open in Z7 is a particularly juicy target. Let’s hope that Marc doesn’t have any. This placement gambles that he doesn’t.
The Chinese OBA is not without its drawbacks. For the ground observer, there are no obvious good vantage points to use to call in the artillery. Radio contact is problematic (needs a 7 or less to make contact and an 8 or less to maintain it compared to the 11 or less required by the Japanese field phone). By the time that the radio observer has gained radio contact, gained battery access and placed a spotting round in the vicinity of my troops, I intend to have retreated out of sight. The aerial observer needs an 8 or less to make contact and a nine or less to maintain it but also has to pass a sighting TC before it can even ask for battery access. I need to have my troops try to stay in cover and maintain concealment as much as possible. The best way to survive an OBA attack is to avoid it in the first place.
If the Japanese get battery access, it is much more difficult for the Chinese to dodge fire since my observer has a good view of where they are coming from and, as the attackers, pulling back out of sight actually suits the defenders quite well. If they aren’t coming forward, they aren’t threatening to win. This is where the field phone gives the Japanese the edge. Barring a double six, my observer is guaranteed to being down fire when the opportunity presents itself. This could be crucial.
Okay, time to save my set up and hit the “send” button to my opponent. Let battle commence!
[Marc – one remark here about Napalm – it’s slightly easier to hit with it, and it does leave a nice smoky fireball, but regular bombs hit with more impact. It was novel having Napalm, for sure, but I didn’t make any adjustments to my strategy for the magic of having Napalm. If it were me setting up, I wouldn’t have worried about whether he had it or not, because there would have been nothing I could about it other than suffer the consequences. However, I am not the greatest defender in the world, and I am sure I am missing something crucial here.]
(To be continued)
Last edited: