J55 – Matsumoto’s Charge
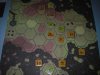
A five turn scenario in ASL Journal # 3 that pits a platoon of U.S. Marauders, defending the village & the eastern hill, against two platoons of attacking Japanese (from the west). The Americans have a Nisei hero (Matsumoto) that can enforce a 2TC roll on any Japanese MMC in his LOS: if the Japanese unit fails the TC, they are forced to banzai charge at the U.S. defences.
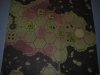
The U.S. forces set up 2 squads in Foxholes on the east hill; a MMG squad is HIP in the palm grove in front of the village; the hero is concealed in the kunai patch with a ½ squad to protect the U.S. right flank.
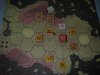
Game Turn 1 –
All but one Japanese unit goes CX, both entrentched U.S. units fire in DefFirstFire & DefFire; a 1 ResidualFire in Open Ground stripes a Japanese Elite squad. The 10-1 leader + 2 squads w/LMG move around their left flank.
In the American turn, two PrepFire shots are effective, with a ½ squad breaking & the striped squad failing a MC to CR down to a ½ squad. DefFire sees one shot take no effect; in Rout, the broken Japanese ½ squad joins the 10-1 in the jungle. In Advance, the U.S. forces remain where they are.
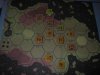
Game Turn 2 –
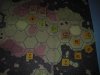
The broken Japanese ½ squad rallies under the 10-1. No PrepFire; in Movement, the revived ½ squad goes CX and runs forward only to be fired on by an entrenched MMG squad in the palm grove: a 4MC is failed & the unit breaks again. Another ½ squad advances into the open & a U.S. ½ squad breaks them on a 1MC. The concealed units on the left both Assault Move into jungle hexes; the 10-1 + 2 squads split right to flank the American position. Two DefFire shots have no effect; no Advancing Fire. Both broken Japanese ½ squads retreat into the right flank jungle. In Advance, 2 squads mount the hillside on their right; the 2 concealed units on the left push forward.
In the Marauders turn, the Japanese ½ squad with the 10-1 leader fails to rally. Two PrepFires result in a pin for the Japanese squad adjacent to the U.S. MMG nest. In Movement, the concealed ½ squad + hero AM toward the village. One DefFire shot fails to harm. No Advancing Fire, no Rout. In Advance, the concealed leader moves uphill to join the entrenched squad; the ½ squad + hero take his place in the village; the MMG squad & village ½ squad swap hexes.
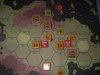
Game Turn 3 –
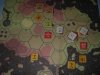
In Rally, the Elite Japanese ½ squad fails to self-rally; the 1st Line ½ squad rallies under the 10-1. No PrepFire; the 2 squads + 10-1 with ½ squad Banzai Charge on the right: with multiple DefFirstFire, SubsequentFirstFire & one FinalProtectiveFire shot, the only result is a striped LMG squad for the Japanese attackers, with two hexes in CloseCombat, and to cap it off, a hot Japanese sniper breaks a U.S. squad on the hill. A squad on the left AM’s into Open Ground, but American DFF cowers for no result! The Japanese reinforcements run towards the jungled hill. In the DefFire Phase, one U.S. shot is blocked by terrain. Advancing Fire sees three shots all fail to harm the Marauders. The broken U.S. squad Routs one hex into the hilltop jungle. In Advance, the Japanese units push forward. The 2 CC’s result in the death of the U.S. ½ squad & a Hand-to-Hand melee between the U.S. MMG squad & Japanese LMG squad.
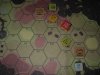
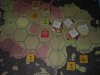
In the American turn, the DM squad fails to self-rally. Two PrepFires result in a Japanese squad striping. In Movement, the reinforcing 8-1 leader & squad enter via AM up onto the hilltop. In DefFire’ 5 shots in DefFire & FinalFire have no results due to several pin checks being passed. No Advancing Fire, no Rout. In Advance, the reserves occupy the vacant hilltop FH; the 9-1 leader goes CX climbing up the hill to the broken ½ squad, and the hero leaves the ½ squad in the huts for the FH’d squad in the hillside palm grove. In the CC Phase, the H-to-H melee results in an American victory in the central hut hex.
A five turn scenario in ASL Journal # 3 that pits a platoon of U.S. Marauders, defending the village & the eastern hill, against two platoons of attacking Japanese (from the west). The Americans have a Nisei hero (Matsumoto) that can enforce a 2TC roll on any Japanese MMC in his LOS: if the Japanese unit fails the TC, they are forced to banzai charge at the U.S. defences.
The U.S. forces set up 2 squads in Foxholes on the east hill; a MMG squad is HIP in the palm grove in front of the village; the hero is concealed in the kunai patch with a ½ squad to protect the U.S. right flank.
Game Turn 1 –
All but one Japanese unit goes CX, both entrentched U.S. units fire in DefFirstFire & DefFire; a 1 ResidualFire in Open Ground stripes a Japanese Elite squad. The 10-1 leader + 2 squads w/LMG move around their left flank.
In the American turn, two PrepFire shots are effective, with a ½ squad breaking & the striped squad failing a MC to CR down to a ½ squad. DefFire sees one shot take no effect; in Rout, the broken Japanese ½ squad joins the 10-1 in the jungle. In Advance, the U.S. forces remain where they are.
Game Turn 2 –
The broken Japanese ½ squad rallies under the 10-1. No PrepFire; in Movement, the revived ½ squad goes CX and runs forward only to be fired on by an entrenched MMG squad in the palm grove: a 4MC is failed & the unit breaks again. Another ½ squad advances into the open & a U.S. ½ squad breaks them on a 1MC. The concealed units on the left both Assault Move into jungle hexes; the 10-1 + 2 squads split right to flank the American position. Two DefFire shots have no effect; no Advancing Fire. Both broken Japanese ½ squads retreat into the right flank jungle. In Advance, 2 squads mount the hillside on their right; the 2 concealed units on the left push forward.
In the Marauders turn, the Japanese ½ squad with the 10-1 leader fails to rally. Two PrepFires result in a pin for the Japanese squad adjacent to the U.S. MMG nest. In Movement, the concealed ½ squad + hero AM toward the village. One DefFire shot fails to harm. No Advancing Fire, no Rout. In Advance, the concealed leader moves uphill to join the entrenched squad; the ½ squad + hero take his place in the village; the MMG squad & village ½ squad swap hexes.
Game Turn 3 –
In Rally, the Elite Japanese ½ squad fails to self-rally; the 1st Line ½ squad rallies under the 10-1. No PrepFire; the 2 squads + 10-1 with ½ squad Banzai Charge on the right: with multiple DefFirstFire, SubsequentFirstFire & one FinalProtectiveFire shot, the only result is a striped LMG squad for the Japanese attackers, with two hexes in CloseCombat, and to cap it off, a hot Japanese sniper breaks a U.S. squad on the hill. A squad on the left AM’s into Open Ground, but American DFF cowers for no result! The Japanese reinforcements run towards the jungled hill. In the DefFire Phase, one U.S. shot is blocked by terrain. Advancing Fire sees three shots all fail to harm the Marauders. The broken U.S. squad Routs one hex into the hilltop jungle. In Advance, the Japanese units push forward. The 2 CC’s result in the death of the U.S. ½ squad & a Hand-to-Hand melee between the U.S. MMG squad & Japanese LMG squad.
In the American turn, the DM squad fails to self-rally. Two PrepFires result in a Japanese squad striping. In Movement, the reinforcing 8-1 leader & squad enter via AM up onto the hilltop. In DefFire’ 5 shots in DefFire & FinalFire have no results due to several pin checks being passed. No Advancing Fire, no Rout. In Advance, the reserves occupy the vacant hilltop FH; the 9-1 leader goes CX climbing up the hill to the broken ½ squad, and the hero leaves the ½ squad in the huts for the FH’d squad in the hillside palm grove. In the CC Phase, the H-to-H melee results in an American victory in the central hut hex.
Attachments
-
 229.4 KB Views: 9
 -
 245.5 KB Views: 10
 -
 288.1 KB Views: 11
 -
 280.9 KB Views: 11
 -
 276.1 KB Views: 13
 -
 251 KB Views: 12