George Kelln
Elder Member
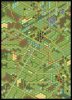
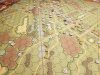
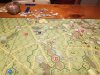
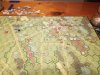
Hell's Highway, TM-Scenario 3 (Eve, 22 Sep 44), end of 7 turns.
SITREP: Evening, 22 September 1944, Mariaheide, Holland:
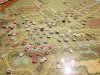
Eastern Flank: While fires burn out of control, the battle rages around the crossroad farmsteading.
The Germans’ counterattack has been blunted, with the Germans losing 2x Panther tanks. The Germans have remaining 3x SPW 251/21 AAht, a SPW 251/9 ht, and a SPW 251/2 and with the Panthers gone are vulnerable to the British Sherman tanks roaming the battlefield. Infantry wise, the German has perhaps 2x Platoons with 6x squads remaining in the area.
The Allies are consolidating their gains hampered by the fire and smoke. The American Paratroopers have cleared the southern farm stead and pushed east to the crossroad steading while the British Sherman tanks having manoeuvred to deal with pair of Panther tanks provide fire support for the paratroopers.
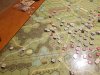
Northeastern Flank: This area has become a tank graveyard, with both sides losing numerous AFV.
The Germans attempting to keep a corridor open, to move supplies and reinforcements, between the Eastern Entry Area and their forces along Hell’s Highway in the north part of the village. The German sent 2x Panthers, 2x SPW 251/21 AAht, but lost a Panther in the process. However, they have managed to clear any Allied forces from the area keeping the corridor open.
The British tried interdict the corridor with a Carrier but it was chased away by a German SPW 251/21 AAht. Meanwhile the British crew continues to try and repair the malfunctioned British 40mm Bofors AA gun, so as be able to interdict the German movement along the eastern flank.
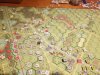
Northern Flank: Fires burn along the railroad, its smoke blanketing the area north of the village.
The Germans conducted a counterattack with a pair of 5-4-8 squads led by a 9-2 leader to regain the buildings and crossroads at the north end of the village. This force was strengthened when it survived a British Thrown DC attack (created a Hero and Battle-Harden a Squad). Clearing the building the force now threatens a British Guards’ Sherman Firefly at the crossroads. The Germans have lost their last northern force Panther tank to a PIAT shot, while attempting to manoeuvre to the eastern flank.
The British southern advance has been stopped, suffering the lost of a couple of squads (1x KIA & 1x PoW), it has been forced to regroup back around a farm stead at the crossroad in the woods. Despite this set back, the British have eliminated the last two Panther tanks in the area.
Centre-Western Flank: the lines have stabilized somewhat as both sides hold their ground.
The Germans’ HQ in the St. Nicholas Convent remains solid, the 10-2 leader direct heavy and accurate fire on any paratroopers who come in range. Along the railroad, the Germans having to reposition 3x 37 Flak Pz AA tanks to the area of the orchard to continue to hold back the paratroopers from advancing north to make contact the with British. The German Panther tank that made a foray into the paratrooper lines, becoming immobilized by 60mm mortar fire, became a pillbox wreaking havoc on the paratroopers. It finally succumb to the paratroopers’ attacks, being destroyed by a bazooka shot from the woods on the west of the intersection.
The American Paratroopers have struggled to push up Hell’s Highway and clear the Germans along it. The Americans continue to be held in the church on the southside of the road, managing to get a squad + MMG across on the right side. The 81mm Mortar team has finally relocated to the graveyard to provide fire support. The Americans’ artillery spotting round has finally come in LOS of its AOT. The paratroopers have taken the brunt of the losses this TM-Scenario, but are starting out flank the Germans’ right side.
During this TM-Scenario both sides felt out their opponent’s position for the first 4 turns, then starting on Turn 5, each side launched an attack in an effort to make gains and capture key terrain before game end. The fact that the scenario has gone the full 8 turns, has both helped and hindered each side, as on the eastern flank the Allies have successful stopped the German attack, and then counterattack capturing ground and eliminating armour. While in the north, it is the opposite, the British attack has been stopped and the German counterattack has regained lost ground at the cost of trading off armour. The final turn will be interesting, as both sides will most likely consolidate their gains in anticipation of the upcoming Consolidation Phase.
SITREP: Evening, 22 September 1944, Mariaheide, Holland:
Eastern Flank: While fires burn out of control, the battle rages around the crossroad farmsteading.
The Germans’ counterattack has been blunted, with the Germans losing 2x Panther tanks. The Germans have remaining 3x SPW 251/21 AAht, a SPW 251/9 ht, and a SPW 251/2 and with the Panthers gone are vulnerable to the British Sherman tanks roaming the battlefield. Infantry wise, the German has perhaps 2x Platoons with 6x squads remaining in the area.
The Allies are consolidating their gains hampered by the fire and smoke. The American Paratroopers have cleared the southern farm stead and pushed east to the crossroad steading while the British Sherman tanks having manoeuvred to deal with pair of Panther tanks provide fire support for the paratroopers.
Northeastern Flank: This area has become a tank graveyard, with both sides losing numerous AFV.
The Germans attempting to keep a corridor open, to move supplies and reinforcements, between the Eastern Entry Area and their forces along Hell’s Highway in the north part of the village. The German sent 2x Panthers, 2x SPW 251/21 AAht, but lost a Panther in the process. However, they have managed to clear any Allied forces from the area keeping the corridor open.
The British tried interdict the corridor with a Carrier but it was chased away by a German SPW 251/21 AAht. Meanwhile the British crew continues to try and repair the malfunctioned British 40mm Bofors AA gun, so as be able to interdict the German movement along the eastern flank.
Northern Flank: Fires burn along the railroad, its smoke blanketing the area north of the village.
The Germans conducted a counterattack with a pair of 5-4-8 squads led by a 9-2 leader to regain the buildings and crossroads at the north end of the village. This force was strengthened when it survived a British Thrown DC attack (created a Hero and Battle-Harden a Squad). Clearing the building the force now threatens a British Guards’ Sherman Firefly at the crossroads. The Germans have lost their last northern force Panther tank to a PIAT shot, while attempting to manoeuvre to the eastern flank.
The British southern advance has been stopped, suffering the lost of a couple of squads (1x KIA & 1x PoW), it has been forced to regroup back around a farm stead at the crossroad in the woods. Despite this set back, the British have eliminated the last two Panther tanks in the area.
Centre-Western Flank: the lines have stabilized somewhat as both sides hold their ground.
The Germans’ HQ in the St. Nicholas Convent remains solid, the 10-2 leader direct heavy and accurate fire on any paratroopers who come in range. Along the railroad, the Germans having to reposition 3x 37 Flak Pz AA tanks to the area of the orchard to continue to hold back the paratroopers from advancing north to make contact the with British. The German Panther tank that made a foray into the paratrooper lines, becoming immobilized by 60mm mortar fire, became a pillbox wreaking havoc on the paratroopers. It finally succumb to the paratroopers’ attacks, being destroyed by a bazooka shot from the woods on the west of the intersection.
The American Paratroopers have struggled to push up Hell’s Highway and clear the Germans along it. The Americans continue to be held in the church on the southside of the road, managing to get a squad + MMG across on the right side. The 81mm Mortar team has finally relocated to the graveyard to provide fire support. The Americans’ artillery spotting round has finally come in LOS of its AOT. The paratroopers have taken the brunt of the losses this TM-Scenario, but are starting out flank the Germans’ right side.
During this TM-Scenario both sides felt out their opponent’s position for the first 4 turns, then starting on Turn 5, each side launched an attack in an effort to make gains and capture key terrain before game end. The fact that the scenario has gone the full 8 turns, has both helped and hindered each side, as on the eastern flank the Allies have successful stopped the German attack, and then counterattack capturing ground and eliminating armour. While in the north, it is the opposite, the British attack has been stopped and the German counterattack has regained lost ground at the cost of trading off armour. The final turn will be interesting, as both sides will most likely consolidate their gains in anticipation of the upcoming Consolidation Phase.