J. R. Tracy
Elder Member
Scenario
HazMo 10 Fresh Grist
Opponent
Paul Chamberland
Renaissance Man
Situation
This is the dawn of WWII, on the outskirts of Shanghai in September 1937. Paul’s IJA was on the attack with a dozen first liners, three 448 Assault Engineers, an HMG, a pair of mediums, some LMGs, a pair of 50mm mortars, two DCs, and a flamethrower. He had four leaders out front and two Chi-Ros in support.
Keep your Co-Prosperity Sphere to yourself
Opposing this mob, I had ten first liners, four 447s, an MMG, three LMGs, a pair of ATRs, and a host of hardware including 37mm and 75mm artillery pieces, a 20L Oerlikon, and a Vickers 6-ton tank. I had great leadership, with a 7-0, an 8-0 Commissar, and a mighty 9-2. I also had two Wire counters, a pair of roadblocks, and three fortified building locations to help me hold the center of the board 53 town.
To win, Paul had to take six of the seven multi-hex buildings (he started with one in hand). The multi-hexers were stone and the rest of the buildings wooden by SSR. Paul could start with 75% of his force (his choice) on board with the balance trickling in beginning on turn three of our seven turns, with the of delaying some reinforcements in exchange for a fighter bomber with bombs.
Gentle probing
My starting force seemed a little light, but an SSR allowed me to ‘buy’ reinforcements: for every three CVP I inflicted, I could purchase a squad (randomly determined to be a 336, 337, or 447) with the possibility of a support weapon and/or leadership (2/3 chance of each). I could buy multiple MMCs at once but only got one roll each for SWs and leaders per turn. On top of all that, all my 447s were automatically Dare-Death squads, no assignment necessary. Close combat would be a bloody two-way affair.
Plan
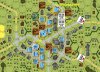
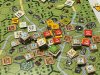
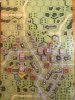
The Japanese set up on/north of hexrow W, while I set up on/south of V. I decided to focus on holding the left, western half of the town, centering my defense on the P3 church. I placed my wire in S4 and S5, and fortified both levels of R2, placing the 75* downstairs and the Oerlikon upstairs to cover the approach through T1/U2/V2 (T2 was rubbled by SSR). I also fortified Q5, and occupied it with the 9-2, directing a 447 with the MMG.
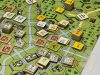
The easy part is over
I put the 37* next door in P5 pointing northeast, where it covered the Q hexrow all the way down to Q10. The Vickers, HIP by SSR, sat in O7 looking down the road through the center of town. I had an ATR on each flank, and a light screen forward on the right; I distributed the balance of the troops evenly after that. The Commissar sat in the church, while the 7-0 backed up the troops on the right. My roadblocks sat in V3/W4 and V8/W9, cutting LOS as much slowing Paul’s armor. I kept a few troops off the front line in case Paul decided to build a kill stack or two to soften things up right off the bat.
My general plan was to reinforce whichever flank was feeling the most pressure, favoring the left otherwise, while hoping to hold the church and one more building for the duration.
Early Going
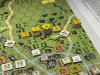
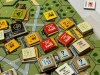
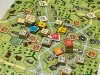
Paul went heavily against my right flank, overrunning my screen and quickly taking the R6 building. He was soon formed up in the angle running from T5 through R6 and out to R9 (Q7 and R7 were shellholes by SSR). Though I was a little sad he didn’t run his jaw straight at my R2 fist, I thought this was still an acceptable development as my western forces were only lightly engaged.
The heavy metal arrives
Overshadowing all of Paul’s early progress was my first roll of Final Fire. I hit a 447 and an FT/DC/448 in T5 with my Q5 MMG/447, directed by the 9-2. I dropped a three on an 8(0) for the dreaded flamethrower Daily Double. The Assault Engineers ate the KIA (thanks to the -1) while the 447 was reduced. Both support weapons were destroyed by the subsequent die rolls (A9.74) and with three CVP in the bag I already had a fresh squad warming up in the bullpen. This was only a hint of things to come.
Uh-Oh!
With my firepower steadily chipping away at Japanese strength, Paul had to jumpstart his attack. After deploying his armor for cover in Q9 and Q10, Paul launched a Banzai charge against my right, on the heels of a DC Hero. My 37* went down to an 11, as did a couple LMGs and my Vickers’ CMG, so Paul was able to crash into the P7 rowhouse. A few of my squads broke on FPF, and though I got my licks in, Paul established himself on my side of the Q hexrow and had a shot at turning the flank of my western position.
A dedicated soul
Big Moment
As pressure mounted on my right, Paul decided to now hit my far left with his reinforcements. A leader and a pair of squads entered in Y1 and made their way through the orchards before getting hammered by the Oerlikon. The survivors gamely advanced into the rubble in T2, only to be smoked by the artillery piece across the street. With this threat stymied, I could devote full attention to the looming assault against my R4-P5 front.
Trouble in mind
Endgame
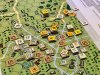
With his forces dwindling and Chinese strength gaining, it was do or die time for Paul’s Japanese, or do and die as the case may be. He only had one leader remaining but all his troops were in a single contiguous mass; it was time to get out the red counters. First a Chi-Ro crashed through the front door of the 9-2’s fortified location, but not before the MMG filled the street with residual firepower. Then the infantry followed, with carnage not far behind. Paul didn’t lose too much crossing the street and generally drove me back from the forward edge of my position, but I was able to rout most of my troops back to the Commissar. My R2 guns turned to face the attack as well.
No self control
In my following game turn, the Commissar rallied up the 9-2 and his friends. On my right, reinforcing GMD squads cleaned up the Japanese incursion without loss. On the left, my ordnance pounded Paul’s troops in Q3 and Q4, while my church force finished off the remnants. With yet another fresh platoon of Chinese forming up to enter, Paul felt his prospects were dim and called it a day.
MVP
The real MVP was SSR 6, which allowed me to buy fresh troops as I inflicted casualties, but the star on the board was probably the 9-2. I don’t think a single roll can make or break a scenario of reasonable size, but that opening 3 certainly shaped the course of the game. The 9-2 was a steady performer after that, and I can’t blame him for failing to stand up to a twelve-and-a-half-ton monster appearing in his living room. Overall he earned his bars.
Lessons Learned
The story of the day was the relentless bleeding of Paul’s force. I focused on striping and then reducing squads, ignoring halfsquads unless I had no other targets. The steady accumulation of CVP bought me ample support; over the course of the game I added eight squads to my force, along with three leaders and some LMGs. In the face of this it feels like the Japanese needs to husband his forces early and then hit the Chinese en masse. This is essentially what Paul tried but the previous casualties just made me too strong to overcome. A mid-game double Banzai, with half the Japanese OoB in each, might shatter the GMD through FPF and carry the buildings before the reinforcements can intervene.
Indomitable spirit prevails
Scenario Impressions
I love this situation – early war is my favorite period and I have a special fondness for GMD/IJA cards. This is a formidable Japanese force but that reinforcement SSR is a doozy. I think the Japanese have a shot, but until you see it played out it’s hard to get a sense of how quickly that power dynamic shifts. The GMD reinforcements come in just over a MPh away from the VP buildings, so the IJA has a turn before the impact of losses is really felt. Planning around that gap is probably the key to a successful attack.
It is an honor to die for the Emperor
This is one of those rare scenarios where the attacker must plot his assault turn by turn before the first weather die roll – you need to know where to be on turn four to maximize the impact of your all-out attack. I will happily play this again, and look forward to taking the Japanese. They might have the short end of the stick but I believe the tools are there to give them a chance.
HazMo 10 Fresh Grist
Opponent
Paul Chamberland
Renaissance Man
Situation
This is the dawn of WWII, on the outskirts of Shanghai in September 1937. Paul’s IJA was on the attack with a dozen first liners, three 448 Assault Engineers, an HMG, a pair of mediums, some LMGs, a pair of 50mm mortars, two DCs, and a flamethrower. He had four leaders out front and two Chi-Ros in support.
Keep your Co-Prosperity Sphere to yourself
Opposing this mob, I had ten first liners, four 447s, an MMG, three LMGs, a pair of ATRs, and a host of hardware including 37mm and 75mm artillery pieces, a 20L Oerlikon, and a Vickers 6-ton tank. I had great leadership, with a 7-0, an 8-0 Commissar, and a mighty 9-2. I also had two Wire counters, a pair of roadblocks, and three fortified building locations to help me hold the center of the board 53 town.
To win, Paul had to take six of the seven multi-hex buildings (he started with one in hand). The multi-hexers were stone and the rest of the buildings wooden by SSR. Paul could start with 75% of his force (his choice) on board with the balance trickling in beginning on turn three of our seven turns, with the of delaying some reinforcements in exchange for a fighter bomber with bombs.
Gentle probing
My starting force seemed a little light, but an SSR allowed me to ‘buy’ reinforcements: for every three CVP I inflicted, I could purchase a squad (randomly determined to be a 336, 337, or 447) with the possibility of a support weapon and/or leadership (2/3 chance of each). I could buy multiple MMCs at once but only got one roll each for SWs and leaders per turn. On top of all that, all my 447s were automatically Dare-Death squads, no assignment necessary. Close combat would be a bloody two-way affair.
Plan
The Japanese set up on/north of hexrow W, while I set up on/south of V. I decided to focus on holding the left, western half of the town, centering my defense on the P3 church. I placed my wire in S4 and S5, and fortified both levels of R2, placing the 75* downstairs and the Oerlikon upstairs to cover the approach through T1/U2/V2 (T2 was rubbled by SSR). I also fortified Q5, and occupied it with the 9-2, directing a 447 with the MMG.
The easy part is over
I put the 37* next door in P5 pointing northeast, where it covered the Q hexrow all the way down to Q10. The Vickers, HIP by SSR, sat in O7 looking down the road through the center of town. I had an ATR on each flank, and a light screen forward on the right; I distributed the balance of the troops evenly after that. The Commissar sat in the church, while the 7-0 backed up the troops on the right. My roadblocks sat in V3/W4 and V8/W9, cutting LOS as much slowing Paul’s armor. I kept a few troops off the front line in case Paul decided to build a kill stack or two to soften things up right off the bat.
My general plan was to reinforce whichever flank was feeling the most pressure, favoring the left otherwise, while hoping to hold the church and one more building for the duration.
Early Going
Paul went heavily against my right flank, overrunning my screen and quickly taking the R6 building. He was soon formed up in the angle running from T5 through R6 and out to R9 (Q7 and R7 were shellholes by SSR). Though I was a little sad he didn’t run his jaw straight at my R2 fist, I thought this was still an acceptable development as my western forces were only lightly engaged.
The heavy metal arrives
Overshadowing all of Paul’s early progress was my first roll of Final Fire. I hit a 447 and an FT/DC/448 in T5 with my Q5 MMG/447, directed by the 9-2. I dropped a three on an 8(0) for the dreaded flamethrower Daily Double. The Assault Engineers ate the KIA (thanks to the -1) while the 447 was reduced. Both support weapons were destroyed by the subsequent die rolls (A9.74) and with three CVP in the bag I already had a fresh squad warming up in the bullpen. This was only a hint of things to come.
Uh-Oh!
With my firepower steadily chipping away at Japanese strength, Paul had to jumpstart his attack. After deploying his armor for cover in Q9 and Q10, Paul launched a Banzai charge against my right, on the heels of a DC Hero. My 37* went down to an 11, as did a couple LMGs and my Vickers’ CMG, so Paul was able to crash into the P7 rowhouse. A few of my squads broke on FPF, and though I got my licks in, Paul established himself on my side of the Q hexrow and had a shot at turning the flank of my western position.
A dedicated soul
Big Moment
As pressure mounted on my right, Paul decided to now hit my far left with his reinforcements. A leader and a pair of squads entered in Y1 and made their way through the orchards before getting hammered by the Oerlikon. The survivors gamely advanced into the rubble in T2, only to be smoked by the artillery piece across the street. With this threat stymied, I could devote full attention to the looming assault against my R4-P5 front.
Trouble in mind
Endgame
With his forces dwindling and Chinese strength gaining, it was do or die time for Paul’s Japanese, or do and die as the case may be. He only had one leader remaining but all his troops were in a single contiguous mass; it was time to get out the red counters. First a Chi-Ro crashed through the front door of the 9-2’s fortified location, but not before the MMG filled the street with residual firepower. Then the infantry followed, with carnage not far behind. Paul didn’t lose too much crossing the street and generally drove me back from the forward edge of my position, but I was able to rout most of my troops back to the Commissar. My R2 guns turned to face the attack as well.
No self control
In my following game turn, the Commissar rallied up the 9-2 and his friends. On my right, reinforcing GMD squads cleaned up the Japanese incursion without loss. On the left, my ordnance pounded Paul’s troops in Q3 and Q4, while my church force finished off the remnants. With yet another fresh platoon of Chinese forming up to enter, Paul felt his prospects were dim and called it a day.
MVP
The real MVP was SSR 6, which allowed me to buy fresh troops as I inflicted casualties, but the star on the board was probably the 9-2. I don’t think a single roll can make or break a scenario of reasonable size, but that opening 3 certainly shaped the course of the game. The 9-2 was a steady performer after that, and I can’t blame him for failing to stand up to a twelve-and-a-half-ton monster appearing in his living room. Overall he earned his bars.
Lessons Learned
The story of the day was the relentless bleeding of Paul’s force. I focused on striping and then reducing squads, ignoring halfsquads unless I had no other targets. The steady accumulation of CVP bought me ample support; over the course of the game I added eight squads to my force, along with three leaders and some LMGs. In the face of this it feels like the Japanese needs to husband his forces early and then hit the Chinese en masse. This is essentially what Paul tried but the previous casualties just made me too strong to overcome. A mid-game double Banzai, with half the Japanese OoB in each, might shatter the GMD through FPF and carry the buildings before the reinforcements can intervene.
Indomitable spirit prevails
Scenario Impressions
I love this situation – early war is my favorite period and I have a special fondness for GMD/IJA cards. This is a formidable Japanese force but that reinforcement SSR is a doozy. I think the Japanese have a shot, but until you see it played out it’s hard to get a sense of how quickly that power dynamic shifts. The GMD reinforcements come in just over a MPh away from the VP buildings, so the IJA has a turn before the impact of losses is really felt. Planning around that gap is probably the key to a successful attack.
It is an honor to die for the Emperor
This is one of those rare scenarios where the attacker must plot his assault turn by turn before the first weather die roll – you need to know where to be on turn four to maximize the impact of your all-out attack. I will happily play this again, and look forward to taking the Japanese. They might have the short end of the stick but I believe the tools are there to give them a chance.


 . I like the chaos to start early, disrupt the attack, look for leverage and get ahead of the curve (so to speak) before my opponent does.