Yeah Japanese player turn 6 was epic. Vic threw everything he had at me. Tank creating a breach on a fortified location, DC hero creating another, two banzais- i suffered a lot as well, losing the 9-2 in CC and he got a foothold in the last victory buildings.
Turn 6 indeed was one of the most intricate and complex turns I've played (in that the moves at the end had to be considered while putting together the pieces for the different banzai charges that would occur). Here's a summary of the background for how we got there and then how it went down....
How we got here:
Given what was said about this before, as the attacker, the big strategy change for the SSR rule in this game was to be very conservative in the beginning of the game, trying to move without giving shots with negative modifiers (particularly vs. Mr. 9-2) and actually trying to avoid HtH CC which can create a lot of losses.
So, in the first 5 turns, I only had 3 buildings, but did get into the center building and thanks to a WP round (actually a CH), managed to get across the street on the top of the board (Q2/R2). Keeping a conservative strategy, kept the majority of reinforcements off the board. In my turn 5, my tanks were not in position to do what they needed to do, so all of this pent up energy would play out in an immensely wild & complex Turn 6.
Up to this point, only 3 reinforcement squads would come in (all cx on the top, and all would be in HtH cc with the cx hat on). This also meant the airplane would be on the board for the major reinforcement. Also, at this point, both sides lost ~4 squads to attrition and one of the mortars went on a CH tear and took out two guns.
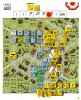
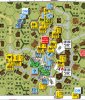
So here we are, the below view shows us the starting point for my turn 6 (the tank/squad/lmg are in Q10).
There is a strong position in the lower building, I correctly suspected there was another fortified building location in O7 and there was a hidden 75* gun in P7
Prep fire & Initial moves:
For preps, what worked well, the MTR didn’t get smoke, but got a CH WP round on P7 breaking the squad and revealing the gun (again, this is 4 MTR CH’s in the game, including two on the guns, so always fire these things). The two MMG’s on top fire at the commissar and roll high.
The initial move:
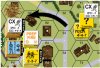
The simple move on the top is one of my last reinforcers goes into Q2 and the HS shown moves thru Q3 to bump the concealment off the cx units (giving me a 2-1 edge in CC). The commissar’s team would first fire on this and these forces would eventually go in and ambush/eliminate the cx’d 337.
Chaos then ensues in the bottom.
We lead off with a tank charge, the aim is to poke two holes in the fortified buildings ahead of a banzai. The lead tank succumbs to a 9-2 lead street fighting attempt, leaving the 2nd tank to roll into the 9-2’s hex where it promptly falls into the cellar for elimination (no CS in this case).
This sets us up for Banzai number 1.
A 3 hex banzai charge ensues. A DC hero spins off, going for the 9-2 who spits out a 6-4 FF shot to eliminate that threat. The squad on the bottom enters P10, stripe/elr’s and is eliminated in cc. The parent 448 with a dc charges ends up striped in the 9-2 hex, throws the remaining DC in his own hex, no result on both ends, and then assassinates the 9-2 in hth cc while being eliminated by a counter 3-1 hth down 2 roll. The 7+1/447 takes a 12 down 2, eliminating the leader and stripe/CR on the squad who then ends up in the guns location (winning in hth cc).
Which brings us to Banzai #2, chaos in the middle.
This charge would also be led by a DC hero who would breach the final fortified building location. Allowing his squad to enter and tie up this location in HtH cc for 3 phases. The HS on the top will be final fired upon by the commissar whose team would then break in FPF when the HS enters it’s hex. In the end this charge was highly successful.
Final moves: Now that everything was tied up, some simple moves occurred. The 10-1/228/HMG moseyed down the road to set up in L7, the 347 in R6 went to the ground level of P5 to enforce FTR and claim that building. The 447/LMG team hung out in their location and then stepped onto the road block as insurance, in case things went really badly in cc that he could impede an end run counterattack into the back buildings.
Going into the CC phase, this game was very much up in the air and could break either way, for me the most important roll was against the 9-2 (need a 6 to win/7 to CR) which turned out successful.
This is where the turn ended up, with 6 reinforcement rolls coming on the board (yes, the 6 reinforcement die rolls!!!.. but with an airplane and only 2 turns left).
There were still 9 squads out there to counterattack, the central building was reinforced and a concealed 70 with a set of 447 friends would jump into cc vs hex M7 in the next half turn, so this game was still wide open.
In my opinion, if we played this sequence 10 times, the defending side would likely come out the winner in 6 or 7 cases, but as stated in our log files, being involved in a complex and infinitely interesting game like this that is decided in cc in the final turn is a win for both players regardless of the outcome and is a reason to share some ASL gold here.
Many thanks to Tuomo for an excellent playing of this great game.
V


")