von Marwitz
Forum Guru
FT168 By Dawn's Early Light - AAR
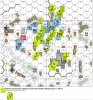
Note one Error in the below picture:
The German 8-1 Leader should be a 8-0 Leader.
Scenario Overview:
This is a small 4 Turn scenario that can easily be played in one session. Setup is simultaneous, a dr decides which side moves first. These two factors might make it a bit dicey, but on the other hand not much is lost in case such a small shorty goes awry. In our playing with me having the defending Americans, it came down to the last CC-roll.
The action is set in December 1944 and part of the Battle of the Bulge. Ground Snow (E3.72) and Mist (E3.32) are in effect, the latter being of no consequence except maybe for the first Turn during the German approach to the town. There are some minor but not unusual specialties such as one US HIP MMC (with SW/SMC), Winter Camo for everyone, Schürzen for the German AFVs and no Kindling. The unusual exception being Prisoner Interrogation being in effect.
The objective for a German insta-win is to Control the big building. The US can insta-win by Eliminating/forcing Recall on a given number of German AFVs. Else the German wins at game end if they control a given number of multi-hex buildings other than the big one. Note: I am a bit hazy on the VC here to respect copyright.
Preliminary Assessment:
Maybe the most difficult issue of all is which side will move first. Each side has a 50% chance and depending on the respective setup, who moves first will make a great difference.
For example, as the American you can make an up-front setup and gamble that you will move first. If you are lucky, that's great - you might shoot up the Germans before they can move and the ensuing chaos can screw up their timetable or force them to be careful with their surviving AFV. If you are not lucky and the Germans move first, they you'll be on the receiving end, will be shot up and get stuck when routing being soon gobbled up by the pursuing Germans. If the Americans with their few units take losses early, then they won't be able to hold back the Germans.
If the Americans go for a more conservative setup playing it safe, then they will present the Germans more or less 'free' movement for their first turn on a platter.
In case they select a 'conservative' setup, then it is a good question where to place the Guns as within the village, there are only limited fields of fire. Those US M1A1 ART Guns are somewhat special: I only realized after the game that they can be dismantled into a 5PP 1/2" counter. So maybe one tactic could be to start with a Gun dm and then carry it to a place helped by a Leader where it is needed. Probably, though, there is not enough time for this, because lugging it around and then assembling it would take two turns and thus half the game. Furthermore, it could not set up Emplaced and thus not HIP. You might confuse a counter-counting opponent, though... I think lugging around this Gun is only an option if it is otherwise absolutely useless and it might catch your opponent off-guard. Within the short timeframe, Pushing might be the quicker way. In any case, you are better off finding a spot for the Guns where they are of immediate use. That said, I had the devillish idea to place these Guns in upper levels because I thought if they can 'move' there in dm'ed state, then they are not forbidden to set up in such a spot. Nice plan, but it does not work: Per B23.423 "No weapon depicted on a 5/8" counter may occupy an upper level of a building [EXC: Mortars (23.85); Fortified Building (23.93)]." This means you could lug a M1A1 upstairs in dm'ed state but not assemble it there, making it useless. It should be noted, that the M1A1s are ART pieces and thus have no Gunshields. So if you are hit by the enemy, the resolution DR cannot be modified by the Gunshield. The bad thing about these Guns is that they only have H7 and no AP. A TK# of 13 for HEAT might be survived by the German AFVs and their Schürzen might ruin your day if you hit them from the side. That said, you must carefully consider when to use H7 or even using it at all - it might be worth more as a threat.
From the German perspective there is this hedge which effectively divides their setup area and will serve to block LOS to any enemy ground units that find themselves on the 'wrong side' of it. As the Americans will likely have attempt to cover all approaches to prevent the Germans from grabbing buildings too easily, it is a good idea to set up only on one side of it, because that way they will be able to avoid some of the defenders.
With only four turns available and the Americans possibly moving last, there is no room for a big 'change of plans' for the Germans. You have to make up your mind how to tackle this one and mainly stick to it. That said, the Germans should well consider if they can clear the big Level 2 building. Going hellbent for the big building would allow the Americans to concentrate on it. Probably the Germans are very well advised to maintain the threat to rush into the American rear-area somewhere to grab unguarded buildings. Even a pesky half-squad could thus turn into a real PITA.
One valuable asset the Germans have is, of course, Smoke. Five AFVs with S8 should get you some Smoke where you need it. On top of that, all German AFVs have the Nahverteidigungswaffe (sN9), so they are pretty much Smoke-making machines. Note that if you find your AFV in CC with a US unit, you cannot use your sN in Close Combat if you have not been attacked.
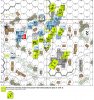
The Battle Plan:
For quite a while I agonized about how to best set up a defence for my Americans. In the end, I resolved to set up within the town and basically give the Germans almost 'free' movement for their first turn - should they move first or not.
I felt that the gamble of a frontal setup had too high stakes, especially considering the hedge that effectively divided the German setup area in two. Setting up within the town would save me from the danger of not being able to fall back. In fact, my positions had to be held more or less until the end.
Especially with my setup more towards the rear, I deemed it highly unlikely that the Germans would go for the big building. It appeared much easier for the Germans to grab some forward multi-hex buildings and then to try to evict me of others for the win.
On the other hand, this meant, that the 22K7 and 22J7 buildings were the crucial ones for me which I had to hold at all cost. Being located in the center of the town from there I could make lateral enemy movement difficult and I had decent fields of fire close around. In each of the buldings I HIP'ed one of the M1A1 Guns and placed a 747. The 8-0 Leader with two Dummy counters on top posed as a 'squad with MMG' in K4. With L5, K5, J5, and I6, the key buildings has something of a rear-area as well. Furthermore, this complex could rather easily be reinforced from the big building and vice versa.
The western flank (left) of these two key buildings was guared by a HIP 337+BAZ in N8 hoping to get a surprise shot at an enemy AFV and the tank destroyer in N6. This beast is awfully fast with its 24 MP, so in case the Germans would not show up, I could redeploy it quickly.
The second anchor of my defence was the big building. I placed the 667+MMG and 9-1, 667 in separate Locations in 2nd Level, each posing as the 'squad+MMG' and threatening to reach out into the German setup area and to mess with the first enemy approach. To optimize the use of one of the Concealment counters, a stack of the Sherman tank and 337+BAZ set up in the Ground Level of 22G6. One 'Infantry' Dummy looked out from 22F6 into the German eastern (right) setup area, a 'Sherman' Dummy did the same from the 22E9 building. I hoped this would be enough to deter the Germans from setting up in the eastern part of their setup area, which, if it worked, would allow me to free some units from the big building to meet the enemy elsewhere.
The greatest risk I saw in the Germans grabbing the 22O9, 22K10, 22H9 buildings and then reaching out for my rear towards the 22O4 and 22N2 buildings.
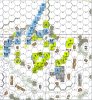
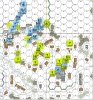
Situation at the Start of German Turn 1 - Game Start:
The dr determined the Germans to move first. I welcomed that as otherwise I would not have moved much had my Americans been first. The other way around, my Americans would move last which could be of advantage.
Apparently, I had made the eastern (right) part of the German setup area appear uninviting enough so that the enemy set up entirely in the West (left). Thus the German Schwerpunkt would attack the American Schwerpunkt. Furthermore, except for two German 'volunteer' half-squad scouts, the rest of the German Infantry set up a bit to the back beneath the Panzer IVs. So far, so good.
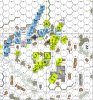
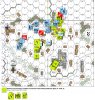
Situation at the End of German Turn 1:
In their Turn 1, the Germans openend up with a StuG and a Pz IV to place Smoke in 16U10 and 16V9.
The Germans launched the two HS scouts to initiate their MPh to check the woods and would later advance into the Ground Level locations of the 22K10 building. That done, more Infantry followed up flanked by a Pz IV. I took a long range shot with my 9-1, 667 combo from Level 2 of the big building, but forseeably due to Mist & Winter Camo, this had no effect. The second StuG scouted along the western board edge, placing some covering Smoke by sN for the follow-up German killer-stack. As my Gun in 22K7 was facing into the wrong direction to meet the German attack, I fired it vs. the German killer-stack as it moved into 16T9. As was to be expected, I missed - but you never know in ASL and now my Gun was facing the right direction, losing HIP/Concealment in the process.
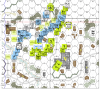
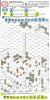
Situation at the End of American Turn 1:
In my Amerian Turn 1, most of the Germans were still out of reach. The German killer-stack in 16T9 had advanced out of LOS in the last turn. However, in 22L10 many Germans were massing and there was trouble brewing. Determining that I would rather have to protect my tank destroyer in 22N6 rather than to risk a Prep Fire shot vs. Concealed units and suffer the return fire, I fired WP into 22L9 with my 22K7 Gun providing cover. Then, the 747 in 22I7 fired vs. 16W10 to make sure that LOS existed, which proved to be the case as I had anticipated. I opened up with my Gun from the same hex upon the Geman stack consisting of a 7-0, 548+PSK, 548, hit, kept ROF and whacked them severely: The 7-0 was lethally wounded, the 548+PSK broke and ELR'ed, and the second 548 broke as well. This took some steam out of the German assault and established that I had LOS and could put serious firepower onto the entire area of the 22K10 building and its surroundings.
During the MPh, my 667+MMG from the big building switched over to 22K5, overlooking the open area to the north-west but also having an eye towards the west (right). The 9-1, 667 left the 2nd Level of the big building to move benath the Sherman. Now, I had both flanks of the crucial 22K7 and 22J7 buildings covered by substantial firepower.
To be continued in a subsequent post...
von Marwitz
Note one Error in the below picture:
The German 8-1 Leader should be a 8-0 Leader.
Scenario Overview:
This is a small 4 Turn scenario that can easily be played in one session. Setup is simultaneous, a dr decides which side moves first. These two factors might make it a bit dicey, but on the other hand not much is lost in case such a small shorty goes awry. In our playing with me having the defending Americans, it came down to the last CC-roll.
The action is set in December 1944 and part of the Battle of the Bulge. Ground Snow (E3.72) and Mist (E3.32) are in effect, the latter being of no consequence except maybe for the first Turn during the German approach to the town. There are some minor but not unusual specialties such as one US HIP MMC (with SW/SMC), Winter Camo for everyone, Schürzen for the German AFVs and no Kindling. The unusual exception being Prisoner Interrogation being in effect.
The objective for a German insta-win is to Control the big building. The US can insta-win by Eliminating/forcing Recall on a given number of German AFVs. Else the German wins at game end if they control a given number of multi-hex buildings other than the big one. Note: I am a bit hazy on the VC here to respect copyright.
Preliminary Assessment:
Maybe the most difficult issue of all is which side will move first. Each side has a 50% chance and depending on the respective setup, who moves first will make a great difference.
For example, as the American you can make an up-front setup and gamble that you will move first. If you are lucky, that's great - you might shoot up the Germans before they can move and the ensuing chaos can screw up their timetable or force them to be careful with their surviving AFV. If you are not lucky and the Germans move first, they you'll be on the receiving end, will be shot up and get stuck when routing being soon gobbled up by the pursuing Germans. If the Americans with their few units take losses early, then they won't be able to hold back the Germans.
If the Americans go for a more conservative setup playing it safe, then they will present the Germans more or less 'free' movement for their first turn on a platter.
In case they select a 'conservative' setup, then it is a good question where to place the Guns as within the village, there are only limited fields of fire. Those US M1A1 ART Guns are somewhat special: I only realized after the game that they can be dismantled into a 5PP 1/2" counter. So maybe one tactic could be to start with a Gun dm and then carry it to a place helped by a Leader where it is needed. Probably, though, there is not enough time for this, because lugging it around and then assembling it would take two turns and thus half the game. Furthermore, it could not set up Emplaced and thus not HIP. You might confuse a counter-counting opponent, though... I think lugging around this Gun is only an option if it is otherwise absolutely useless and it might catch your opponent off-guard. Within the short timeframe, Pushing might be the quicker way. In any case, you are better off finding a spot for the Guns where they are of immediate use. That said, I had the devillish idea to place these Guns in upper levels because I thought if they can 'move' there in dm'ed state, then they are not forbidden to set up in such a spot. Nice plan, but it does not work: Per B23.423 "No weapon depicted on a 5/8" counter may occupy an upper level of a building [EXC: Mortars (23.85); Fortified Building (23.93)]." This means you could lug a M1A1 upstairs in dm'ed state but not assemble it there, making it useless. It should be noted, that the M1A1s are ART pieces and thus have no Gunshields. So if you are hit by the enemy, the resolution DR cannot be modified by the Gunshield. The bad thing about these Guns is that they only have H7 and no AP. A TK# of 13 for HEAT might be survived by the German AFVs and their Schürzen might ruin your day if you hit them from the side. That said, you must carefully consider when to use H7 or even using it at all - it might be worth more as a threat.
From the German perspective there is this hedge which effectively divides their setup area and will serve to block LOS to any enemy ground units that find themselves on the 'wrong side' of it. As the Americans will likely have attempt to cover all approaches to prevent the Germans from grabbing buildings too easily, it is a good idea to set up only on one side of it, because that way they will be able to avoid some of the defenders.
With only four turns available and the Americans possibly moving last, there is no room for a big 'change of plans' for the Germans. You have to make up your mind how to tackle this one and mainly stick to it. That said, the Germans should well consider if they can clear the big Level 2 building. Going hellbent for the big building would allow the Americans to concentrate on it. Probably the Germans are very well advised to maintain the threat to rush into the American rear-area somewhere to grab unguarded buildings. Even a pesky half-squad could thus turn into a real PITA.
One valuable asset the Germans have is, of course, Smoke. Five AFVs with S8 should get you some Smoke where you need it. On top of that, all German AFVs have the Nahverteidigungswaffe (sN9), so they are pretty much Smoke-making machines. Note that if you find your AFV in CC with a US unit, you cannot use your sN in Close Combat if you have not been attacked.
The Battle Plan:
For quite a while I agonized about how to best set up a defence for my Americans. In the end, I resolved to set up within the town and basically give the Germans almost 'free' movement for their first turn - should they move first or not.
I felt that the gamble of a frontal setup had too high stakes, especially considering the hedge that effectively divided the German setup area in two. Setting up within the town would save me from the danger of not being able to fall back. In fact, my positions had to be held more or less until the end.
Especially with my setup more towards the rear, I deemed it highly unlikely that the Germans would go for the big building. It appeared much easier for the Germans to grab some forward multi-hex buildings and then to try to evict me of others for the win.
On the other hand, this meant, that the 22K7 and 22J7 buildings were the crucial ones for me which I had to hold at all cost. Being located in the center of the town from there I could make lateral enemy movement difficult and I had decent fields of fire close around. In each of the buldings I HIP'ed one of the M1A1 Guns and placed a 747. The 8-0 Leader with two Dummy counters on top posed as a 'squad with MMG' in K4. With L5, K5, J5, and I6, the key buildings has something of a rear-area as well. Furthermore, this complex could rather easily be reinforced from the big building and vice versa.
The western flank (left) of these two key buildings was guared by a HIP 337+BAZ in N8 hoping to get a surprise shot at an enemy AFV and the tank destroyer in N6. This beast is awfully fast with its 24 MP, so in case the Germans would not show up, I could redeploy it quickly.
The second anchor of my defence was the big building. I placed the 667+MMG and 9-1, 667 in separate Locations in 2nd Level, each posing as the 'squad+MMG' and threatening to reach out into the German setup area and to mess with the first enemy approach. To optimize the use of one of the Concealment counters, a stack of the Sherman tank and 337+BAZ set up in the Ground Level of 22G6. One 'Infantry' Dummy looked out from 22F6 into the German eastern (right) setup area, a 'Sherman' Dummy did the same from the 22E9 building. I hoped this would be enough to deter the Germans from setting up in the eastern part of their setup area, which, if it worked, would allow me to free some units from the big building to meet the enemy elsewhere.
The greatest risk I saw in the Germans grabbing the 22O9, 22K10, 22H9 buildings and then reaching out for my rear towards the 22O4 and 22N2 buildings.
Situation at the Start of German Turn 1 - Game Start:
The dr determined the Germans to move first. I welcomed that as otherwise I would not have moved much had my Americans been first. The other way around, my Americans would move last which could be of advantage.
Apparently, I had made the eastern (right) part of the German setup area appear uninviting enough so that the enemy set up entirely in the West (left). Thus the German Schwerpunkt would attack the American Schwerpunkt. Furthermore, except for two German 'volunteer' half-squad scouts, the rest of the German Infantry set up a bit to the back beneath the Panzer IVs. So far, so good.
Situation at the End of German Turn 1:
In their Turn 1, the Germans openend up with a StuG and a Pz IV to place Smoke in 16U10 and 16V9.
The Germans launched the two HS scouts to initiate their MPh to check the woods and would later advance into the Ground Level locations of the 22K10 building. That done, more Infantry followed up flanked by a Pz IV. I took a long range shot with my 9-1, 667 combo from Level 2 of the big building, but forseeably due to Mist & Winter Camo, this had no effect. The second StuG scouted along the western board edge, placing some covering Smoke by sN for the follow-up German killer-stack. As my Gun in 22K7 was facing into the wrong direction to meet the German attack, I fired it vs. the German killer-stack as it moved into 16T9. As was to be expected, I missed - but you never know in ASL and now my Gun was facing the right direction, losing HIP/Concealment in the process.
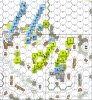
Situation at the End of American Turn 1:
In my Amerian Turn 1, most of the Germans were still out of reach. The German killer-stack in 16T9 had advanced out of LOS in the last turn. However, in 22L10 many Germans were massing and there was trouble brewing. Determining that I would rather have to protect my tank destroyer in 22N6 rather than to risk a Prep Fire shot vs. Concealed units and suffer the return fire, I fired WP into 22L9 with my 22K7 Gun providing cover. Then, the 747 in 22I7 fired vs. 16W10 to make sure that LOS existed, which proved to be the case as I had anticipated. I opened up with my Gun from the same hex upon the Geman stack consisting of a 7-0, 548+PSK, 548, hit, kept ROF and whacked them severely: The 7-0 was lethally wounded, the 548+PSK broke and ELR'ed, and the second 548 broke as well. This took some steam out of the German assault and established that I had LOS and could put serious firepower onto the entire area of the 22K10 building and its surroundings.
During the MPh, my 667+MMG from the big building switched over to 22K5, overlooking the open area to the north-west but also having an eye towards the west (right). The 9-1, 667 left the 2nd Level of the big building to move benath the Sherman. Now, I had both flanks of the crucial 22K7 and 22J7 buildings covered by substantial firepower.
To be continued in a subsequent post...
von Marwitz
Last edited: