von Marwitz
Forum Guru
FrF95 Blood Red Snow - AAR
Set in December 1942 in Russia, this is a short 5-Turn, single half-board winter action.
Looking at the source for this scenario, I recognized the name of Günter Koschorrek, who has lived through this action. I could remember having read a book of him, so I checked my library and found it. I took it up and read it again. It is a good book recounting his experiences as an infantry man, more precisely a HMG gunner. He was only into action for a short while at the time of this action and survived a desperate situation which this scenario captures pretty well. It is quite sobering to read his memories, especially that he was considered to be of the "old breed" after no longer than two years with less than half a dozen soldiers left of the company he entered the war with in 1942. Koschorrek in his memories mentions the devastating effect of a Flak-Vierling on infantry repeatedly. He also relates that the 88 FlaK managed to kill one T-34 before its crew got torn to pieces by a Russian shell. We will see, what happens in the scenario.
The Germans set up in a defensive position with Trenches and a Pillbox, but the instructions do not allow to concentrate these. They have powerful weapons at their disposal: A 88 Flak Gun, a FlaK-Vierling, a 81mm MTR and two HMGs. Roughly half of the force is made up of 548 Assault Engineers. 7 AT-Mine factors round it off. These will be reinforced by a PaK 40 in tow in German Turn 2.
The Russians have 11 squads, two each 628s and 458s, the rest 1st Line led by only two leaders. However, they are strongly supported by four T-34 M41 and one T-34 M43. The Russains have Winter Camouflage. The
Russians will have the choice, where to attack and the Germans have to prepare for any of the possible routes as best as he can. This means, that the Russians will be able to overwhelm the Germans where they elect to push their attack. But on the other hand, there will always be some Germans the Russians will have trouble suppressing.
And this exactly is the crux of the scenario: The Russians will not have time for subtleties and can move right on top of the Germans. But then, from afar, either the 88 Gun or the FlaK-Vierling will rake them probably along with another HMG.
Being a short scenario, this one is a bit suspectible to the luck you have with your dice. There is somewhat of a danger that either side can 'stomp' the other early. However, if the dice are just about even, then the scenario is a blast to play and of brutal intensity.
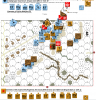
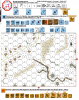
Situation at Start of Russian Turn 1:
The Russians can basically attack either from the North, the East, and/or moving out of the Gully. I expected an attack from the East, but it came from the North. This was not a major catastrophe, because my defence had that direction taken into account as well, but I had to turn the CA of the 88 and the Flak-Vierling to meet the threat.
I had only placed the required minimum of troops on the northernmost hill, because it was quite obvious that it would be overrun at once if an attack came from that direction. My two Halfsquads there were a nuisance, but were poised to be hit in CC.
The armored juggernaut charged forward to enter my entrenched 88 Gun position and that of an entreched HMG. The 88 took out the first T-34 M41, which burned. It could kill a second one that followed up to enter my Gun's position, frantically and without success searching for APCR and using IF. It could not covercome the third being forced to use FPF. My bunker with a HMG had its CA towards the other direction, so my main line of resistance was 'frozen', allowing the Russian infantry to swarm up, covered by the blazes of two Russian tanks. My Flak-Vierling did what these things always seem to do - looking like a most evil menace and having no big effect...
On the outlying hill, one of my HS went down in CC, but the other one rolles Snakes, killing off the attacking Russian squad and generating a leader. This was BAD for the Russians, because my HS + 8-0 was now in a position, where it could cause 'Failure to Rout' to numerous Russian units - if they would break.
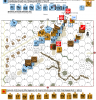
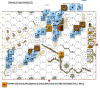
Situation Start of German Turn 1:
My objective was to break as much Russian infantry as possible to take the steam out of the Russian attack and hoping to kill more T-34s which bound me to target selection limits, so I openend up almost everything I had. This started off quite well with my 81mm MTR going on a ROF tear and scoring a CH which selected two Russian squads by Random selection. One of them pinned, the other one became Fanatic and generated a Hero... My Flak-Vierling followed up but managed to break only the pinned squad and broke the leader. Next, my HMG + 447 was gunning for a Russian 447 + 237 in open ground atop my Pillbox. No effect. Then the 88 FlaK tried to kill off the tank in its hex – missed both the regular shot and IF.
I learned that units on top of a Pillbox are not bound by target selection limits by the units within the pillbox in the same hex. This came as a nasty surprise to me as I had reckoned that all Russians on the crestline could not hamper my movement. Well, so I boldly moved a 548 Assault Engineer ADJACENT anyway in the hope of surviving and to be able to advance into CC with one of the tanks later. It broke, however, since the Russians were now marked, I could rush my Germans from the southern edge forward. Advancing Fire had no effect. So despite all my fire, I was not much better off than before – I had traded a broken Russian squad and a leader for a fanatic Russian squad and a Russian Hero. Luckily for me, the Russian defensive fire was largely ineffective. However, in CC I managed to kill two more Russian T-34 tanks atop my trenches. We had overlooked that they are by SSR always considered stopped in Trench hexes for CC purposes. Menacingly for the Russians, despite having broken and chased away the German HS on the northermost hill and attempting CC vs. my lone 8-0 Leader which had been previously created in CC on snakes, the same killed off a second Russian squad all by himself after the Russians had gacked their roll. Apparently, that German Leader knew his business...
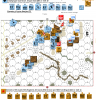
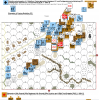
Situation Russian Turn 2:
The Russians had lost all but one tank, but on the bright side of it (pun intended), he now had plenty of cover by blazing wrecks which were inhibiting my defensive fire severly as the Germans had to fire out of SMOKE.
The Russians succeeded in neutralizing my 88 FlaK position by breaking a squad and the crew which were eliminated for failure to rout. The Russians then advanced in with two 458s and a leader, ready to capture the 88 FlaK.
A Russian and German squad mutually killed each other in Melee atop the Pillbox.
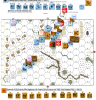
Situation at Start of German Turn 2:
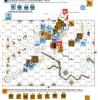
The Germans were to receive their PaK 40 this turn. Unfortunately, I totally screwed up its setup because I forgot about the extra 1MP per hex entered for a Gun in tow. I would not be able to get it anywhere, where it could threaten important Russian units... This was all the more irritating because I had moved out a 548AE as bait for the remaining T-34 to draw fire, so that the PaK could enter without danger. The 548AE was promply broken in the process.
The Russian peasants surely found the 88 FlaK but did not manage to make it count firing it vs. the ADJACENT Germans. However, not knowing what to do (captured use, unwualified use) and adding a +5 SMOKE Hindrance does not help, admittedly... My Germans could not do much damage either due to all the SMOKE. The Flak-Vierling just continued to look dangerous but did not do real damage. At least in sum I managed to break one of the two 458s in the FlaK's Trench, which was then eliminated for FtR - thanks to my lone leader on the southernmost hill, who was responsible for the demise of 3.5 Russian squads so far either by CC or by causing FtR.
In an attempt to kill the last remaining Russian tank, another 548AE was shot up by it. I did manage to close in for CC, but a leader led 548AE did merely manage to immobilize the tank.
To be continued in subsequent post...
von Marwitz
Set in December 1942 in Russia, this is a short 5-Turn, single half-board winter action.
Looking at the source for this scenario, I recognized the name of Günter Koschorrek, who has lived through this action. I could remember having read a book of him, so I checked my library and found it. I took it up and read it again. It is a good book recounting his experiences as an infantry man, more precisely a HMG gunner. He was only into action for a short while at the time of this action and survived a desperate situation which this scenario captures pretty well. It is quite sobering to read his memories, especially that he was considered to be of the "old breed" after no longer than two years with less than half a dozen soldiers left of the company he entered the war with in 1942. Koschorrek in his memories mentions the devastating effect of a Flak-Vierling on infantry repeatedly. He also relates that the 88 FlaK managed to kill one T-34 before its crew got torn to pieces by a Russian shell. We will see, what happens in the scenario.
The Germans set up in a defensive position with Trenches and a Pillbox, but the instructions do not allow to concentrate these. They have powerful weapons at their disposal: A 88 Flak Gun, a FlaK-Vierling, a 81mm MTR and two HMGs. Roughly half of the force is made up of 548 Assault Engineers. 7 AT-Mine factors round it off. These will be reinforced by a PaK 40 in tow in German Turn 2.
The Russians have 11 squads, two each 628s and 458s, the rest 1st Line led by only two leaders. However, they are strongly supported by four T-34 M41 and one T-34 M43. The Russains have Winter Camouflage. The
Russians will have the choice, where to attack and the Germans have to prepare for any of the possible routes as best as he can. This means, that the Russians will be able to overwhelm the Germans where they elect to push their attack. But on the other hand, there will always be some Germans the Russians will have trouble suppressing.
And this exactly is the crux of the scenario: The Russians will not have time for subtleties and can move right on top of the Germans. But then, from afar, either the 88 Gun or the FlaK-Vierling will rake them probably along with another HMG.
Being a short scenario, this one is a bit suspectible to the luck you have with your dice. There is somewhat of a danger that either side can 'stomp' the other early. However, if the dice are just about even, then the scenario is a blast to play and of brutal intensity.
Situation at Start of Russian Turn 1:
The Russians can basically attack either from the North, the East, and/or moving out of the Gully. I expected an attack from the East, but it came from the North. This was not a major catastrophe, because my defence had that direction taken into account as well, but I had to turn the CA of the 88 and the Flak-Vierling to meet the threat.
I had only placed the required minimum of troops on the northernmost hill, because it was quite obvious that it would be overrun at once if an attack came from that direction. My two Halfsquads there were a nuisance, but were poised to be hit in CC.
The armored juggernaut charged forward to enter my entrenched 88 Gun position and that of an entreched HMG. The 88 took out the first T-34 M41, which burned. It could kill a second one that followed up to enter my Gun's position, frantically and without success searching for APCR and using IF. It could not covercome the third being forced to use FPF. My bunker with a HMG had its CA towards the other direction, so my main line of resistance was 'frozen', allowing the Russian infantry to swarm up, covered by the blazes of two Russian tanks. My Flak-Vierling did what these things always seem to do - looking like a most evil menace and having no big effect...
On the outlying hill, one of my HS went down in CC, but the other one rolles Snakes, killing off the attacking Russian squad and generating a leader. This was BAD for the Russians, because my HS + 8-0 was now in a position, where it could cause 'Failure to Rout' to numerous Russian units - if they would break.
Situation Start of German Turn 1:
My objective was to break as much Russian infantry as possible to take the steam out of the Russian attack and hoping to kill more T-34s which bound me to target selection limits, so I openend up almost everything I had. This started off quite well with my 81mm MTR going on a ROF tear and scoring a CH which selected two Russian squads by Random selection. One of them pinned, the other one became Fanatic and generated a Hero... My Flak-Vierling followed up but managed to break only the pinned squad and broke the leader. Next, my HMG + 447 was gunning for a Russian 447 + 237 in open ground atop my Pillbox. No effect. Then the 88 FlaK tried to kill off the tank in its hex – missed both the regular shot and IF.
I learned that units on top of a Pillbox are not bound by target selection limits by the units within the pillbox in the same hex. This came as a nasty surprise to me as I had reckoned that all Russians on the crestline could not hamper my movement. Well, so I boldly moved a 548 Assault Engineer ADJACENT anyway in the hope of surviving and to be able to advance into CC with one of the tanks later. It broke, however, since the Russians were now marked, I could rush my Germans from the southern edge forward. Advancing Fire had no effect. So despite all my fire, I was not much better off than before – I had traded a broken Russian squad and a leader for a fanatic Russian squad and a Russian Hero. Luckily for me, the Russian defensive fire was largely ineffective. However, in CC I managed to kill two more Russian T-34 tanks atop my trenches. We had overlooked that they are by SSR always considered stopped in Trench hexes for CC purposes. Menacingly for the Russians, despite having broken and chased away the German HS on the northermost hill and attempting CC vs. my lone 8-0 Leader which had been previously created in CC on snakes, the same killed off a second Russian squad all by himself after the Russians had gacked their roll. Apparently, that German Leader knew his business...
Situation Russian Turn 2:
The Russians had lost all but one tank, but on the bright side of it (pun intended), he now had plenty of cover by blazing wrecks which were inhibiting my defensive fire severly as the Germans had to fire out of SMOKE.
The Russians succeeded in neutralizing my 88 FlaK position by breaking a squad and the crew which were eliminated for failure to rout. The Russians then advanced in with two 458s and a leader, ready to capture the 88 FlaK.
A Russian and German squad mutually killed each other in Melee atop the Pillbox.
Situation at Start of German Turn 2:
The Germans were to receive their PaK 40 this turn. Unfortunately, I totally screwed up its setup because I forgot about the extra 1MP per hex entered for a Gun in tow. I would not be able to get it anywhere, where it could threaten important Russian units... This was all the more irritating because I had moved out a 548AE as bait for the remaining T-34 to draw fire, so that the PaK could enter without danger. The 548AE was promply broken in the process.
The Russian peasants surely found the 88 FlaK but did not manage to make it count firing it vs. the ADJACENT Germans. However, not knowing what to do (captured use, unwualified use) and adding a +5 SMOKE Hindrance does not help, admittedly... My Germans could not do much damage either due to all the SMOKE. The Flak-Vierling just continued to look dangerous but did not do real damage. At least in sum I managed to break one of the two 458s in the FlaK's Trench, which was then eliminated for FtR - thanks to my lone leader on the southernmost hill, who was responsible for the demise of 3.5 Russian squads so far either by CC or by causing FtR.
In an attempt to kill the last remaining Russian tank, another 548AE was shot up by it. I did manage to close in for CC, but a leader led 548AE did merely manage to immobilize the tank.
To be continued in subsequent post...
von Marwitz
Last edited: