Mike205
Senior Member
- Joined
- Jul 7, 2017
- Messages
- 150
- Reaction score
- 301
- Country
-

Wir sind auf Sondereinsatz.
Mit welches Vollmacht?
Vollmacht von oben.
Ganz oben.
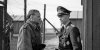
It’s April 1945 and schweres Panzerjager Kompanie 614 finds itself near Zossen, Germany. Their orders are unclear- should they fight their way through to the OKW headquarters located in the town? Or would it be better to hold position, blocking any future Soviet thrust from the south? Perhaps it is best to pull back, conserving their few remaining tank destroyers for the inevitable next fight? Some among them even mutter that they should ignore any orders from above and flee to the west-better to spend the next few years in an American prison camp than languishing in Siberia. Although the Reich is collapsing, the company remains intact, and the men look to Der Hauptmann, Captain Ritter, to decide their fate.
Last Orders is played on halfboards 20 and 10. It would be our first foray into the Friendly Fire scenario series and didn’t disappoint. For starters, there’s the SSR, which calls for four possible, randomly chosen missions for the Germans, and forces them to prepare for any contingency. These missions are determined by selecting a playing card after setup:
Hearts: The Germans counterattack and must secure 28 or more CVP
Clubs: The Germans hold their ground and win if there are 16 or less Soviet CVP on board 10
Diamonds: The Germans retreat and need to move 8 or more AFV CVP off board 10 Y10
Spades: Ritter and the boys try to breakout to the west and win as soon as they exit 10 infantry CVP from 10R5.
As the defender I wound up drawing Hearts.
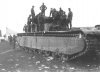
Counterattacking the Soviets would be challenging given the mixed force at my disposal: Two Elephants, a 5-4-8, 2 x 4-4-7s, a 4-3-6, a lmg, and a 8-0 leader supported by an old T-35 which had been mothballed at the nearby Kummersdorf proving grounds since the Wehrmacht captured it in 1941. The beast would be piloted by an inexperienced crew and therefore, despite its coolness factor, it never really got into the fight.
I was also constrained in my setup area, and had to position my troops on board 20 in hexes 5-8. A thin gray line indeed.
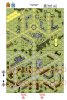
Since I initially had no clue what Captain Ritter would decide to do, I chose to place one Elephant in T5 to cover the bridge and right flank. The second Elephant went into AA5, CA Z6, and put the T35 in Y5 to also cover the traffic circle. The 5-4-8 and lmg went into X5 and across the boulevard was a 4-4-7 in AA6, and the other 4-4-7 and 4-3-6 stacked with the 8-0 in BB5. I planned to push my guys into the CC7 stone building. Regardless of the mission, I hoped to channel the Soviet main effort into the Y7 circle, where I could wind up knocking out a couple of tanks and dice up the infantry before falling back into the Z4 building or beyond, given the mission. I figured I’d lose my armor at some point (hey, this is ASL after all) so to my detriment, I planned to rely in part on PF generation among the infantry. We’d discussed adding the German balance of a PSK but decided to keep it even because of the Elephants and the good possibility of PF creation. In retrospect, I should have taken that PSK and said “thank you sir.”
Doug’s Reds would enter in two groups. Turn 1 two T85s and a 6-2-8 came on , followed by the main force in Turn 2, which consisted of another 6-2-8, 3 x 4-5-8s toting a lmg, FT, and led by a salty 8-1.
Accompanying them were another T85, a SU85, and a truck to transport a couple of squads who didn’t like to walk. Hey, the war’s almost over! By SSR, the truck would not be able to move if empty, and minimum road movement was 1 MF per hex.
His recon force immediately got hammered. The 6-2-8 was reduced to a HS on a K/2 DR compliments of the 4-4-7 in AA6 and broke. One T85 wised up and stopped in Y9, taking an ineffectual shot at the T 5 which was returned, equally ineffectively. The second T85 rolled into S10 and changed CA towards AA6 but Doug declined to take a bounding fire shot.
German turn 1 I was feeling pretty good about myself, despite the fact the Soviet HS managed to rally. I moved my other 4-4-7 and 4-3-6 into BB6 and CC7 respectively and kept my 8-0 back at the BB5 rally point. My T35 managed to hit the T85 but failed to penetrate its glacis. I didn't feel bad because that happens a lot on prom night too, from what I hear.
Soviet turn 2 the rest of Doug’s guys came on board. The 8-1, lmg, and a 4-4-8 slinked into CC9 and the other two into the EE9 building. The 6-2-8 and FT hung back in the GAZ in Y10, the T85 bypassed into DD8 and the SU hung back in CC10.
German turn 2 I was still feeling good about things. In fact I was so optimistic that when the guys in CC7 reached into their pockets and found a PF I moved them into BB7 to engage the T85. They weathered the tank’s defensive fire, which Mal’fed the MA, but wound up dying in the street when the 4-4-8 in EE9 rolled low. That left the old men and boys in DD6.
They failed to turn up a PF so I assault moved them into DD7, hoping to CC the tank during its moment of weakness. They pinned due to Soviet fire and would wind up CAS reducing, disrupting, and then dying the following turn. Just like that I’d lost half my infantry.
Turn 3 the Soviets surged forward. The T85 X’ed its gun and was recalled but the SU rolled forward and in German turn 3 managed to nail the paras in X5 with a critical hit, rubbling the building. My remaining 4-4-7 paired up with the 8-0 and began to retreat. My T35 survived a dud hit from the T85 on the boulevard but was also recalled after MA’ing its gun. German Turn 3 my Elephant managed to kill the T85 at the traffic circle.
However, in Turn 4 it went down in a duel with the T85 creeping up on my right flank. Bent on surviving, my 8-0 and 4-4-7 continued to retreat towards the Z4 Alamo. The FT squad of assault engineers had also moved up and threw a 12FP flame at me in AfP.
But Uncle Joe, I mean Uncle Doug, rolled high and my guys passed the PTC. That scared me though, and Doug managed to herd me deeper into the Z4 building while another squad started moving in behind, hoping to cut off possible rout paths. Just because it could, my last Elephant which lumbered over from the right knocked out the idle GAZ. The SU and the T85 didn’t take it on because Doug wisely protected his largest remaining CVP assets. At game’s end my Elephant moved to support the 4-4-7 and 8-0 in their bid to fend off the barbarians in the Alamo. If the game hadn’t ended it looked well positioned to die by flame. Although I knocked out a T85, I had failed to inflict enough casualties to win. The boys of Kompanie 614 wouldn't make it to the after party in Zossen.

I really like this scenario and its design is next level. Not only do the random “orders” offer up a lot of replay value, but they can really throw a wrench in the defender’s plans. The set up restrictions are also guaranteed to throw the forces together regardless of the mission. Even if they retreat, the Germans will have to stage a fighting withdrawal.
We also liked that this was a tournament style scenario that played quickly over the course of an evening. The only sticky point for me is the balance vs. mission- if the player draws the attack mission, I could see the PSK evening things out because of the German’s need to take out as many AFVs as he can. It may be too much in other missions though, and the players won’t have an inkling of how the balance attributes might effect play due to the randomness of the order generation. Another lmg to beef up the OB or a better leader, likely a 8-1, nothing too crazy, might be a better fit. Perhaps two balance options per side might work in order to provide even more variety and depth.
Lastly, I appreciated that the designers included their source material- I wish this was more common since I often get interested in a battle or campaign and want to learn more.
This one is a banger that we’ll definitely play again.
Attachments
-
 8.2 KB Views: 7
