von Marwitz
Forum Guru
FrF12 The Fields of Black Gold - AAR
I wanted to play this scenario for a long time because it looks quite interesting and ROAR gives it an excellent Excitement Rating of 7.25 (out of 9) based on 73 playings. On the other hand, ROAR also lists 47 Russian wins vs. only 26 Germans. As this seemed to be no detriment to the fun, I took the attacking Germans and gave it a go.
Set in September 1942 near Grozny, this is about as far east as the Germans ever got. The Germans have an excellent elite SS-force supported by 3x Pz IVF2, 1x Pz IVF1, and 2x Pz IIIJ including a 9-2 Armor Leader. The Russians have the same number of 1st Line squads with MOL Capability to keep the Germans honest in their notion of moving ADJACENT. Support consists of 2x 76L ART Ratschbumms, one of which has to be towed into position along with a few MGs and 7 Trenches. The Germans need to secure the Level 3 hill hexes and the 18P7 hill. In Turn 3, the Russians receive armored reinforcements in the form of 2x T-34 M41 and 4x Valentin IIs. The AT capacity of the latter is not exactly impressive and they are slow, but on the other hand their armor provides decent protection vs. the German 50L Guns, they have sM's, and a CMG is surely always useful vs. enemy infantry. Two squads, a leader, and an LMG round off the reinforcements.
Because the Russians were surprised by the German attack, a certain amount of Russian units will be TI for the entire first Game Turn, which is surely something that the Attacker needs to take advantage of. Noteworthy was furthermore, that the EC are Very Dry, there is that MOL Capability and a Light Breeze is blowing from board 2 towards board 18. Kindling is NA, but still - nudge, nudge... Wink, wink...
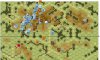
Situation at Start of German Turn 1:
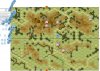
As ROAR had this significantly pro-Russian, I put some careful considerations into the setup and movement for the first German Turn. Looking at the setup of my opponent, I found it appearing mostly sound: Two lines of Infantry screen on the main hill mass that could not be ignored and could prove dangerous with the Russian MOL capability. I suspected the Trenches around the TI units of the victory hills. The two lines of screens would delay my Germans until the TI came off and bought time for the Russian armored reinforcements to make their appearance. I suspected the HIP Russian Gun on a Level 3 Hill as my opponent knew that I would have to move into every one of them and would also have a wide view to threaten German tanks.
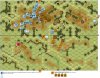
Situation at the End of German Turn 1:
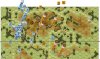
Altogether, my German initial advance worked as planned. The Russian Defensive Fire did hardly any damage, though some German infantry was Pinned in G1 by a lucky shot from the Level 3 hill. And more importantly, one of the valuable Pz IVF2 tanks narrowly escaped two shots from the Russian 76L ART which popped up unexpectedly in 18S10. A number of German HS had moved up ADJACENT to the first screen of Russian infantry to make sitting tightly in place an unpleasant decision.
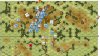
Situation at the End of Russian Turn 1:
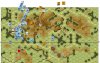
During the Russian Turn 1, the bulk of his force was still TI, so I could do my best to fire at them and gain Acquistion before they could do any harm in return. The first Russian skirmish line attempted to fall back but every one of the three squads was fired at and broken. Better yet, my Final Fire was hideously effective: My tank in D5 blasted the key Russian HMG postion with Leader atop the hill in a Trench out of Concealment and broke everyone. The Russian squad in 2M5 which had previously pinned some Germans on the western flank was broken by the German Pz IVF1. This meant, that not only had the first skirmish line vanished but also the main defensive line atop the hill was decisively weakened before it could fire a shot. I was planning to exploit this situation as best as I could. Meanwhile the Russian second Gun was towed atop the hill in the backfield, which IMHO was not the best of spots to deploy it. Furthermore, the MP cost was calculated incorrectly at first, so that the Gun could not unhook in the position where it is shown on the map in 2BB6. Instead, it unhooked in a less favorable position in 2CC6.
To be continued in subsequent post...
von Marwitz
I wanted to play this scenario for a long time because it looks quite interesting and ROAR gives it an excellent Excitement Rating of 7.25 (out of 9) based on 73 playings. On the other hand, ROAR also lists 47 Russian wins vs. only 26 Germans. As this seemed to be no detriment to the fun, I took the attacking Germans and gave it a go.
Set in September 1942 near Grozny, this is about as far east as the Germans ever got. The Germans have an excellent elite SS-force supported by 3x Pz IVF2, 1x Pz IVF1, and 2x Pz IIIJ including a 9-2 Armor Leader. The Russians have the same number of 1st Line squads with MOL Capability to keep the Germans honest in their notion of moving ADJACENT. Support consists of 2x 76L ART Ratschbumms, one of which has to be towed into position along with a few MGs and 7 Trenches. The Germans need to secure the Level 3 hill hexes and the 18P7 hill. In Turn 3, the Russians receive armored reinforcements in the form of 2x T-34 M41 and 4x Valentin IIs. The AT capacity of the latter is not exactly impressive and they are slow, but on the other hand their armor provides decent protection vs. the German 50L Guns, they have sM's, and a CMG is surely always useful vs. enemy infantry. Two squads, a leader, and an LMG round off the reinforcements.
Because the Russians were surprised by the German attack, a certain amount of Russian units will be TI for the entire first Game Turn, which is surely something that the Attacker needs to take advantage of. Noteworthy was furthermore, that the EC are Very Dry, there is that MOL Capability and a Light Breeze is blowing from board 2 towards board 18. Kindling is NA, but still - nudge, nudge... Wink, wink...
Situation at Start of German Turn 1:
As ROAR had this significantly pro-Russian, I put some careful considerations into the setup and movement for the first German Turn. Looking at the setup of my opponent, I found it appearing mostly sound: Two lines of Infantry screen on the main hill mass that could not be ignored and could prove dangerous with the Russian MOL capability. I suspected the Trenches around the TI units of the victory hills. The two lines of screens would delay my Germans until the TI came off and bought time for the Russian armored reinforcements to make their appearance. I suspected the HIP Russian Gun on a Level 3 Hill as my opponent knew that I would have to move into every one of them and would also have a wide view to threaten German tanks.
Situation at the End of German Turn 1:
Altogether, my German initial advance worked as planned. The Russian Defensive Fire did hardly any damage, though some German infantry was Pinned in G1 by a lucky shot from the Level 3 hill. And more importantly, one of the valuable Pz IVF2 tanks narrowly escaped two shots from the Russian 76L ART which popped up unexpectedly in 18S10. A number of German HS had moved up ADJACENT to the first screen of Russian infantry to make sitting tightly in place an unpleasant decision.
Situation at the End of Russian Turn 1:
During the Russian Turn 1, the bulk of his force was still TI, so I could do my best to fire at them and gain Acquistion before they could do any harm in return. The first Russian skirmish line attempted to fall back but every one of the three squads was fired at and broken. Better yet, my Final Fire was hideously effective: My tank in D5 blasted the key Russian HMG postion with Leader atop the hill in a Trench out of Concealment and broke everyone. The Russian squad in 2M5 which had previously pinned some Germans on the western flank was broken by the German Pz IVF1. This meant, that not only had the first skirmish line vanished but also the main defensive line atop the hill was decisively weakened before it could fire a shot. I was planning to exploit this situation as best as I could. Meanwhile the Russian second Gun was towed atop the hill in the backfield, which IMHO was not the best of spots to deploy it. Furthermore, the MP cost was calculated incorrectly at first, so that the Gun could not unhook in the position where it is shown on the map in 2BB6. Instead, it unhooked in a less favorable position in 2CC6.
To be continued in subsequent post...
von Marwitz