Mike205
Senior Member
- Joined
- Jul 7, 2017
- Messages
- 150
- Reaction score
- 301
- Country
-

After an ASL hiatus imposed by the pandemic and work demands, we decided to inaugurate our return with a Normandy scenario and settled on Fontenay by Day from Dispatches from the Bunker # 38. It covers the British 49th division's efforts during Operation Martlet, which covered the right flank of the Epsom offensive in late June 1944. It depicts the Royal Scots Fusilers' attempt to take Fontenay-le-Pensil, which like many villages in region had been turned into a fortress by the 12th SS.
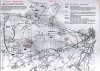
This seven turn scenario played out on half boards 10,19,&44:
Dicing it up, Doug drew the SS garrison, consisting of 2x 8-3-8s, 7 x 6-5-8s armed with a HMG, MMG, 3 LMGs, 2 PSKs, a DC which can be set, a 50L AT gun, 75L AT gun and 2-2-8 crews led by a 10-2, 9-1, and 2 x 8-0 command element. The garrison can fortify three building locations, have 8 ?s, 7 1S foxholes, 2 trenches, 2 wires, and 12 FP of mines at their disposal, supported by an 80mm OBA module. One squad equivalent can set up HIP. On turn four they receive reinforcements in the form of a 6-5-8, LMG, 8-1, and a Panther tank. A small but formidible force.
To pry Fontenay out of Nazi hands, I had 15 x 4-5-8s, 3 x 2-4-8s, a HMG, 2x MMGs, 4 LMGs, 2 X 51mm MTRs, 2 x PIATs, a FT, and 2 DCs, led by a 9-2, 9-1, 8-1, 2 x 8-0s, and a 7-0. They had armored support in the form of 3 x Sherman IIas and a cumbersome Churchill V. On turn 6 they would receive 2 FB 150s. At game start they also have a creeping barrage:

After set up, it appeared that Doug had set up most of his Nazi thugs to cover the board 10 approach, which had the most cover. I decided to use the barrage to go straight across board 10, sending the three Shermans with HS riders armed with a LMG, DC, and PIAT, led by the 9-1 leader towards the lightly defended board 44 flank, with the goal of driving into the undefended backfield and grabbing some buildings. four more squads and a 8-0 would double time it that way as well. Hopefully, this blitz would at the very least pull some precious squads away from the front and disrupt Doug's defensive plans. Everyone else, including the Churchill, HMG, MMGs, FT and remaining leaders would closely follow a board 10 barrage which would march across Fontenay and hopefully smash everything in its path. The Scots would need to take 18 VP worth of stone buildings on board 10 in order to win.
Things turned into a total s-show on turn 1.
The barrage came down on time and on target
and while it would hold course for six turns, it really didn't do much of anything. Sure, it broke a few squads and a 8-0 leader, collapsed two empty buildings, and revealed fighting positions. But it didn't do anything catastrophic and really harmed the Norman fields more than anything, churning up shell holes left and right. Its ineffectiveness would leave the German gun teams unharmed and they would have devestating effect and my troops advanced out of the gate.
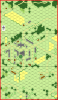
The image below depicts Doug's gun positions:
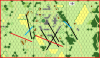
The black lines are the MGs in play on turn one. The HMG and 10-2 revealed themselves in the church steeple in the center of the village, the MMG, 6-5-8 and 9-1 were in V7, a 6-58 and LMG were in U6, another in W3. On the German right flank a 6-5-8 and LMG at Level 1 of BB8 covered the board 44 opene ground, and on the left a 6-5-8 and LMG in a H10 foxhole covered the board 19 road.
The red lines are the 50L AT gun in 44 CC4 and the 75 AT gun in 10 U1. The blue lines are Doug's PSK HS, entrenched in foxholes.
Doug's dice were ultra hot and his HMG and 10-2 went on a tear. Despite the turn 1 +2 LVR hindrance and the dust thrown up by the barrage, he started breaking squads left and right, forcing my men to go to ground. My board 44 blitz immediately ran into trouble too and the 50L took out one Sherman and shocked another which fortunately recovered. The other Sherman MA'ed its gun on the first shot and then Malfed it in the next rally phase to get recalled. What a day.
Those Tommies not caught in small arms fire managed to crawl into a patch of woods and take cover before later advancing and CCing the 75 crew. It would be one of my few successes in the game.
The carnage continued in turn 2- everytime I tried to get guys forward MGs would rip them to shreds, especially the HMG in the church tower. Doug's dice remained hot and he got several KIAs and doled out K/2s like candy as I tried to push forward. One squad even got reduced and wiped out before it could even rally. His SAN 4 sniper was also wild for the first three turns- successful morale checks or good IFT rolls seemed to generate lethal hits constantly, wounding a 7-0 and breaking several HS. What few squads that were able to get forward were disjointed and leaderless. Smoke was few and far between- the lumbering Churchill and MTRs forgot theirs on the start line. The only thing I could do was watch the chaos unfold.
By turn three I'd managed to get a Sherman, 2 4-5-8s, a 9-2, and a few HS led by a 9-1 into the eastern edge of the village and the barrage had broken a few backfield squads. For a moment it looked like the momentum might have turned.

That was when one HS toting a DC decided to go beserk and wound up locked in Melee for two more turns before dying. A set DC in 10U6 then broke two HS and pinned a 4-5-8. My momentum was winding down and by the top of turn 5 I'd totaled up 75 casualties. My remaining forces were too scattered to mount an effective attack against SS in stone buildings. The arrival of the Panther signaled the end and Doug was already making local counterattacks, flanking some of squads by infiltrating the western woods. I never even got to start the purple and call in air support, conceding at the end of British turn 5.
Despite experiencing one of my most complete defeats in my ASL career I enjoyed this scenario. The maps give you a good feel for the terrain and the OB underscore the tough nature of the fighting as the British slogged their way through village after village. If the dice weren't against me and I had invested in a smoke barrage or had better HE effect I think this might have been closer despite Doug's very good defense. Of course, my planning-especially my attempt to blitz across board 44-was also to blame.
My only criticism about the German OB would be the 10-2 leader. I'm not sure its appearance reflects the shoddy state of 12th SS by late June 1944. The German military in general and the Waffen SS in particular prized small unit leadership which led from the front, resulting in heavy casualties among platoon and company commanders. Indeed, some scholars have posited that the loss of beloved and experienced company commanders was one of the reasons why the teenagers of 12th SS committed their atrocities against the Canadians earlier in the month and I've read one account of a unit counter attacking just to retrieve the body of a fallen officer. Likewise, Steven Zaloga in his book on the Ardennes notes that early in the offensive the advance of 12th SS stalled due to so many junior officers becoming casualties. By the end of June 1944 the Hitlerjugend was a shadow of its former self and it doesn't seem likely many leaders of 10-2 caliber would have been left. Dropping the leadership value might be more accurate but that's just me, whoever that guy was he definitely added some swords or oakleaves to that KC because that HMG really chopped my guys up.
We're looking forward to finishing this saga up in Fontenay by Night.
This seven turn scenario played out on half boards 10,19,&44:
Dicing it up, Doug drew the SS garrison, consisting of 2x 8-3-8s, 7 x 6-5-8s armed with a HMG, MMG, 3 LMGs, 2 PSKs, a DC which can be set, a 50L AT gun, 75L AT gun and 2-2-8 crews led by a 10-2, 9-1, and 2 x 8-0 command element. The garrison can fortify three building locations, have 8 ?s, 7 1S foxholes, 2 trenches, 2 wires, and 12 FP of mines at their disposal, supported by an 80mm OBA module. One squad equivalent can set up HIP. On turn four they receive reinforcements in the form of a 6-5-8, LMG, 8-1, and a Panther tank. A small but formidible force.
To pry Fontenay out of Nazi hands, I had 15 x 4-5-8s, 3 x 2-4-8s, a HMG, 2x MMGs, 4 LMGs, 2 X 51mm MTRs, 2 x PIATs, a FT, and 2 DCs, led by a 9-2, 9-1, 8-1, 2 x 8-0s, and a 7-0. They had armored support in the form of 3 x Sherman IIas and a cumbersome Churchill V. On turn 6 they would receive 2 FB 150s. At game start they also have a creeping barrage:
After set up, it appeared that Doug had set up most of his Nazi thugs to cover the board 10 approach, which had the most cover. I decided to use the barrage to go straight across board 10, sending the three Shermans with HS riders armed with a LMG, DC, and PIAT, led by the 9-1 leader towards the lightly defended board 44 flank, with the goal of driving into the undefended backfield and grabbing some buildings. four more squads and a 8-0 would double time it that way as well. Hopefully, this blitz would at the very least pull some precious squads away from the front and disrupt Doug's defensive plans. Everyone else, including the Churchill, HMG, MMGs, FT and remaining leaders would closely follow a board 10 barrage which would march across Fontenay and hopefully smash everything in its path. The Scots would need to take 18 VP worth of stone buildings on board 10 in order to win.
Things turned into a total s-show on turn 1.
The barrage came down on time and on target
and while it would hold course for six turns, it really didn't do much of anything. Sure, it broke a few squads and a 8-0 leader, collapsed two empty buildings, and revealed fighting positions. But it didn't do anything catastrophic and really harmed the Norman fields more than anything, churning up shell holes left and right. Its ineffectiveness would leave the German gun teams unharmed and they would have devestating effect and my troops advanced out of the gate.
The image below depicts Doug's gun positions:
The black lines are the MGs in play on turn one. The HMG and 10-2 revealed themselves in the church steeple in the center of the village, the MMG, 6-5-8 and 9-1 were in V7, a 6-58 and LMG were in U6, another in W3. On the German right flank a 6-5-8 and LMG at Level 1 of BB8 covered the board 44 opene ground, and on the left a 6-5-8 and LMG in a H10 foxhole covered the board 19 road.
The red lines are the 50L AT gun in 44 CC4 and the 75 AT gun in 10 U1. The blue lines are Doug's PSK HS, entrenched in foxholes.
Doug's dice were ultra hot and his HMG and 10-2 went on a tear. Despite the turn 1 +2 LVR hindrance and the dust thrown up by the barrage, he started breaking squads left and right, forcing my men to go to ground. My board 44 blitz immediately ran into trouble too and the 50L took out one Sherman and shocked another which fortunately recovered. The other Sherman MA'ed its gun on the first shot and then Malfed it in the next rally phase to get recalled. What a day.
Those Tommies not caught in small arms fire managed to crawl into a patch of woods and take cover before later advancing and CCing the 75 crew. It would be one of my few successes in the game.
The carnage continued in turn 2- everytime I tried to get guys forward MGs would rip them to shreds, especially the HMG in the church tower. Doug's dice remained hot and he got several KIAs and doled out K/2s like candy as I tried to push forward. One squad even got reduced and wiped out before it could even rally. His SAN 4 sniper was also wild for the first three turns- successful morale checks or good IFT rolls seemed to generate lethal hits constantly, wounding a 7-0 and breaking several HS. What few squads that were able to get forward were disjointed and leaderless. Smoke was few and far between- the lumbering Churchill and MTRs forgot theirs on the start line. The only thing I could do was watch the chaos unfold.
By turn three I'd managed to get a Sherman, 2 4-5-8s, a 9-2, and a few HS led by a 9-1 into the eastern edge of the village and the barrage had broken a few backfield squads. For a moment it looked like the momentum might have turned.
That was when one HS toting a DC decided to go beserk and wound up locked in Melee for two more turns before dying. A set DC in 10U6 then broke two HS and pinned a 4-5-8. My momentum was winding down and by the top of turn 5 I'd totaled up 75 casualties. My remaining forces were too scattered to mount an effective attack against SS in stone buildings. The arrival of the Panther signaled the end and Doug was already making local counterattacks, flanking some of squads by infiltrating the western woods. I never even got to start the purple and call in air support, conceding at the end of British turn 5.
Despite experiencing one of my most complete defeats in my ASL career I enjoyed this scenario. The maps give you a good feel for the terrain and the OB underscore the tough nature of the fighting as the British slogged their way through village after village. If the dice weren't against me and I had invested in a smoke barrage or had better HE effect I think this might have been closer despite Doug's very good defense. Of course, my planning-especially my attempt to blitz across board 44-was also to blame.
My only criticism about the German OB would be the 10-2 leader. I'm not sure its appearance reflects the shoddy state of 12th SS by late June 1944. The German military in general and the Waffen SS in particular prized small unit leadership which led from the front, resulting in heavy casualties among platoon and company commanders. Indeed, some scholars have posited that the loss of beloved and experienced company commanders was one of the reasons why the teenagers of 12th SS committed their atrocities against the Canadians earlier in the month and I've read one account of a unit counter attacking just to retrieve the body of a fallen officer. Likewise, Steven Zaloga in his book on the Ardennes notes that early in the offensive the advance of 12th SS stalled due to so many junior officers becoming casualties. By the end of June 1944 the Hitlerjugend was a shadow of its former self and it doesn't seem likely many leaders of 10-2 caliber would have been left. Dropping the leadership value might be more accurate but that's just me, whoever that guy was he definitely added some swords or oakleaves to that KC because that HMG really chopped my guys up.
We're looking forward to finishing this saga up in Fontenay by Night.
Attachments
-
 16.7 KB Views: 7