Vrosso
Member
Had the pleasure of playing this one as the defender vs. James Taylor in the Deluxe VASL league that is run by Carl. I think this was the semi-final round and this game ended up being a ten and a half turn chess match that went down to the wire. To set things up, based on the 30-21 ratio in Roar, we gave the Germans half balance (reduction of VP from 50 to 47.5) and then diced for sides.
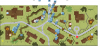
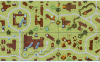
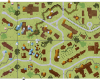
So we'll post images from my turns thru the 10 game turns.
Below is a screen shot of Turn 1. Looking back, as memory serves me right, I see a lot of things that could have been done better and against James, I learned a lot, and added to my bag of tricks, a lot of subtle nuances to improve my game play.
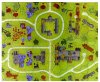
My first challenge was not seeing a couple of LOS, as luck would be in my favor (somewhat), didn't pay too dearly for that. Did lose one of my MMG's when the leader/squad broke and ran away. The challenge was due to them setting up within LOS of first floor locations in Jame's area. The 9-2 with two HMG's will provide a lot of hurt. Out of the gate, the mmg was down and the 50 cal/and my 9-1 was under fire turn 1.
The defensive theory (at least I like to call it that, but in reality it was a little better than just chucking the counters on the board), was to put up some light resistance up front and have a main line of defense along the board edge where the terrain goes down to woods. That's where the guns and tanks where. In reality, that plan didn't work out so well as the center was under heavy fire and I had to spend most of the game repositioning my lines, which meant the guns/tanks were not where they needed to be at the end.
So turn 1 ended pretty well for me, only lost the use of a mmg and will never regain that.
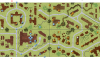
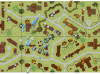
Going into my turn 2:
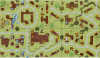
I seem to be doing well on the top board, but James has entered the large building on the lower board and has one of my squads encircled.
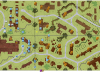
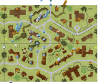
Going into my 3rd turn:
One of my HIP squads turns up in the upper building (hiding under the encircled counter) but we're holding on to the top board fairly well, the lower board is being evacuated. My tanks in bN1 decides it is time to get while the getting is good as the panthers approach and it's location will become untenable.
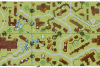
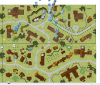
Going into my 4th:
The HIP unit on Bdc has been eliminated and my other HIP unit aN4 is about to be pulverized (that LMG will soon become a German possessed weapon). One of my T34's has relocated to the guns hex to try to disguise that a gun is there and draw the Panthers in to two guns.
Going into my 5th turn (a critical one).
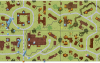
One Panther moved within two hexes of a gun on the lower board and will be immobilized (James would throw boxcars on an intensive fire shot and shred the gun forcing the crew to abandon). The gun in bN4 after firing all APCR at the panther in cJ4 would be able to DI on a 5, but I couldn't manage to make that roll. So one tank stopped here. The main line is engaged, but will not be able to hold up against the 9-2's firepower in the center.
Going into my 6th.
The gun crew in bM2 would keep rallying (at least twice while under DM) until removed from the board by Jame's fire. My 50 cal in dF2 pulled off a trick shot and killed a unit in bO5 establishing a LOS. What I failed to do was a start roll on my concealed T34 when the panther parked in that hex (a small gaffe in my game that would hurt me). The gun in bM5 will pop out and immobilize the panther, but the panther will kill my T34 on a tough shot but good roll (5 to hit after failing on the SD). Two panthers stopped, I'm feeling pretty good.
Going into my 7th:
Things are still looking pretty good for me. My gun is still hidden adjacent to the 9-2. I played this, by waiting to the adv fire phase, taking a single shot at the 9-2 (NE) retaining concealment and then hoping to jump on the adjacent HS in cc and hopefully free prisoners. This was poor play, James broke the hs and ran away. Would have been better to stay hidden and then jump the HS by surprise (this could have made a difference in the outcome of the game).
The bad news, James knows where all the guns are, the tanks are free to cause mayhem!
Going into my 8th:
More bad news, the 9-2 is in the tower with 3 squads, 2 HMG and a MMG. Worse the radio operator is with him. My last tank will reposition to fire on this hex from the back.
Going into my 9th:
Things are getting dodgy, I'll be able to hide my units in the area of dI1 but will lose them in Jame's next turn, but am still holding on. Will lose the use of my 50 this upcoming turn. The concealed squad in dC1 will move to the first level of dD1 and prevent the 9-2 stack from being able to exit the board (unless they want to survive an 8-2 shot).
Going into my 10th:
I really miss my units in the area of dI1. The panther in dK3 moved up too far and the 9-1/fanatic 628 will manage to ambush and immobilize it. The 628 will even advance into the street for the final turn to mess with Jame's exit plans (but fail a NMC!!!!).
more to follow.....
So we'll post images from my turns thru the 10 game turns.
Below is a screen shot of Turn 1. Looking back, as memory serves me right, I see a lot of things that could have been done better and against James, I learned a lot, and added to my bag of tricks, a lot of subtle nuances to improve my game play.
My first challenge was not seeing a couple of LOS, as luck would be in my favor (somewhat), didn't pay too dearly for that. Did lose one of my MMG's when the leader/squad broke and ran away. The challenge was due to them setting up within LOS of first floor locations in Jame's area. The 9-2 with two HMG's will provide a lot of hurt. Out of the gate, the mmg was down and the 50 cal/and my 9-1 was under fire turn 1.
The defensive theory (at least I like to call it that, but in reality it was a little better than just chucking the counters on the board), was to put up some light resistance up front and have a main line of defense along the board edge where the terrain goes down to woods. That's where the guns and tanks where. In reality, that plan didn't work out so well as the center was under heavy fire and I had to spend most of the game repositioning my lines, which meant the guns/tanks were not where they needed to be at the end.
So turn 1 ended pretty well for me, only lost the use of a mmg and will never regain that.
Going into my turn 2:
I seem to be doing well on the top board, but James has entered the large building on the lower board and has one of my squads encircled.
Going into my 3rd turn:
One of my HIP squads turns up in the upper building (hiding under the encircled counter) but we're holding on to the top board fairly well, the lower board is being evacuated. My tanks in bN1 decides it is time to get while the getting is good as the panthers approach and it's location will become untenable.
Going into my 4th:
The HIP unit on Bdc has been eliminated and my other HIP unit aN4 is about to be pulverized (that LMG will soon become a German possessed weapon). One of my T34's has relocated to the guns hex to try to disguise that a gun is there and draw the Panthers in to two guns.
Going into my 5th turn (a critical one).
One Panther moved within two hexes of a gun on the lower board and will be immobilized (James would throw boxcars on an intensive fire shot and shred the gun forcing the crew to abandon). The gun in bN4 after firing all APCR at the panther in cJ4 would be able to DI on a 5, but I couldn't manage to make that roll. So one tank stopped here. The main line is engaged, but will not be able to hold up against the 9-2's firepower in the center.
Going into my 6th.
The gun crew in bM2 would keep rallying (at least twice while under DM) until removed from the board by Jame's fire. My 50 cal in dF2 pulled off a trick shot and killed a unit in bO5 establishing a LOS. What I failed to do was a start roll on my concealed T34 when the panther parked in that hex (a small gaffe in my game that would hurt me). The gun in bM5 will pop out and immobilize the panther, but the panther will kill my T34 on a tough shot but good roll (5 to hit after failing on the SD). Two panthers stopped, I'm feeling pretty good.
Going into my 7th:
Things are still looking pretty good for me. My gun is still hidden adjacent to the 9-2. I played this, by waiting to the adv fire phase, taking a single shot at the 9-2 (NE) retaining concealment and then hoping to jump on the adjacent HS in cc and hopefully free prisoners. This was poor play, James broke the hs and ran away. Would have been better to stay hidden and then jump the HS by surprise (this could have made a difference in the outcome of the game).
The bad news, James knows where all the guns are, the tanks are free to cause mayhem!
Going into my 8th:
More bad news, the 9-2 is in the tower with 3 squads, 2 HMG and a MMG. Worse the radio operator is with him. My last tank will reposition to fire on this hex from the back.
Going into my 9th:
Things are getting dodgy, I'll be able to hide my units in the area of dI1 but will lose them in Jame's next turn, but am still holding on. Will lose the use of my 50 this upcoming turn. The concealed squad in dC1 will move to the first level of dD1 and prevent the 9-2 stack from being able to exit the board (unless they want to survive an 8-2 shot).
Going into my 10th:
I really miss my units in the area of dI1. The panther in dK3 moved up too far and the 9-1/fanatic 628 will manage to ambush and immobilize it. The 628 will even advance into the street for the final turn to mess with Jame's exit plans (but fail a NMC!!!!).
more to follow.....
Last edited: