Adrian Carter
Senior Member
We decided to take the plunge and play the Sparrow Force campaign game (CG) from the excellent ASL Journal #14 from Andy Rogers and the team down under. It appeared to be a lighter entry into the joys of campaign games consisting of three related scenarios. The extent of the win in the first scenario defines the victory points that are carried over to the next scenario. Each scenario consists of a fixed order of battle plus Reinforcement Groups (RG) purchased each turn based on the CPP values in the applicable table. The campaign is set in Babau, West Timor between 20 and 22 February 1942 with the Japanese attacking the village of Koepang and the Penfui airfield defended by the Australian 2/40th Battalion of Sparrow Force.
CG Day 1 Flying Samurai was the first scenario representing the initial attack by elements of the Japanese 1 Company, Yosuka 3rd Special Naval Landing Force, Eastern Department in Babau, West Timor defended by elements of the HQ Company and rear echelon units of the Australian 2/40th Battalion. The Japanese have 8 turns to secure the huts and buildings of the village of Koepang. I defended with the Australians and my regular gaming buddy, Johan, attacked with the Japanese.
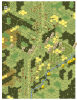
Start of Game. This looked to be a classical pendulum style scenario. My weak Australian forces were facing overwhelming Japanese strength but as the turns progress the reinforcements swing the pendulum back to the Australians. My plan was to use cover to cause some initial Japanese casualties before falling back to the victory buildings west of the white dotted line. I had 20 FPP to spend so I bought HIP for 3 MMCs and the rest I spent on dummies. I guessed my best defence was deception and subterfuge so I scattered some dummy stacks in D14, R11, V15, and Z14 and my 3 HIP MMC in N14, T16, and T10 which I thought would be likely routes of Japanese attack. I did not purchase any foxholes because I think they can be very dangerous for the defenders if they are trying to fall back. I even went the full Monty and decided to save my 2 CPP on turn 1 so that I could spend 4 CPP on turn 2. I also reckoned that my reinforcements on turn 2 could secure the rear areas quickly such that I didn’t need any libero defenders to the start. The Japanese looked as if they would advance through the paddy fields whilst sending a long left hook around the southern end of the board. Let’s see how this played out.
Start of Turn 3. The Japanese had successfully crossed the stream and paddy fields but had taken some casualties thereby causing some visible striping. It was the first time for both of us with the paddy field rules, but after a little time we got the hang of it. Basically, running across the banks is fast but dangerous, and going through them is slow but safer. The first HIP MMC in Q15 revealed itself to cause a KIA on a Japanese MMC counter. The Japanese reinforcements were arriving in strength and the Australians were falling back. The Japanese were also looking to turn the flank of the Australians on the northern side of the map. I was reasonably happy with my defence up to this point but things can change quickly with the ASL dice gods.
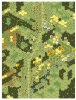
Start of turn 6. The Japanese attack had been slow but sure, and Johan had successfully completed a successful banzai attack which took his troops into the woods as a stepping point for the attack on the village. By this stage of the game the pendulum of forces had swung back to the Australians. I had numerous forces in and around the village of Koepang ready to face the inevitable final Japanese banzai attacks. The Japanese hook around the south had been thwarted by some Australian reinforcements that had entered in the south along the trail. The Japanese hook around the north had made better progress, but was losing steam slowly. All set for the mayhem of turns 6, 7, and 8.
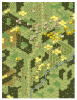
End of Game. The image shows the positions at the start of the final Aussie turn 8 at which point we decided to end the scenario. Despite some valiant banzai attacks, the Japanese had only secured 1 victory building for 2 VP whilst the Australians still had 30. The Japanese had suffered 36 CVP in the process and the Australians had only lost 20 CVP. Thus there no chance that the Japanese could have reduced the net positive VP below +9 for the Australians. One banzai attack was foiled by some diabolic ASL dice. On a subsequent first fire point blank shot I rolled snake eyes to cause a K/2 result on a stack containing 3 half squads and a leader. Johan’s random selection die rolls were 6, 6, 6, 6, which destroyed everything. Can you believe it? And that was following my snake eyes. The Australians garnered an outright win and +5 VP to carry over to the next scenario. Stay tuned.
This was a wild scenario especially at the end with lots of forces on the board. It was great fun even if it does look tough for the Japanese.
CG Day 1 Flying Samurai was the first scenario representing the initial attack by elements of the Japanese 1 Company, Yosuka 3rd Special Naval Landing Force, Eastern Department in Babau, West Timor defended by elements of the HQ Company and rear echelon units of the Australian 2/40th Battalion. The Japanese have 8 turns to secure the huts and buildings of the village of Koepang. I defended with the Australians and my regular gaming buddy, Johan, attacked with the Japanese.
- Japanese advantages: Strong forces and reinforcements initially, lots of cover, banzai
Japanese disadvantages: Lot of ground to cover, paddy fields to negotiate - Australian advantages: Deception and subterfuge, Strong reinforcements later
Australian disadvantages: Weak 2nd line troops initially
Start of Game. This looked to be a classical pendulum style scenario. My weak Australian forces were facing overwhelming Japanese strength but as the turns progress the reinforcements swing the pendulum back to the Australians. My plan was to use cover to cause some initial Japanese casualties before falling back to the victory buildings west of the white dotted line. I had 20 FPP to spend so I bought HIP for 3 MMCs and the rest I spent on dummies. I guessed my best defence was deception and subterfuge so I scattered some dummy stacks in D14, R11, V15, and Z14 and my 3 HIP MMC in N14, T16, and T10 which I thought would be likely routes of Japanese attack. I did not purchase any foxholes because I think they can be very dangerous for the defenders if they are trying to fall back. I even went the full Monty and decided to save my 2 CPP on turn 1 so that I could spend 4 CPP on turn 2. I also reckoned that my reinforcements on turn 2 could secure the rear areas quickly such that I didn’t need any libero defenders to the start. The Japanese looked as if they would advance through the paddy fields whilst sending a long left hook around the southern end of the board. Let’s see how this played out.
Start of Turn 3. The Japanese had successfully crossed the stream and paddy fields but had taken some casualties thereby causing some visible striping. It was the first time for both of us with the paddy field rules, but after a little time we got the hang of it. Basically, running across the banks is fast but dangerous, and going through them is slow but safer. The first HIP MMC in Q15 revealed itself to cause a KIA on a Japanese MMC counter. The Japanese reinforcements were arriving in strength and the Australians were falling back. The Japanese were also looking to turn the flank of the Australians on the northern side of the map. I was reasonably happy with my defence up to this point but things can change quickly with the ASL dice gods.
Start of turn 6. The Japanese attack had been slow but sure, and Johan had successfully completed a successful banzai attack which took his troops into the woods as a stepping point for the attack on the village. By this stage of the game the pendulum of forces had swung back to the Australians. I had numerous forces in and around the village of Koepang ready to face the inevitable final Japanese banzai attacks. The Japanese hook around the south had been thwarted by some Australian reinforcements that had entered in the south along the trail. The Japanese hook around the north had made better progress, but was losing steam slowly. All set for the mayhem of turns 6, 7, and 8.
End of Game. The image shows the positions at the start of the final Aussie turn 8 at which point we decided to end the scenario. Despite some valiant banzai attacks, the Japanese had only secured 1 victory building for 2 VP whilst the Australians still had 30. The Japanese had suffered 36 CVP in the process and the Australians had only lost 20 CVP. Thus there no chance that the Japanese could have reduced the net positive VP below +9 for the Australians. One banzai attack was foiled by some diabolic ASL dice. On a subsequent first fire point blank shot I rolled snake eyes to cause a K/2 result on a stack containing 3 half squads and a leader. Johan’s random selection die rolls were 6, 6, 6, 6, which destroyed everything. Can you believe it? And that was following my snake eyes. The Australians garnered an outright win and +5 VP to carry over to the next scenario. Stay tuned.
This was a wild scenario especially at the end with lots of forces on the board. It was great fun even if it does look tough for the Japanese.