Thunderchief
Elder Member
Slaughter in the Water continued...and becomes a messy land battle.
The fighting is mostly in the RB2 area and each player turn is taking about 2 hours, so overall things are speeding up.
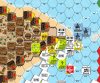
US T1 – It’s going to be a battle for the middle of the island. The IJA are stacked mostly one squad to a hex, but we got some planes! 3 lovely planes! Some WP to start worked well but there was a HOB for the IJA and a SAN killed an 8-1 of mine. Lots of ROF from mortars and MGs was very good – lots of stripes around and even a few kills. There was also lots of acq for later if the IJA hangs around. One mortar scored a CH on a bombproof and I killed a Ha-Go with a Stuart. Movement went smoothly and everyone made it safely on board. The front lines are thin for both of us, but the IJA stripes while the US breaks - so mine is more fragile at the moment.
IJA T1 – I am concerned about my front line. I would not put it past the IJA to fire everything and charge and try and wipe me out in one turn, forcing me to take back the beaches. 3 x 347s were added to the IJA reinforcement pool. No extras to bring on though. Prep cost me two Stuarts and another was shocked – I always seem to fail Possible Shocks! About half of the front line ended up as broken too, so the guys remaining (and the planes) are going to have to kill a whole bunch of IJA. Another Stuart went down to a THH that managed to get an ATMM. Lots of IJA assault moved to close the front line gaps and get in close with my guys. The planes did a very little bit of damage but nothing significant. A leader of mine threw a DC and caused some ELRs and casualties for a big stack of IJA ready to assault my line. The roll vs my hex broke and wounded the leader that threw it but caused the broken squad to rally and go berserk. This unit then fired on the same stack with good results. My 9-2 AL in a Stuart killed an IJA tank and my MGs along the line killed, pinned, broke and striped a whole bunch of IJA squads which was very good news and surely saved some of my guys. CC went about 50/50 - it's deadly on this island.
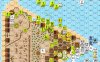
US T2 – One plane only, but better than nothing. Prep went ok with lots of ROF but a few SANs in return. Movement was pain free except the berserker who died in the hex he moved into. One LVT made it off the map and a bunch made it on to RB2 but without enough MPs to unload this turn.The pier is very busy and parts are overstacked but it’s good for the advance phase at least. There was some heavy AA but it missed the plane. The RB1 wrecks are providing a lot of cover for the troops on RB2 and those landing there. The IJA rolled a few snakes – cost me some units as well as the 9-2AL in the Stuart. This was when the deadly stack of 9-2/668wHMG+MMG/768wFT+HMG went down. A sad moment – those guys were doing good work. By the end of DFire all I had was a broken 668 and a bunch of MGs and an unpossessed FT. There are so many SW on each side it’s madness. Lots of routing and no CC, I can’t afford to do any until my reinforcements arrive on the front line.
IJA T2 – The IJA received 9 counters as reinforcements – two leaders and seven squads were chosen. There were some good rallies for me, but half my front line of RB2 went down to the IJA prep then there was a general movement to my guys. Nasty stuff and a berserker got into a PB with me on RB3. My sole FB hit the 140L with a bomb but the crew passed the 2MC, so zero result there. DFire saved a few of my guys and did a bit of damage but not nearly enough. An LVT malfed the MA and one of the 4FP MGs. A few Korean units died FTR, which was nice then it was just a matter of how many guys I lost in CC. I’ve lost a bit of terrain – but how many squads? I am lucky that my guys will be unloading next turn and more new guys will be coming on – I need them desperately. This turn was low on casualties but I have a lot of broken guys that need to recover, and a lot of my good SW will soon be in IJA hands if he can get them in the next rally phase.
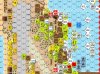
US T3 – LETS HOPE FOR SOME NOBA TOO! No planes, and I killed a crew and CRd a squad in the rally phase. Almost no rallies, and the IJA just pick up a bucket load of my SW. Very average prep fire, I got a few guys but not nearly enough – I’m really going to suffer I think. In movement I got a lot of new guys onto the beach, exited some LVTs (though one was lost on RB2), and all my reinfs got on unscathed. I tried to place two DCs, but only one was successful, but at least it was on the biggest stack. IJA malfed a FT of mine he captured, but still killed a HS with it. At one stage I had six leaders in a stack – just had to get them all into position where they can get at the IJA, no matter what. The IJA fired a lot of shots and scored a few critical hits – this is depressing. I lost two squads for FTR, both 668s. There were a few CCs and we lost a bit each, but no breakthroughs took place. The front line is a mixed mess. I have a bunch of broken units hiding in pillboxes adjacent to the beach. They are temporarily safe but have to rally soon or it'll be all over for them.
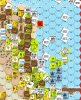
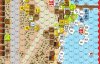
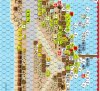
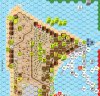
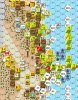
The image is the map at the end of 20PM US T3. This would be a nightmare to play FTF with counters, it's hard enough on VASL.
This is definitely hardcore ASL and the US player's PMC is tested repeatedly. At this stage, a few good rolls for the IJA in the right places and the US may collapse.
The US have now lost 501 (+79) CVP and the IJA have now lost 212 (+65) CVP. CVP losses in brackets are those suffered in the second scenario.
The fighting is mostly in the RB2 area and each player turn is taking about 2 hours, so overall things are speeding up.
US T1 – It’s going to be a battle for the middle of the island. The IJA are stacked mostly one squad to a hex, but we got some planes! 3 lovely planes! Some WP to start worked well but there was a HOB for the IJA and a SAN killed an 8-1 of mine. Lots of ROF from mortars and MGs was very good – lots of stripes around and even a few kills. There was also lots of acq for later if the IJA hangs around. One mortar scored a CH on a bombproof and I killed a Ha-Go with a Stuart. Movement went smoothly and everyone made it safely on board. The front lines are thin for both of us, but the IJA stripes while the US breaks - so mine is more fragile at the moment.
IJA T1 – I am concerned about my front line. I would not put it past the IJA to fire everything and charge and try and wipe me out in one turn, forcing me to take back the beaches. 3 x 347s were added to the IJA reinforcement pool. No extras to bring on though. Prep cost me two Stuarts and another was shocked – I always seem to fail Possible Shocks! About half of the front line ended up as broken too, so the guys remaining (and the planes) are going to have to kill a whole bunch of IJA. Another Stuart went down to a THH that managed to get an ATMM. Lots of IJA assault moved to close the front line gaps and get in close with my guys. The planes did a very little bit of damage but nothing significant. A leader of mine threw a DC and caused some ELRs and casualties for a big stack of IJA ready to assault my line. The roll vs my hex broke and wounded the leader that threw it but caused the broken squad to rally and go berserk. This unit then fired on the same stack with good results. My 9-2 AL in a Stuart killed an IJA tank and my MGs along the line killed, pinned, broke and striped a whole bunch of IJA squads which was very good news and surely saved some of my guys. CC went about 50/50 - it's deadly on this island.
US T2 – One plane only, but better than nothing. Prep went ok with lots of ROF but a few SANs in return. Movement was pain free except the berserker who died in the hex he moved into. One LVT made it off the map and a bunch made it on to RB2 but without enough MPs to unload this turn.The pier is very busy and parts are overstacked but it’s good for the advance phase at least. There was some heavy AA but it missed the plane. The RB1 wrecks are providing a lot of cover for the troops on RB2 and those landing there. The IJA rolled a few snakes – cost me some units as well as the 9-2AL in the Stuart. This was when the deadly stack of 9-2/668wHMG+MMG/768wFT+HMG went down. A sad moment – those guys were doing good work. By the end of DFire all I had was a broken 668 and a bunch of MGs and an unpossessed FT. There are so many SW on each side it’s madness. Lots of routing and no CC, I can’t afford to do any until my reinforcements arrive on the front line.
IJA T2 – The IJA received 9 counters as reinforcements – two leaders and seven squads were chosen. There were some good rallies for me, but half my front line of RB2 went down to the IJA prep then there was a general movement to my guys. Nasty stuff and a berserker got into a PB with me on RB3. My sole FB hit the 140L with a bomb but the crew passed the 2MC, so zero result there. DFire saved a few of my guys and did a bit of damage but not nearly enough. An LVT malfed the MA and one of the 4FP MGs. A few Korean units died FTR, which was nice then it was just a matter of how many guys I lost in CC. I’ve lost a bit of terrain – but how many squads? I am lucky that my guys will be unloading next turn and more new guys will be coming on – I need them desperately. This turn was low on casualties but I have a lot of broken guys that need to recover, and a lot of my good SW will soon be in IJA hands if he can get them in the next rally phase.
US T3 – LETS HOPE FOR SOME NOBA TOO! No planes, and I killed a crew and CRd a squad in the rally phase. Almost no rallies, and the IJA just pick up a bucket load of my SW. Very average prep fire, I got a few guys but not nearly enough – I’m really going to suffer I think. In movement I got a lot of new guys onto the beach, exited some LVTs (though one was lost on RB2), and all my reinfs got on unscathed. I tried to place two DCs, but only one was successful, but at least it was on the biggest stack. IJA malfed a FT of mine he captured, but still killed a HS with it. At one stage I had six leaders in a stack – just had to get them all into position where they can get at the IJA, no matter what. The IJA fired a lot of shots and scored a few critical hits – this is depressing. I lost two squads for FTR, both 668s. There were a few CCs and we lost a bit each, but no breakthroughs took place. The front line is a mixed mess. I have a bunch of broken units hiding in pillboxes adjacent to the beach. They are temporarily safe but have to rally soon or it'll be all over for them.
The image is the map at the end of 20PM US T3. This would be a nightmare to play FTF with counters, it's hard enough on VASL.
This is definitely hardcore ASL and the US player's PMC is tested repeatedly. At this stage, a few good rolls for the IJA in the right places and the US may collapse.
The US have now lost 501 (+79) CVP and the IJA have now lost 212 (+65) CVP. CVP losses in brackets are those suffered in the second scenario.