So, TM-III. 1/2 way through the CG. The Canadians are beyond the 1st road and now I need to keep as many of them from crossing the 2nd and 3rd roads. I've been buying max infantry (3 whole squads, oh my!) as well as max MGs and for the most part, putting them in the village. So he has to come and root me out. The Canadians have lots of chrome and the Germans limited long range AT assets. Still, I am in a decent position.
I continue to max out my infantry purchases and put the SS platoon in reserve to save on CPPs. I get another Pz IVJ and I buy a PaK 40 and put it in the upper level of K22, which I had already fortified for this purpose. Sure, it's an easy target but it should be able to take out a few AFVs and keep the SMOKE machines busy. I'm low in CPPs at this point so I round out the purchases with some more fortification points and an 81mm OBA module. I don't have enough for 2nd OBA module so opt for the last section of 75mm INF guns, but they'll have to be pushed from offboard. No worries as I don't expect to use them until TM-IV.
I setup pretty much in the village with some dummies up front. The Canadians need to come in hard this TM so I might as well take advantage of +3 stone TEM and try to kill as many as I can as they come in.
German setup for TM-III
(image:
http://www.komerex.com/asl/images/BB/TM-III-German-setup.jpg)
Canadian 1:
Guy purchases Recon and if reveals most of the dummies I had up front. Oh well, I tried. He finds a few real units too, but they all get their concealment back. No SMOKE shots and we discover the Canadians have 2 OBA modules. The 1st fails radio contact but the 2nd succeeds and draws a black card. But the AR is put on a spot where it needs to make an extra chit draw and that is red so it loses battery access. No other Prep shots.
The offboard stuff moves first and in the west, a Sherman III with riders heads for the western fascine. It gets 1 hex short and drives into a 1FP resid left from an HMG earlier which cowered and failed to get a firelane done (at an OT Achilles). But the 1FP manages to break a 457/MMG and 247. Then on the bailout they both fail again so all that's left is a 247. Yes, I point out that riders only has 14PP so this was "overstacked" but we played it through for A.2. In the east, another Achilles gets immobilized from AT mines in EE7 (he kept driving by them in TM-I and TM-II). Further eastern movement attracts some more firelanes which only pins a 457 and creates a hero.

In the middle, about 1.5 squads approach a 348/MMG (which had a firelane pointing eastward). The foxhole in H18 is captured but that activates a 348/PsK reserve unit in H21. More units move southward in the west to attract more firelanes but for NE. All of the AFVs move up and get within 4-5 hexes of the village.
DFPh starts off poorly as my OBA draws a red card and the 81mm MTR rolls boxcars. But, the PaK 40 reveals itself and with a great ROF tear takes out and the flailless Crab (crew lives), an Achilles (crew perished) and shocked a Sherman III but loses concealment in the process.
During AFPh, Guy rolls a bunch of 3's which gives warm and hot snipers (the first of the game IIRC) and also rolls snakes from a Sherman III to KIA an 8-0 and 348/MMG. The middle 348/MMG also dies as one of those 3's gets a K/2. So the Canadians do some good damage despite losing some AFVs. Several ACQ counters show up and the grain continues to burn.
The few DM units on the map route safely and the Canadians move forward in APh. They fail to clear mines in P11 but they got the TL there anyway so they will probably back out next turn.
(image:
http://www.komerex.com/asl/images/BB/TM-III-1-endofC1.jpg)
German 1:
I do not fix my 81mm MTR and the Sherman III goes from Shocked to UK for RPh. The HMG in the A13 pillbox double breaks a busted 1/2 squad in A9 to start PFPh. The mighty PaK 40 burns the Sherman III that was UK (it has a -2 ACQ on it) and with the RoF shot, changes its CA to shoot at a Firefly. The 1st shot is a miss but another RoF shot gets it to kill but not burn. I hate to admit it, but I forgot to do my OBA this turn.
MPh is mainly skulking but I need to shift some MGs around to cover my losses in Canadian 1. My newly purchased Pz IVJ comes on board and stays in the middle as I'm not sure where he is needed yet. I try pushing my 2 INF guns on board but even with M10, I still gaff the rolls!
For DF, Guy draws a red card for OBA1 and a black card for OBA2. OBA2 gets an SR down near K22. The AVRE takes a MG shot at the 348/PsK and breaks him with a NMC. Not much for the rest of the turn.
(image:
http://www.komerex.com/asl/images/BB/TM-III-2-endofG1.jpg)
Canadian 2:
I fix the 81mm MTR in RPh and a 658 picks up the MMG in U19 which was discarded in Canadian 1 but a crit from a Sherman III left it lonely. Guy fires SMOKE from the N18 Sherman III into P18 and OBA2 comes down as SMOKE in K23, which effectively covers the 75L and several other German units in that area. OBA1 draws another red card. The immobilized Sherman III in U7 (which got the critical hit in Canadian 1) shoots again a U19 (658/MMG) to miss but he IFs and gets another crit! This KIAs the 658!
I was not able to take detailed notes of the MPh since I had my 6 day old son in my lap at the time (start 'em young!). But, Guy was fairly aggressive moving up. No major shooting on my part, though, but I did manage to break at least 1 unit. The units north of the 1st road end up mainly in the east.
For my DF, I recorded that I got the SR for my OBA to Y16 and I broke the MMG in C23. AFPh was ineffective and all routing and advancing occur without mishap. But, a 127/PIAT advances into R18 where I have a HIP 9-1, 348/HMG in a foxhole. In the ensuing CC, the 127 dies.
(image:
http://www.komerex.com/asl/images/BB/TM-III-3-endofC2.jpg)
German 2:
I roll snakes on the Wind Change DR and then a subsequent '6' to generate a Mild Breeze. Random direction has it heading NW (6). This will create a lot of SMOKE cover for the Canadians approaching the NW side of the village. For the rest of RPh, I do not self rally a 348/PsK and the 9-1 picks up the PIAT that 127 was carrying. Nothing for the Canadians.
I start off PFPh by moving the 81mm OBA SR to AA13 (keep him guessing and he's strongest on the east side now). I reveal a 348/HMG in level 1 of X23 and he takes a couple of shots at T19 (a CX 247 in a foxhole) for a 1MC but he passes (cold German SAN). The now revealed 9-1, 348/HMG in R17 shoot at the adjacent 7-0, 458/DC and break both of them. The RoF shot is at a 457 in P17 which breaks and ELRs him. I waste a shot from the PaK 40 as it turns out LOS was blocked. The HMG in the A13 pillbox is lonely as he no longer has any Canadians in LOS.
MPh is 99% skulking. The new Pz IVJ moves to T22 (hulldown) and the INF guns move up very slowly in the middle. The 81mm MTR and it's former spotter move southwestward, hoping to be able to cover the west side of the village eventually. DFPh is not good for the Canadians as both radios lose contact and the rest is mainly ACQ shots (not many targets after skulking). There is no AFPh stuff except for SMOKE drifting. The broken Canadians gets away safely in RPh and the Germans move back up in APh. That's it for German 2.
(image:
http://www.komerex.com/asl/images/BB/TM-III-4-endofG2.jpg)
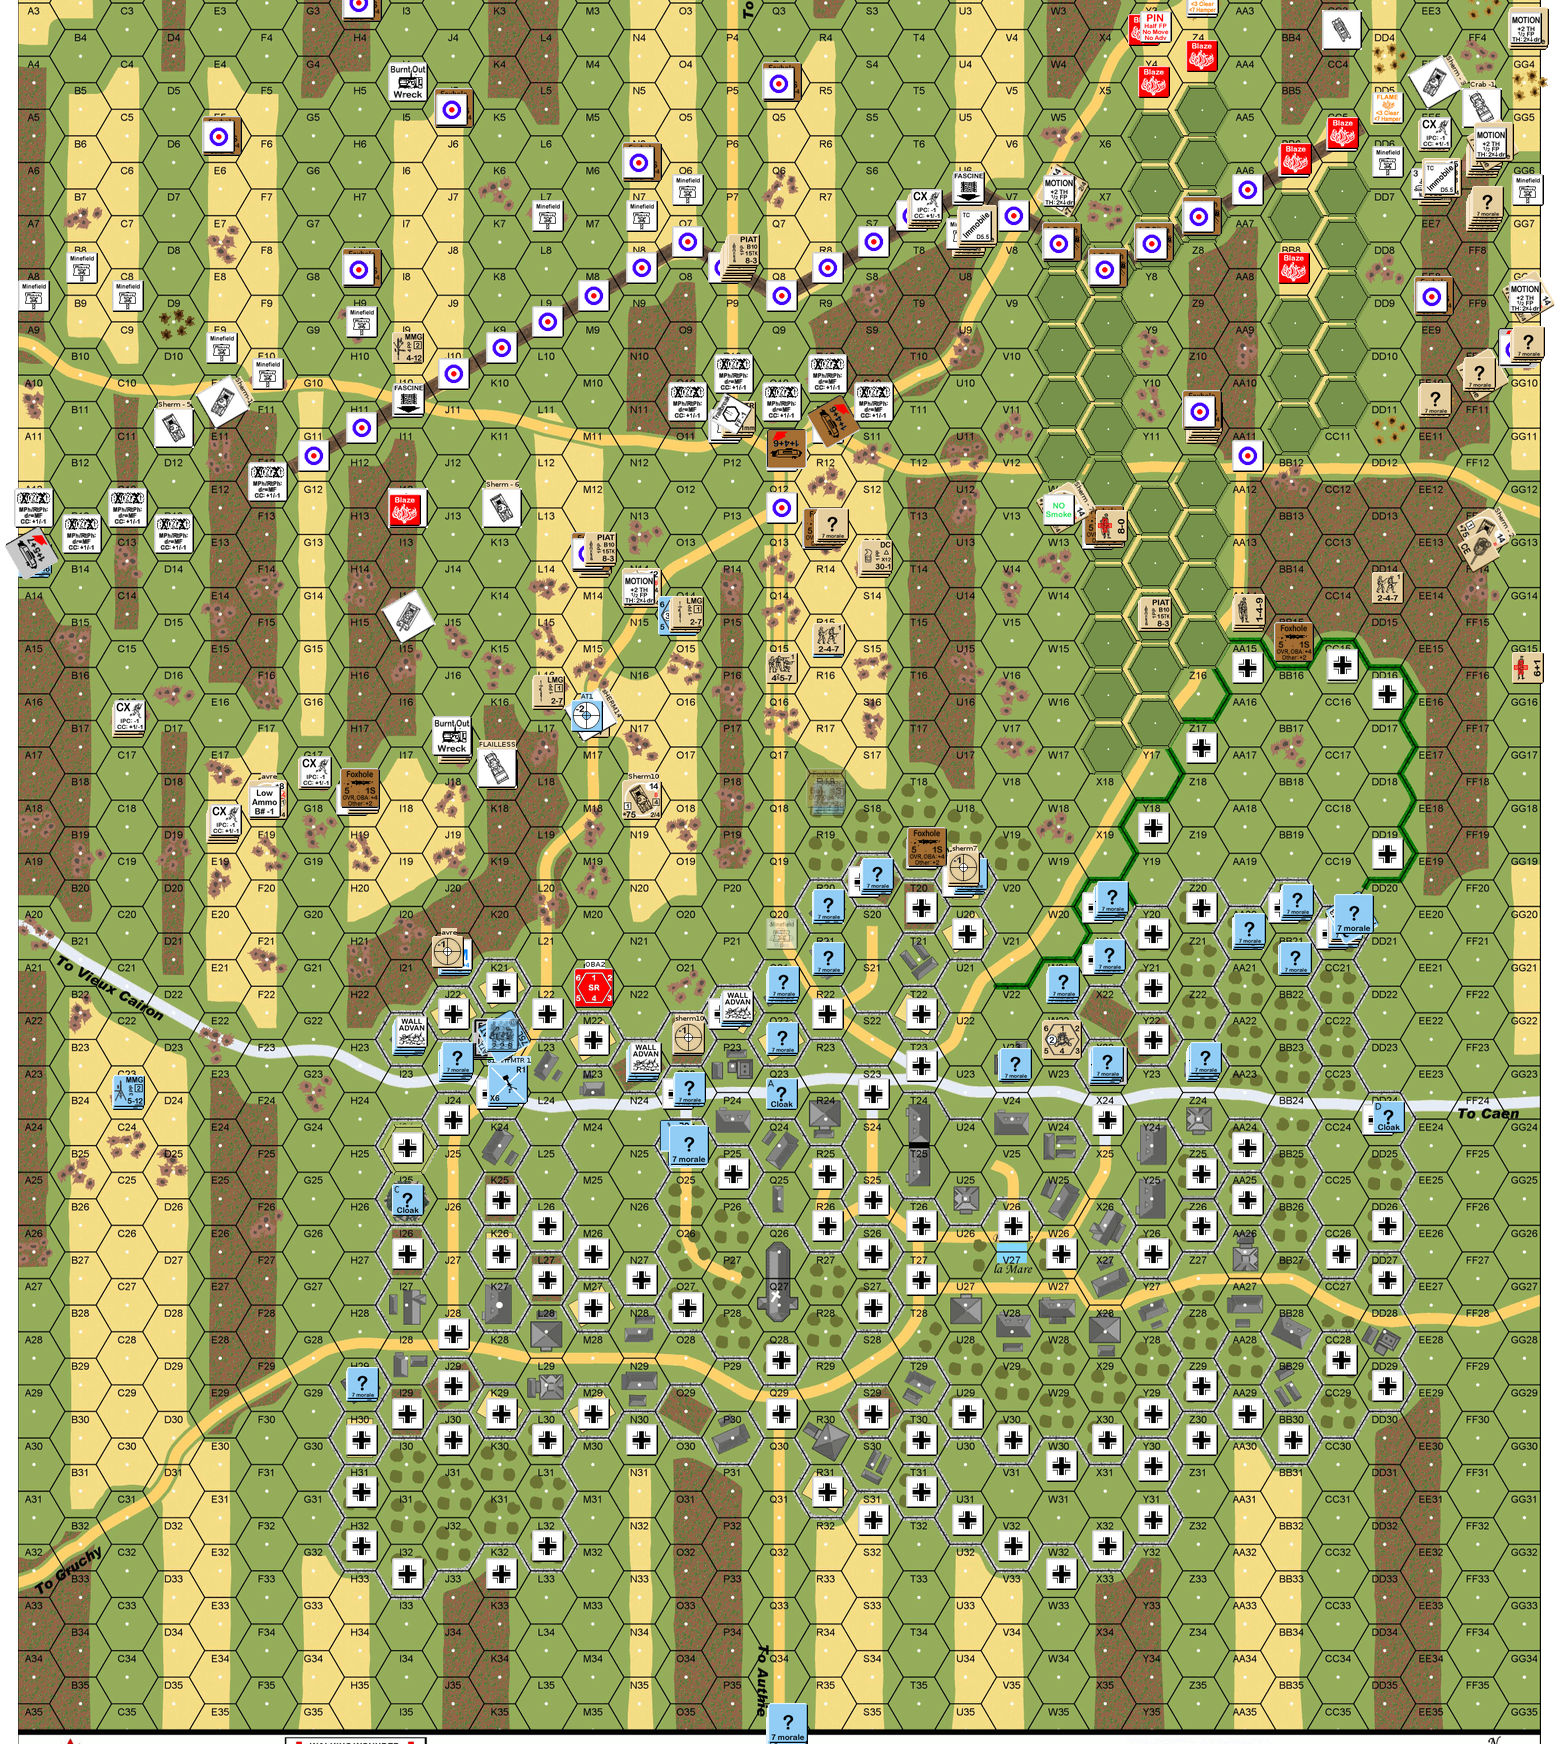
Canadian 3:
A couple of Canadian squads rally and 7-0 battle hardens to an 8-0. But another squad rolls boxcars to CR. The Germans don't manage to fix a MMG. No Smoke in Prep, no radio contact for the 1st OBA module and the 2nd draws a red card so no OBA this turn. The rest of PFph is mainly ACQ shots.
Movement is everyone moving South, as expected. A couple of squads cross the 2nd VC road in the west and the rest inch closer to the village, with a 247 and 127 actually making it into the village. First fire shots have some results:
- 247/LMG moving to M18 gets hit with a 8FP-2 for a 2MC and he rolls boxcars to die (FL from the 658/LMG declared as part of the shot too).
- The Q21 HMG gets a 1MC on a 457/LMG in O18 but he passes.
- Q21 HMG subs on a 447/PIAT for a 1MC which breaks him.
- The X20 HMG breaks a 457/LMG/PIAT in U15 on a NMC.
- A 247 moves to DD17 drawing a CMG shot from a Pz IVJ for NE but the BB20 MMG gets a 1MC to break him.
- The 247 in T19 gets out of his foxhole and wishes he didn't as a 658 gets a 2MC on him to break him. A hot Allied SAN breaks a 348 manning an HMG in X23.
Other notes. The Crocodiles are revealed so I know where they are now. Also, a 127 moving to O21 activates a reserve unit (8-1, 658/LMG).
DF has the 81mm German OBA doing most of the work. Calling in an FFE to EE14 breaks a 457 on a 3MC, breaks a 457 (8-0 passes) on a 2MC and breaks another 457 on a 3MC. This essentially breaks up that attack. The 9-1, 348/HMG holdout in F18 breaks a 458/DC that was nearby. Finally, the PaK 40 takes a few shots at a Crocodile with the 1st shot bouncing off the armor and the 2nd shot breaking the Gun.
To finish off the turn the Canadians end up capturing some TLs in Y18, AA15, K21 and O22.
(image:
http://www.komerex.com/asl/images/BB/TM-III-5-endofC3.jpg)
German 3:
I am lucky and am able to fix the PaK 40, but still cannot fix that MMG. A single Canadian 457/LMG/PIAT rallies.
The east Pz IVJ tries for SMOKE but finds he has none. The 81mm OBA moves to GG16 but for NE. Several more Prep shots in the east are also for NE. A HMG in the middle gets some RoF to break a 247, K/2 a 457 and CR a broken 457. Warm Allied SAN pins a unit. The 81mm MTR goes a RoF tear in the west to break a 8-0 and 457. Movement is 95% skulking and shuffling to cover losses. The 2nd Pz IVJ moves up behind a wall.
DF: Both Canadian OBA modules are back in action and get SRs to U16 and BB24. The Canadians have more LOS to the 2nd Pz IVJ than I thought and he draws a lot of fire (3) that all miss but it doesn't look pretty for next turn.
AF/ADV/CC: I try to push back the interlopers in the village in AF and CC and it backfires. AF is ineffective. In CCPh I kill a 247 but lose a 348 and 7-0 as he rolls a 3. I gack a 6-1 odds shot by rolling a 12 and I kill a 247. So not so hot for the Germans.
(image:
http://www.komerex.com/asl/images/BB/TM-III-6-endofG3.jpg)
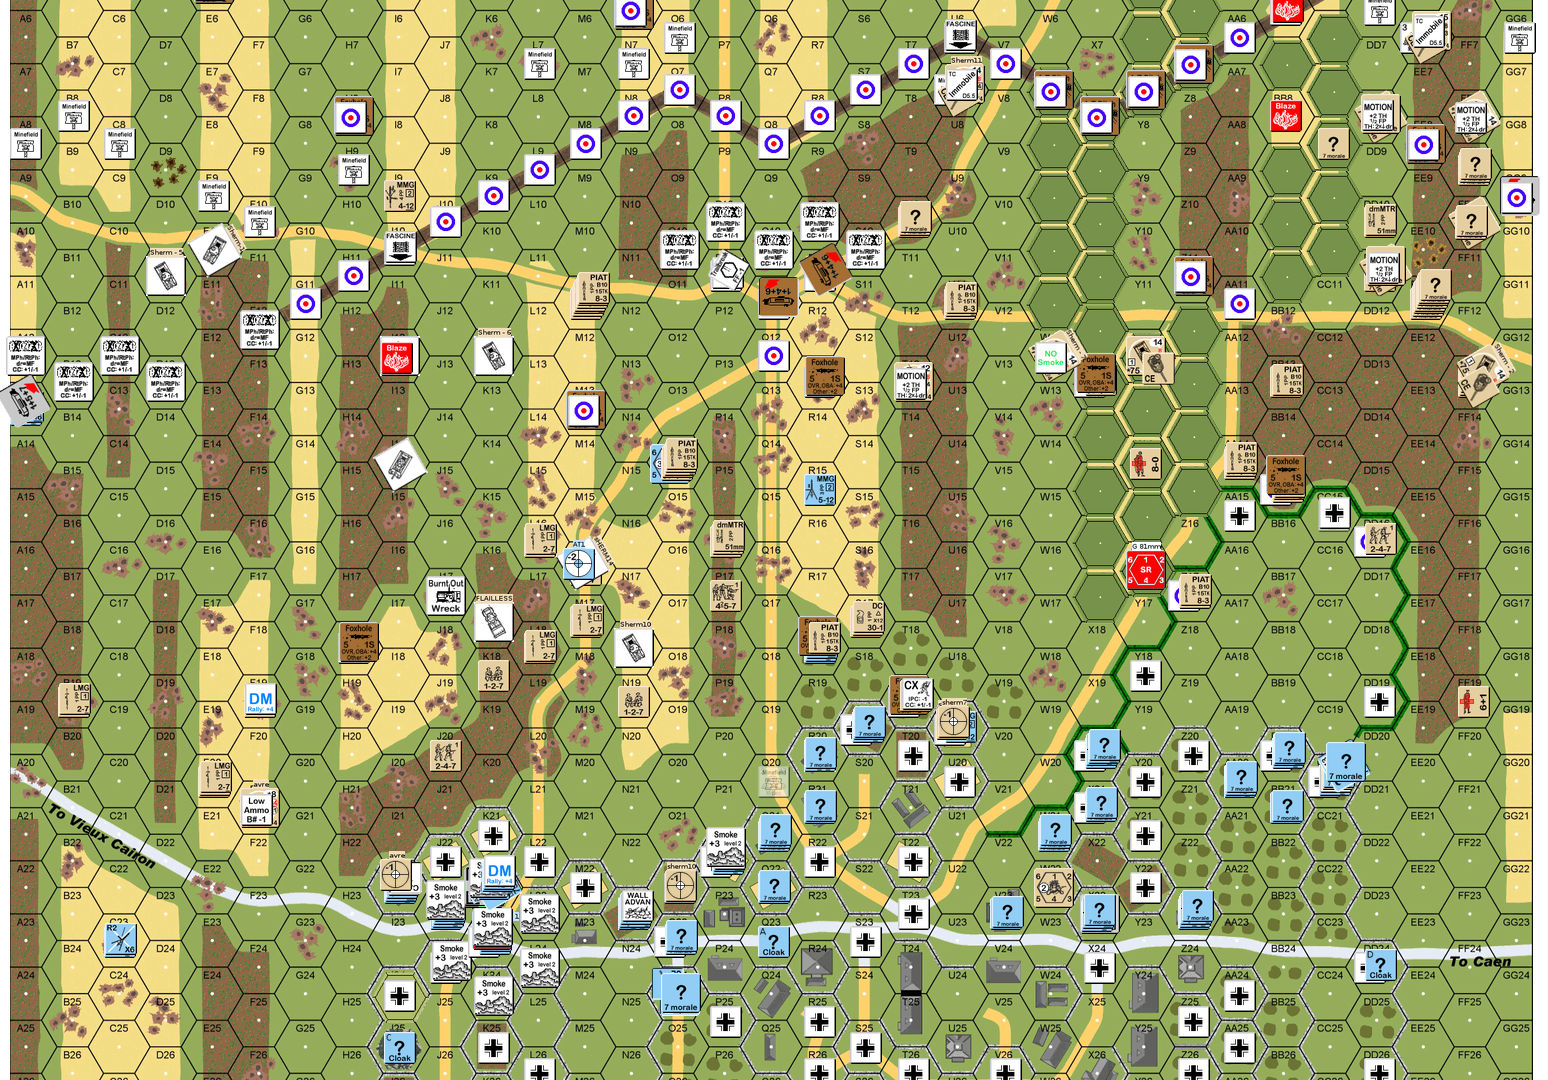
Canadian 4:
I was watching my 1 month old son during this session so my notes were not very detailed towards the end of the turn. Guy has a broken 458 go fanatic on a snakes to rally but his wounded 6+1 kills a 247 when he rolls boxcars. I am able to fix an MMG but not my Pak 40.
The OBA smoke is all gone now and 51mm MTR puts down a great smoke shot on the Pz IVJ in the east. Both Canadian OBAs stay as SRs with one in T19 and the other in Z19 (middle and east). The immobilized Achilles which had a great LOS to my other Pz IVJ gets a hit to burn it. I totally miscalculated the safety of that hex. All of the other Sherman III shots (5 total) miss except for 1 which breaks an 8-0 and 348/HMG in X20 and the last one breaks it's MA.
The Canadians in the west and middle make a little progress forward (south). The most by a 127 which gets into the K22 area and he eventually advances into level 0 of that fortified building (only the 228/PaK 40 are in there and they are upstairs. A 247/LMG gets to C25 and he survives and MMG shot and a RoF tear from the 82m MTR. The east makes the most progress as I have several broken units on that side and more TLs are captured in the 15-18 rows. I do break a 457 with a minefield in CC15. The remaining Shermans also move up but cautiously. The AVRE moves to G23 to takes shots at my 82mm MTR.
(image:
http://www.komerex.com/asl/images/BB/TM-III-7-endofC4.jpg)
German 4:
Still watching my infant son so the notes are a bit sparse. I am unable to fix the Pak but do rally a 348/HMG. Guy rallies a leader and a squad in K22. For Prep the 81mm MTR breaks a squad in C25. The J22 MMG breaks a 457/LMG in K19 and a RoF shot at the adjacent 127 in K22 get a PTC which he passes (cold Axis SAN). The R18 HMG boys break 2 more squads and a leader. A 348 in T19 gets a great shot to break a wounded 8-0 and kills a broken 247 that fails the MC.
Movement is skulking of course. The last PzIV pulls back so it can remain a threat. The rest is trying to get leaders around to rally next turn or to block route paths. For DF the 1st Canadian module goes FFE in T18. The 20FP+4 vs a 348/PsK is NE. The 2nd OBA module lands a SR around the Y19 area. Then, the AVRE gets a hit on my 81mm MTR! I was calculating that it would break the gun before it hit me; and I calculated wrong. The resulting shot gets a 1KIA to kill the crew and destroy the MTR. The R18 348/HMG eventually breaks from a RoF shot from a Sherman III (the 9-1 is okay though).
No AF and in Route my units get away. Most of the Canadians do too but a 127 is forced to surrender. In CC, I manage to kill another pesky 127 in K22.
Canadian 5:
Guy rallies a bunch of stuff, but does kill a 247 with boxcars. I rally a 348/PsK, a 8-1 and a 348. Prep starts off with a SMOKE shot at K22 (he's rally paranoid I'll fix the PaK). OBA1 loses radio contact but OBA2 puts an FFE down in S18 (that area is getting pounded) which pins the 348/PsK in T19.
I did not get the chance to record what happened in Movement but the Canadians are moving southward in decent force now. I did manage to break a 457 on a 1MC in H23 which was great. He would have really threatened the K22 area. In DF the German OBA immobilizes a Firefly in FF17 and I manage to break a few more key Canadian squads. I can say that the Crocodiles have moved up and one torches the 348/PsK as it rolls boxcars on an MC (I miscalculated the odds of hitting with the PsK so I did not shoot as he moved up). The rest of the turn was fairly uneventful IIRC.
(image:
http://www.komerex.com/asl/images/BB/TM-III-8-endofC5.jpg)
German 5:
This is the turn I'll fix my AT gun. Nope! Roll a 6 and it's gone! I do self rally a 348/MMG in Z23 and leader rally a 348 in R20. Guy goes about 50/50 and rallies a 457, 447/MTR/PIAT and 457/LMG. I draw a black card for the OBA and drop a SR in CC20 and that is it for PFPh. MPh is mainly skulking but some shifting too as I need more infantry where his infantry is coming. But the Crocodiles are in the fight now so will probably pull back a bit from the edge to get out of their range. My AT assets are limited as the AT gun and a PzIV are gone.
In DFPh Guy tries to put an SR down near some concealed units and the extra card is red to lose the mission. The other OBA moves its FFE to T19 (drawing black on the extra card) but it's only effects are to break a Canadian unit. A Sherman III in FF19 shoots at CC21 as ATT and misses and that's it for DFPh. I kill a 237 when a 348 fires in AFPh and he double breaks. Route is not interesting, APh is de-skulking and there is no CC.
Canadian 6:
Guy rallies a Fanatic 458 and I pick up two HMGs that some dudes left lying around. All Canadian OBA leaves the map as the OP tank of the 1st module wants to move this turn and the other module is not needed (no targets). The Achilles in F17 takes a shot for a miss and that is it. For Movement, the Canadian infantry keep moving southwards; getting real close to the village now. The First Fire shots were a PTC on a 247 that assault moved to X22 which he passed. Next was a 8FP+4 vs a 457/LMG/PIAT in CC19 for NE (he ended up capturing a TL in CC20). The last "shot" was an attempt to find a Pf to shoot at that pesky AVRE in the west but I rolled a 6 and the 658 ends up pinned.
DFPh is my OBA getting to CC20 and a 1MC on the Canadians in hex but they pass. A HMG in level 1 of X23 goes on a RoF tear on X20 and breaks itself on the 3rd shot. But a hot German SAN kills a broken half squad in O18. The fire started from the death of the PzIV is starting to spread around in the village and a Flame lands in a hex occupied by a Churchill. The rest of AFPh is mainly ACQ shots. The rest of the turn goes quietly.
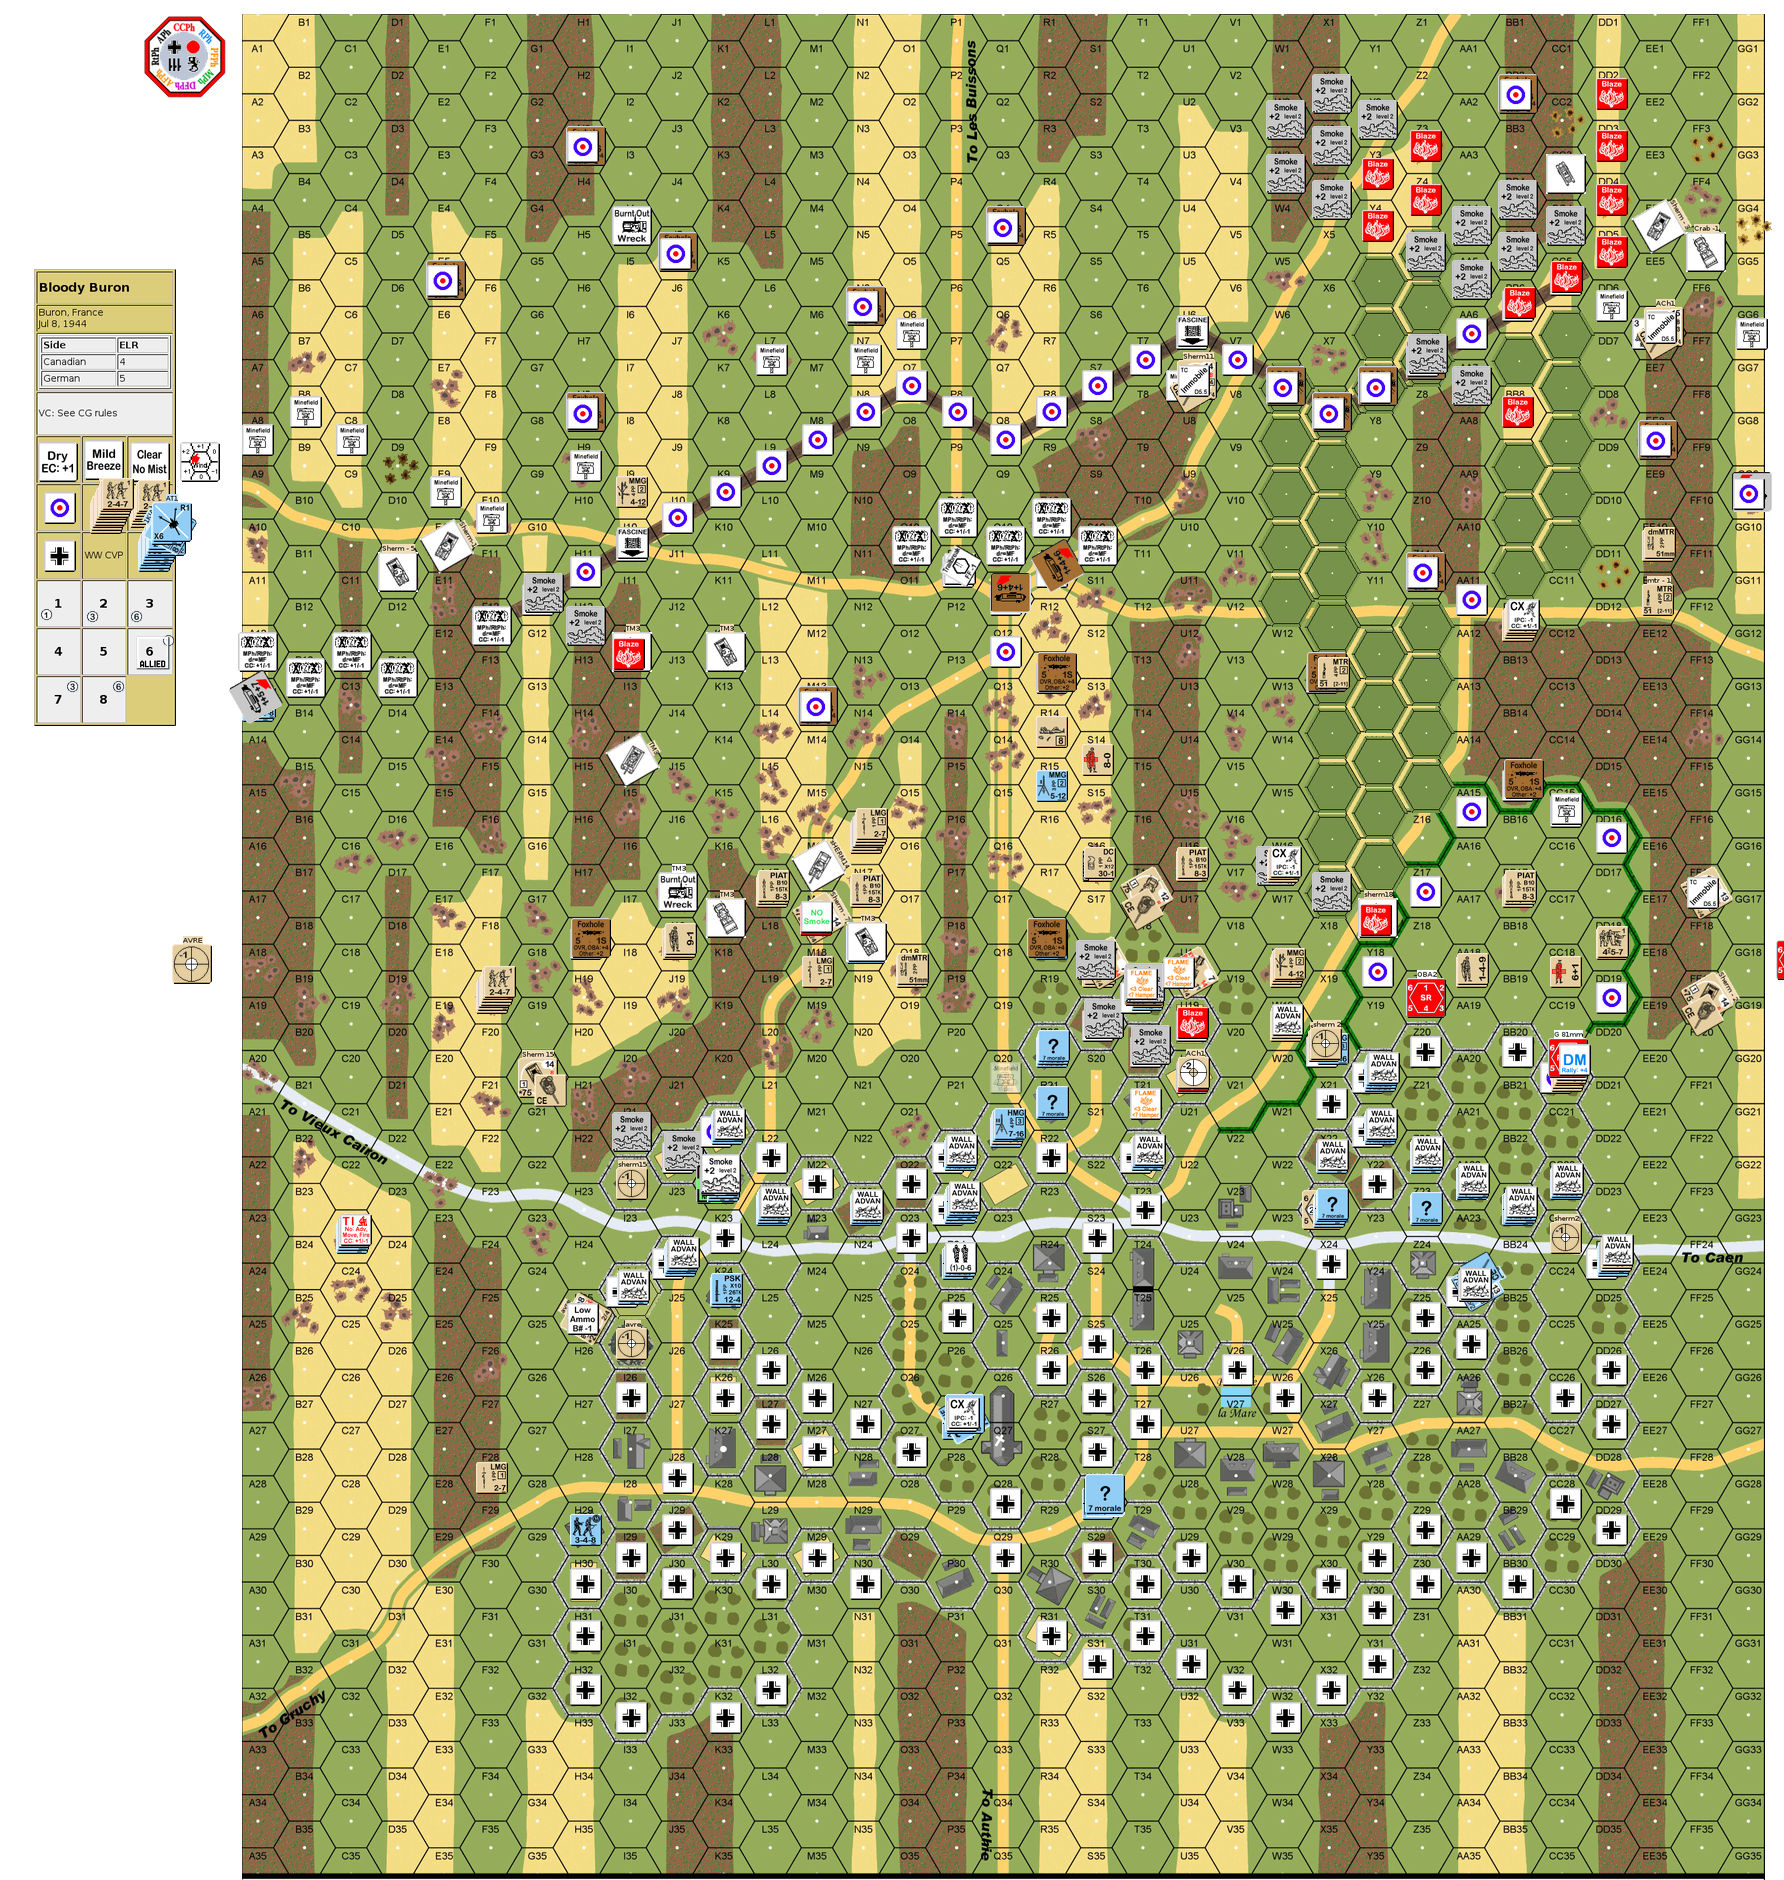
German 6:
I do not fix my HMG but Guy rallies 1.5 squads and a wounded 8-0. My OBA keeps up the action and breaks a squad. An HMG in Q21 breaks a squad in H20 and other shots generate some cold German SAN rolls but ultimately for NE. MPh is all skulking or slightly pulling back. My INF guns which had come from offboard are getting close enough to be useful in the next TM. DFPh is mainly OBA as one module loses radio contact and the other draws a black card and puts a SR in Z19. AFPh is pretty much just rolling for Flame. Route is uneventful and APh is de-skulking again.
In CC Guy rolls a 1 to end the TM.
(image:
http://www.komerex.com/asl/images/BB/TM-III-9-endofG6.jpg)
I did not expect and early end here and that obviously favors me. The Canadians needed at least 1 more turn to get a foothold in the village. After some discussion, we decided to call the CG here as a German victory. The Canadians just did not have enough time to advance far enough to get the VP points they needed. At least that is what we felt.
As always with George's stuff, I really enjoyed this CG. It's small and pretty fast and a bunch of funky stuff on the map (AVREs, Crabs, Crocodiles, etc). The Germans don't get as many 'toys' but they have the fun of planning out 10+ hex firelanes.
I believe the setup can be quite variable. As you saw, I made no attempt to hide my initial minefields and instead showed a just about board length wall of mines. I have a friend who is also playing this and his strategy was the exact opposite where almost no mines were visible. I don't know how that game turned out, but it seems like a viable strategy to me. I guess it may depend on your opponent and if you know their playing style. There were a bunch of fires and most of the grain in the east burned down but it wasn't as important it was in OzB.
Again, I would recommend giving Bloody Buron a shot and I think you'll enjoy it. Thanks George for another great product!
We're going to take a break from the Lone Canuck for the next CG only because I really want to play the Rees mini-CG from Dispatches from the Bunker #44. I playtested a couple of the scenarios and really want to give the full CG a try. I love Tom Morin's stuff.
Thanks for reading,
MikeS