Adrian Carter
Senior Member
We had had so much fun with our last three Crucible of Steel Kursk scenarios that we decided to play another one, namely BFP-101 Panzer Spirit. Elements of the 169th Tank Brigade of the Russian 2nd Tank Corps were counterattacking the 1. SS-Panzer-Regiment of the 1. SS-Panzer-Grenadier-Division near Jamki on 12 July 1943. The Russians attacked with a combined arms force consisting of 4 T-34 M41, 4 T-34 M43 and 1st line infantry armed with machine-guns and anti-tank rifle. The Germans were defending the village with a mixture of 4 Marder III(t)H self-propelled guns (SPG), a 50L AT gun, and Panzergrenadiere armed with some machine-guns. The action was based on the two halves of boards BFP L and 17. The Russians had 6 turns to take 12 or more buildings to win. The ROAR website had recorded 50 Russian wins versus 48 German wins so it appeared both popular and balanced. I attacked with the Russians and Johan defended with the Germans. There was one interesting SSR which we didn’t quite know how to interpret at first, namely that all Marder III(t)H SPGs start with a circled B12. Fortunately, there was an official Q&A for the circled this SSR:
Q. In some scenarios there is a SBR giving some Low Ammo vehicles a "Circled B12." How is this handled?
A. On a 12 the Gun malfunctions and a Low Ammo counter is placed. If the Gun Repairs, it is under Low Ammo and suffers shortage penalties (i.e. X on 12, B on 11).
Many thanks to the folks at Bounding Fire Productions for this clarification!
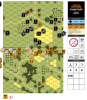
Figure 1 shows the troop dispositions at the start of the game. Originally, I had made the mistake of trying to position my troops on half hexes of board 17 that butted onto board BFP L, but Johan rightly pointed that this was not allowed pursuant to A2.3. It was easily fixed and didn’t change my attack much. I decided to push the bulk of my infantry down the northern and central parts of the maps thereby using the woods and grain as cover. I would start by moving most of my troops with the machine guns marked with Opportunity Fire counters. The T-34 M41s would strike to the south whilst the T-34 M43s would hold back and wait for suitable targets to appear. The Germans appeared to have focused the bulk of their infantry in the village on the western side with token forces upfront and the south. I guessed that some of the German forces in the BFP LX1 building were dummy counters. The Marder SPGs were looking ominous and covering the main areas of open country.
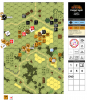
Figure 2 shows the positions at the start of Allied turn 3 at one third through the game. The opening turn was deadly for the T-34s. I lost two of them to the Marder SPGs and had to pass my own personal TC to continue. The 75L guns are really deadly if they hit a T-34, especially if they are lucky enough to get APCR. In contrast, once the T-34s can later fire for back (remember all Russian AFVs start in Motion) the Marder SPGs are extremely vulnerable to fire from the 76L gun of the T-34. Consequently, Russian fire had turned two of the Marder SPGs into burning wrecks and a third into a wreck. The frontal armour of the T-34s was relatively impervious to the AP fire of the 50L AT gun unless it rolled snake-eyes and this is exactly what happened to create one Russian burning wreck in BFP L EE2. By this stage, the Germans had only one Marder together with the doughty 50L AT gun in BFP L GG7 that had run out of APCR rounds. The Russian infantry counters were pushing through the middle despite some stout resistance by the German infantry. The Russians had only captured one victory building by this point but still had most the infantry and 5 T-34s still intact. It was time to hustle.
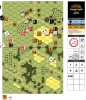
Figure 3 shows the positions at the start of Allied turn 5. One of the T-34s had finally neutralized the crew of the 50L AT gun and the remaining T-34s were free to sleaze freeze the Germans in the buildings, thereby helping the Russians to cross the open ground. However, my infantry attack through the grain field had stalled because I decided to move several units in to a CC with the Germans. Another German squad fired into the melee and the ensuing random selection for the K/2 result saw me roll a 5 four times! The ASL Dice gods are very fickle at times. After this I was always going to be behind schedule. In retrospect, I should have spread my troops more and moved round the German defence in the grain field.

Figure 4 shows the positions at the end of Allied turn 6 / start of Axis turn 6. The Russians had only occupied 9 of the required 12 buildings by this stage, and were probably were going to lose control of at least one building in the German turn. I therefore conceded the game. The delay in the grain field had cost me dearly. It was a good win for the Germans! I would definitely play this again with either side; it was a very enjoyable little tussle.
If anyone has other suggestions for tactics, don’t hesitate to post a reply. I’d be very happy to hear of other approaches.
Cheers
Q. In some scenarios there is a SBR giving some Low Ammo vehicles a "Circled B12." How is this handled?
A. On a 12 the Gun malfunctions and a Low Ammo counter is placed. If the Gun Repairs, it is under Low Ammo and suffers shortage penalties (i.e. X on 12, B on 11).
Many thanks to the folks at Bounding Fire Productions for this clarification!
- German advantages: 8 ML SS-Panzergrenadiere, AFV crews 9 ML, 75L SPG, concealment
German disadvantages: Thin armour of the Marder SPGs, few machine guns - Russian advantages: 1st line infantry, leadership, 8 T-34s
Russian advantages: Open ground to cover, only 6 turns
Figure 1 shows the troop dispositions at the start of the game. Originally, I had made the mistake of trying to position my troops on half hexes of board 17 that butted onto board BFP L, but Johan rightly pointed that this was not allowed pursuant to A2.3. It was easily fixed and didn’t change my attack much. I decided to push the bulk of my infantry down the northern and central parts of the maps thereby using the woods and grain as cover. I would start by moving most of my troops with the machine guns marked with Opportunity Fire counters. The T-34 M41s would strike to the south whilst the T-34 M43s would hold back and wait for suitable targets to appear. The Germans appeared to have focused the bulk of their infantry in the village on the western side with token forces upfront and the south. I guessed that some of the German forces in the BFP LX1 building were dummy counters. The Marder SPGs were looking ominous and covering the main areas of open country.
Figure 2 shows the positions at the start of Allied turn 3 at one third through the game. The opening turn was deadly for the T-34s. I lost two of them to the Marder SPGs and had to pass my own personal TC to continue. The 75L guns are really deadly if they hit a T-34, especially if they are lucky enough to get APCR. In contrast, once the T-34s can later fire for back (remember all Russian AFVs start in Motion) the Marder SPGs are extremely vulnerable to fire from the 76L gun of the T-34. Consequently, Russian fire had turned two of the Marder SPGs into burning wrecks and a third into a wreck. The frontal armour of the T-34s was relatively impervious to the AP fire of the 50L AT gun unless it rolled snake-eyes and this is exactly what happened to create one Russian burning wreck in BFP L EE2. By this stage, the Germans had only one Marder together with the doughty 50L AT gun in BFP L GG7 that had run out of APCR rounds. The Russian infantry counters were pushing through the middle despite some stout resistance by the German infantry. The Russians had only captured one victory building by this point but still had most the infantry and 5 T-34s still intact. It was time to hustle.
Figure 3 shows the positions at the start of Allied turn 5. One of the T-34s had finally neutralized the crew of the 50L AT gun and the remaining T-34s were free to sleaze freeze the Germans in the buildings, thereby helping the Russians to cross the open ground. However, my infantry attack through the grain field had stalled because I decided to move several units in to a CC with the Germans. Another German squad fired into the melee and the ensuing random selection for the K/2 result saw me roll a 5 four times! The ASL Dice gods are very fickle at times. After this I was always going to be behind schedule. In retrospect, I should have spread my troops more and moved round the German defence in the grain field.
Figure 4 shows the positions at the end of Allied turn 6 / start of Axis turn 6. The Russians had only occupied 9 of the required 12 buildings by this stage, and were probably were going to lose control of at least one building in the German turn. I therefore conceded the game. The delay in the grain field had cost me dearly. It was a good win for the Germans! I would definitely play this again with either side; it was a very enjoyable little tussle.
If anyone has other suggestions for tactics, don’t hesitate to post a reply. I’d be very happy to hear of other approaches.
Cheers
")