Marshal Lannes
Member
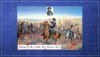
The Battle of the Little Big Horn 1876 is a free demo game from Wargame Design Studio. It is a nice freebie on par with the Mius River Demo. Once you have loaded it up on your computer; the initial screen is accompanied by Indian chanting - " Heya , heya ....Heya ....Hey !." The initial scenario board shows a few starter and 12 turn scenarios which was a bit iffy and then the big surprise - 244 turns for the main battle event. At 5 minutes per turn and a afternoon start ; you know that the action will easily continue to the second day.
Most people will decide to play as the US 7th Cavalry against an Injun A.I., ( as is suggested by the specific scenario notes ). So far , so good...... Let's have a looksee at the forces at your disposal. You have the initial part of Lt.Col. Custer's Battalion and all of Major Reno's Battalion at your disposal.
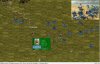
I was expecting individual units to be composed of 2 or 3 troopers and possibly 4, 5 or 6. I initially saw one trooper units and 2 Injun scouts and of course individual leaders. Then further looking showed that there were quite a bit of 7 trooper units and even a single 8 and 9 and later on a 10. Interesting design choice which kind of works but maybe should have been capped at 5 as a maximum. No need to worry unduly about this ; as your larger units will quite soon be whittled down to 1 or 2 troopers, or none. Tell me about it !......Terrain graphics are good and unit portraits more than adequate for the job.
Definitely a large battlefield; more than enough room for manouvre......something that can sometimes ruin a game, if too, compact.
The anticipation and excitement rises as your mind floats on the possibility of not ending up like Custer....you will consequently be bathing in acclaim , glory and tactical prowess; just like yellow hair himself. What could possibly go wrong ????
Again ; most people on a Vanilla playthrough, will order Major Reno's Battalion to cross the nearest ford over the Horn river and approach the hostiles just to get a measure of the enemy numbers and ability. Major Reno takes half the Crow scouts ( about 8 ), an interpreter and 146 mounted troopers to carry out his orders. There is a bunching up at the Ford ( which is known as Reno's Ford ) , because you cannot cross more than one unit/counter of cavalry at a time..... you can cross 1 trooper counter or a 7/8/9 trooper unit at a time but you canoot cross two , 1 trooper units stacked together......a bit odd but who am I to judge......if there were hostiles present .........I would judge..........because there is a gamey element suggesting itself....but as I have remarked earlier........will become less of a problem later on in the game.
Major Reno's command trots down the eastern side of the tree/wood line with scouts ahead at about 8 to 10 hex intervals.....I am taking no chances. After a few more turns; confidence is growing as the hostile encampment is sighted. Reno extends his mounted line to about 24 hexes resting his right on the wood/tree-line.....two Crow scouts and a interpreter checking the woods for any sneaky enemy activity. In the next turn , his line goes forward and 2 troopers are in range of a small amount of hostiles. Let's check out firepower at an 8 hex range. First shot drops one Injun and the second has no effect. The hostiles make one defensive shot and one of the troopers falls off his horse. Trading one for one is not good but it is still early.......Reno moves up the rest of his line to all be in firing distance while 4 Crow scouts move off to the left - they attract hostile fire but are unscathed. Major Reno, seeing that a growing host is now gathering out of the enemy encampment, shouts out the order for most of the centre line troopers to dismount.........Three troopers hit the dirt, stone cold from reaction hostile fire , and there cannot be any offernsive firing while dismounting, or mounting a horse.......learnt tnat the hard way....those few troopers who are still mounted attract defensive fire as they slightly change facing. Learnt that the hard way, too - the firing arc is small. Two more troopers fall......

The next hostile offensive phase gets another 4 troopers........ a Crow scout defensive fire gets one Injun and the rest get fatigue results or no effect...........How are we doing so far ?.........after one offensive fire.......US 7th Cavalry - 10....... Hostiles - 2.
The next turn was not so bad....6 troopers for 4 Injuns............notably, the allied Crow scouts dropped 2, whereas 7 trooper units only got 1. I am at this point wondering whether getting in closer may have better effect. This thought was also on the A.I.'s mind too as a horde of 3 and 4 unit stack hostiles moved to within 3 hexes of my right flank.
Let's see what a Springfield '73 rifle can do at closer range............the hostiles showed me by taking down double digit troopers for the next 4/5 turns. I did send about 6 troopers to join the 3 remaining Crow scouts on my left to see if I could fool the A.I. into turning to counter them or stalling their main attack on my right, somewhat. The main Injun attack still went ahead and were even now closing on my centre. The next two turns go down as ...............let's just not fire at them at all as the resulting defensive fire is just as bad as their offensive fire.......and let them nine pin us till no one is left standing - it sure feels that way.
The only saving grace is that the Injuns are reluctant to close to melee because if they did......it would be a complete wipe out. What gives with their stacking anyhow- they have 3 and 4 counter unit stacks with 30 to 80 men per stack. If I did that; I would only have a frontage of 2 to 4 hexes.
At this point, there is only only one Crow scout on the left, 4 units with no ammo and about 3 units routed and 2 officers killed.
What was a majestic line , now reduced to small bands of widely distanced men. Whoops !, there goes the last Crow scout on the left who made a heapum backtrack to the Ford and got a reaction fire. What to Do ..... ?? What to doooo ??? A few units including one 7 trooper unit and one 4 troopper were out of ammo , so they were useless and rode back to the Ford. How about retreating into the wood. Only one problem with that idea.....you can move about one hex per turn in there and half my remaining units have to cross hostile reaction fire zones of control to reach the timber line.......which was only extant for about six to seven hexe,s as I had to withdraw slowly backwards.......under constant fire. Hostiles were growing in number, anyhow at the wood's edge . The two Crow scouts and interpreter positioned there earlier had by this time been gutted and scalped.
Major Reno withdraws back to the Ford leaving behind about 13 troopers under the command of Lt.Smith to cover the rear. Only this officer and 3 troopers returned across the ford an hour later. Major Reno made a roll call of the survivors.......38 men. Historically , Reno lost 40 troopers.........not 108. Reno's last stand is over .......It is now Custer's turn......

Custer has a larger force.....Hooray !........Once his command has completely arrived by the reinforcement schedule. His entire battalion moves across the eastern side of the Little Big Horn.....the terrain here is low and high rises and movement is pretty swift.......the force is punctuated by a short distance between each echelon. This is manufactured by the re-inforcement arrival times. Naturally, as Custer; you want to move off early to scout ahead. Eventually, you will come across a very small encampment located on the east side of the river.......couple of Injun units there........no problemo....a sergeant, Keough , and 12 troopers are dispatched to see them off. After about an hour - they were all dead.......the hostiles still with about 5 units still left.
Custer's scouts with his forward command reach a ford and get to see the scale of the Injun encampment - it is big. The second lagging command comes up. There are a lot of hostiles massing on the other side of the Ford. A brisk firefight ensues and about 7 troopers are killed to about 3 Injuns. No way anybody would cross here ; so Custer decides to leave about ten troopers in the small amount of wood cover available and takes the first two sections of his command further up the river. The third section of his command drops away about 10 troopers to deal with the small encampment and follows on to the middle ford and eventually to Custer. Just before reaching the farthest ford . You can see long lines of ponies and hostiles stretching about the same size as the actual Injun encampment........Oh Brother !......Custer crosses the Ford and moves in to engage the hositle lines - the good news is that the hostiles are made up of pony herders /civilians. There seems to be only one 10 man mounted hostile unit to cover them.....that said - you still receive defensive fire from some of the civilian counters....so hostile losses start mounting up considerably.........albeit slowly at first.
Eventually the third section of Custer's command arrives with a number of 7 trooper counters allowing more bloodletting. At this point ....you get to wonder where in the hell are all the Hostiles to defend their civilians and pony herd. There are only 3 troopers left at the middle ford - the others joining the third section moving towards Custer. Anyhow , I grow bored of the relatively uneven fight and decide to attack the enemy encampment. I mass about 84 fresh troopers with Lt. Col. Thomas Custer to await my arrival at the stream just west of the wigwams.
Be aware that if you want to move a leader counter who is in an enemy zone of control.....move it out first one hex and then do the drag and drop....because when I did it , the Custer counter moved one hex to the right within the civilian/pony herder zone of control and stayed there. All other units had moved or fired and guess what...the next offensive phase ; a civilian unit meleed the lone Custer counter and captured it............a group of old men, women and children knocked him off his horse and dragged him away.....no kidding.....and you know that when that happens ....you do not feel like playing anymore but this is a vanilla test play-through; so the glory continues apace..............?????
Command is now delegated to Lt. Col. Thomas Custer who is now seeking retribution by attacking the Injun encampment. A lot of hostiles are still massed at the middle ford, so let's attack them from behind. Lt.Col. Custer advances ; the bugle is sounded ..........Chaaaaaarge .....! without sabres, as they were left behind....a charge of Springfield rifles. The troopers run into about 4/5 Injun counters who were mostly hidden, somewhat south of the hostile main force.
Over the next 5 or so turns ; the troopers are being felled slowly while they are only inflicting fatigue and no effect losses and the very rare one hostile killed. This is no doubt because of the -40% defensive advantage of being in tepee cover status.....the rifle bullets seem to be bouncing off the stainless steel coverings of the wigwams .....I am wondering why it is not reciprocal........I lose an entire 7 trooper and 2 trooper unit in no time at all. Three of the hostile units move off to join the main force at the ford leaving two behind which I quickly surround; ....maybe some enfilade fire will improve things.....no luck.....just a slower slog. The tepee defensive adjustment should be -20% or even 10%.....

While Custer was attacking the pony herd grouping. Benteen's command had come up to Major Reno's and having been assuaged assuaged of the disaster that has occurred. Benteen decides to send 14 troopers to scout towards the wood and if no hostiles are seen ; to return and aid Major Reno in his possible defence of the rise beyond the ford. The rest of Benteen's command ride towards Custer and not long after; can hear firing from the hostile camp which is being shot up by Custer's brother. Benteen reaches the middle ford area and has to stop. as growing numbers of hostiles are evident and his command is split in three parts- again a result of staggered reinforcement arrival. His initial lead echelon has been badly cut up and his rear echelon is chasing down hostile units in the small encampment and in the rises that stretch north.
Benteen is cut off from Custer's battalion by ever growing numbers ; so he has no choice but to go on the defensive amid the small clumps of trees that are available. Losses are starting to become about equal. The troopers that did not join Lt. Col. Thomas Custer's attack on the hostile encampment disengage from the pony herd and decide to high tail it back to the ford towards the new sounds of firing to the Northwest. Half of them are ammo depleted but they can still make defensive fire shots against Injuns moving up from the ford.
About this time.....Gibbon and the lengthy US 7th Cavalry supply train start to arrive on the map way to the east.........they move slowly towards Reno's command position.
This is where I stop the game ....as I cannot take it anymore.......the situation is sort of stabilised but only heading for an inevitable result, which has already been reached................

I only reached about 55 Game turns......and I am still waiting for an Injun attack on Reno.
Things that should be altered/modified: 1) More A.I. hostile defence of pony herd - not too much. 2 ) Tepee defense factor. 3) US 7th cavalry firepower...a little bit. 4) Some hostiles should follow up reno's retreat back over the Ford - this may occur later on in the game by the A.I.
( I should like to point out that I managed to wound one major hostile Leader ( Crow King ) .......or maybe his horse just threw him amidst all the noise of battle.......the way things have gone......I would not be surprised.....! ).
I am definitely playing as the Sioux next time..........it should be interesting to see what the A.I. will come up with...........especially as there is a big river in between...............Reno's scalp is there for the taking.....Yup !...

Attachments
-
 44.2 KB Views: 18
Last edited:
") .
.
 .
.