Battle Along the Tziepov
Major John F. Schmitt, USMCR – Marine Corps Gazette – April 1999.
Adapted for TacOps v4.
Notes: USMC Tanks – M60A1; Host Nation Tanks – Leopard 1A5; Host Nation APC – M113; USMC Arty – Arty Bn 10/27/3; USMC Air 10% chance. Opfor Tanks – T-72BMS+ATGM AT-11; Opfor APC – BTR-70; Opfor SAM – SA-7B; Unaided visibility 3500m, thermal 4,000. Arty and vehicular smoke defeats thermals.
Since was the first run through for this scenario and map, most maneuver was done in company sized counters for the sake of speed. End users would most likely making better use of the terrain and be maneuvering in platoon counters. "Your mileage may vary."
General Plans: Blue – per the scenario description, Alpha LAR conducts a movement to contact to Thorpe Bridge. 1st Tank Bn held in reserve east of Pageton, 2nd Mech Bn conducts a movement to contact to vic Fouse Bridge. 3rd Motorized Bn establishes battle position vic Leon Ridge, 4th Host Nation Bn establish defensive position Pageton, 5th Host Nation Bn establish Defensive position Gunnington.
General Plans: Red – 1st BMP Bn seize Fouse Bridge, 2nd BMP Bn + exploit across Tziepov at Fouse Bridge, seize Gunnington, 3rd BTR Bn occupy Lafferty Heights. Advance Guard seize Thorpe Bridge, 4th BMP Bn sieze Leon Ridge.
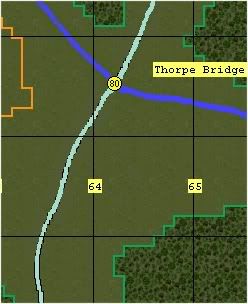
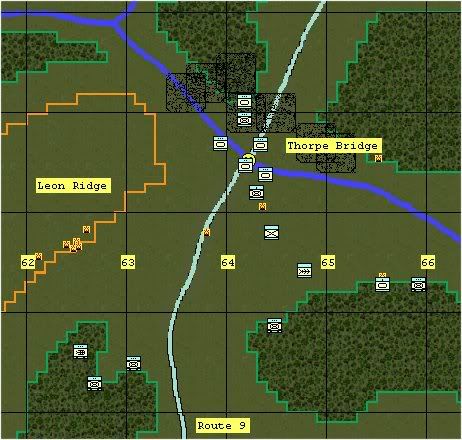
Turns 1-5: Contact vicinity Thorpe Bridge along Route 9 – Alpha Co LAR lost all four of it’s AT variants and 5 LAV-25’s in exchange for 4x BMP-2. LAR Company establishes a hasty defensive position blocking enemy movement south along Route 9. Requests immediate suppression mission GC650323.
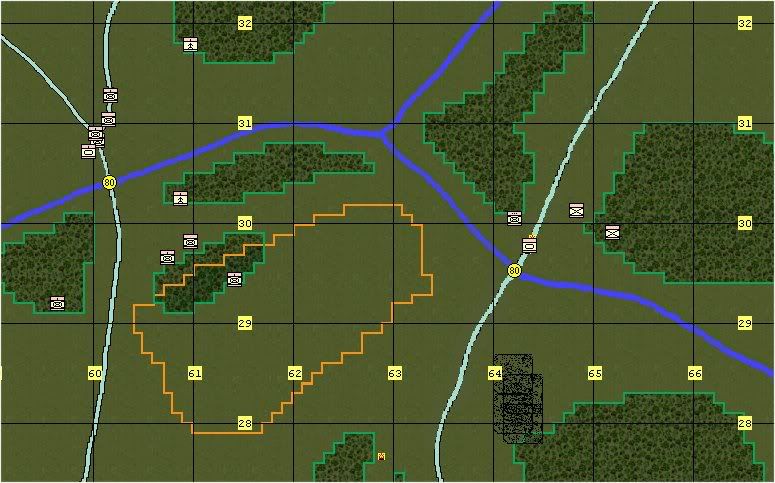
Bde HQ redirects 3rd Motorized Bn route of advance to go west of the wooded area vic GC 625268; Two Sections of 1st Tank Bn AT Company to overwatch positions north of Pageton.
Soviets: Advance Guard made contact with enemy reconnaissance forces, multiple enemy casualties. AG continuing with its mission. 1st BMP Bn just north of Fouse, no contact. 2nd BMP continues. 3rd BTR Bn continues. 4th BMP Bncrossing Clarkson Bridge.
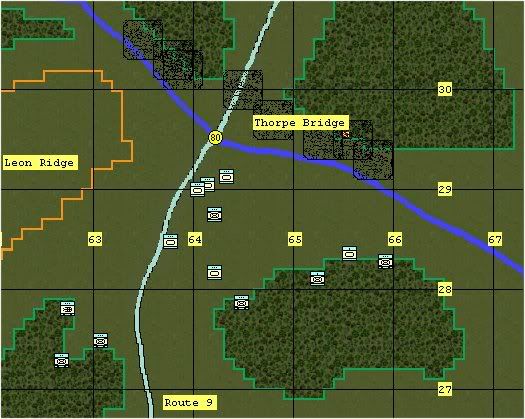
Turns 6-10: Opfor Advance Guard approaches Thorpe Bridge, AT Sections of 1st Tanks get into position and engage Opfor just north of the Thorpe Bridge. Appears Opfor first attempt at Thorpe Bridge has been repulsed at significant cost. A total of one platoon, plus all four LAV-AT’s and one section of 1st Tank Bn’s AT Company.
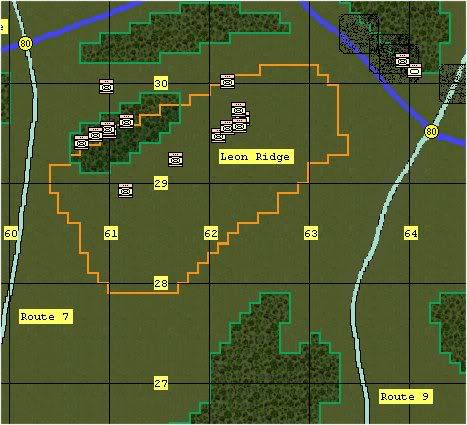
Opfor has crossed Fouse Bridge , about 400m south along Route 7 they make visual contact with US forces and launch a salvo of ATGM’s.
Turns 11-15
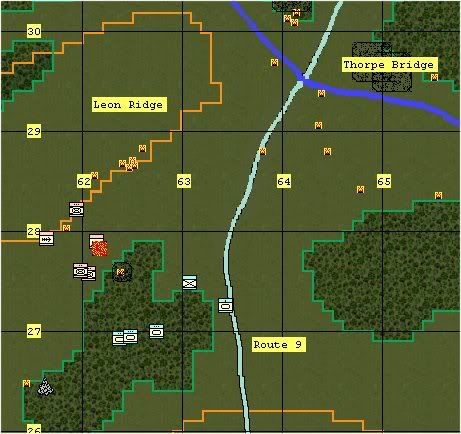
Blue HQ directs 1st Tank Bn to establish a defensive position oriented NW in vic GC 616265. 2nd Mech Bn establish a defensive position vic 800m N of Gunnington. Cancel 3rd Motorized Bn’s orders, revert to reserve vic north of Route 30 between Pageton and Gunnington. Massacre of elements of 3rd Motorized which was caught in the open by BMP’s who unleashed a barrage of AT-5i Spandrels into the rear of 5 Ton Truck loaded with infantry. That BMP Company was finally savaged by an ICM stike but not after putting quite a hurt on a Mechanized company attempting to flank that unit.
Turns 16-20
Opfor MLRS strike north of Gunnington as more Opfor forces pour into the Fouse Bridgehead. Blue Bde HQ decides to restrict M-60A1 from firing at ranges over 2km after countless rounds wasted in company volley fire. More skirmishing takes place in the vicinity of Thorpe Bridge as two previously unidentified mechanized rifle companies appear north of Thorpe.
Turns 21-25
An Opfor Support By Fire (SBF) position unveils itself vic GC 610292 and establishes an ATGM cross fire just about ending the valiant resistance in the Thorpe Bridge area. An apparent breakout of the Fouse Bridgehead appears to have begun. The remnants of 2nd Mechanized Bn is putting up what resistance it can. 1st Tank Bn is in ambush positions. And should be able to provide effective enfilade fire. 2nd Bn Javelins engage as forces breaking out of Fouse enter their effective range. The Javelins of the devastated 3rd Bn enter into the breakout fray.
Turns 26-30
Opfor is stalled in vic of Thorpe Bridge. Brutal ATGM duels are taking place in the area surrounding the Fouse Bridgehead breakout. 1st Tank Bn, after suffering the equivalent of one company lost, pulls back to regroup, suffering even further during the breaking of contact. Three companies (two tank and one mech) of 5th Host Nation Bn launch a spoiling attack out of Gunnington.
Turn 31-35
Two immobilized M-60’s of 1st Tank Bn remain covering the rest of its battalion and disrupting the enemy advance as most of the US ATGM units have either exhausted their supplies or have been eliminated. Remnants of Alpha LAR engages a mech rifle company with M203’s south of Thorpe. Intense battle between the 5th Host Nation Battalion’s attack and a mechanized rifle company, and now the Opfor joins in with a previously unidentified force in the area of Lafferty Heights, north of the river. An Opfor airstrike devastes the mech company of the 5th Host Nation Bn. 5th Battalion has to go over to a hasty defense.
Looks as both US and Opfor have reach relative culminating points. I’ll need to re-set, devalue some of the ATGM death rays from Javelins, AT-5i and AT-11 to Dragons, AT-3, and no-ATGM armed Tanks.
Plenty of things done wrong tactically for the sake of testing the scenario. It was conducted by just me, hot seat. After tweaking the OOB's some I may post the second AAR if there is much change.
Major John F. Schmitt, USMCR – Marine Corps Gazette – April 1999.
Adapted for TacOps v4.
Notes: USMC Tanks – M60A1; Host Nation Tanks – Leopard 1A5; Host Nation APC – M113; USMC Arty – Arty Bn 10/27/3; USMC Air 10% chance. Opfor Tanks – T-72BMS+ATGM AT-11; Opfor APC – BTR-70; Opfor SAM – SA-7B; Unaided visibility 3500m, thermal 4,000. Arty and vehicular smoke defeats thermals.
Since was the first run through for this scenario and map, most maneuver was done in company sized counters for the sake of speed. End users would most likely making better use of the terrain and be maneuvering in platoon counters. "Your mileage may vary."
General Plans: Blue – per the scenario description, Alpha LAR conducts a movement to contact to Thorpe Bridge. 1st Tank Bn held in reserve east of Pageton, 2nd Mech Bn conducts a movement to contact to vic Fouse Bridge. 3rd Motorized Bn establishes battle position vic Leon Ridge, 4th Host Nation Bn establish defensive position Pageton, 5th Host Nation Bn establish Defensive position Gunnington.
General Plans: Red – 1st BMP Bn seize Fouse Bridge, 2nd BMP Bn + exploit across Tziepov at Fouse Bridge, seize Gunnington, 3rd BTR Bn occupy Lafferty Heights. Advance Guard seize Thorpe Bridge, 4th BMP Bn sieze Leon Ridge.
Turns 1-5: Contact vicinity Thorpe Bridge along Route 9 – Alpha Co LAR lost all four of it’s AT variants and 5 LAV-25’s in exchange for 4x BMP-2. LAR Company establishes a hasty defensive position blocking enemy movement south along Route 9. Requests immediate suppression mission GC650323.
Bde HQ redirects 3rd Motorized Bn route of advance to go west of the wooded area vic GC 625268; Two Sections of 1st Tank Bn AT Company to overwatch positions north of Pageton.
Soviets: Advance Guard made contact with enemy reconnaissance forces, multiple enemy casualties. AG continuing with its mission. 1st BMP Bn just north of Fouse, no contact. 2nd BMP continues. 3rd BTR Bn continues. 4th BMP Bncrossing Clarkson Bridge.
Turns 6-10: Opfor Advance Guard approaches Thorpe Bridge, AT Sections of 1st Tanks get into position and engage Opfor just north of the Thorpe Bridge. Appears Opfor first attempt at Thorpe Bridge has been repulsed at significant cost. A total of one platoon, plus all four LAV-AT’s and one section of 1st Tank Bn’s AT Company.
Opfor has crossed Fouse Bridge , about 400m south along Route 7 they make visual contact with US forces and launch a salvo of ATGM’s.
Turns 11-15
Blue HQ directs 1st Tank Bn to establish a defensive position oriented NW in vic GC 616265. 2nd Mech Bn establish a defensive position vic 800m N of Gunnington. Cancel 3rd Motorized Bn’s orders, revert to reserve vic north of Route 30 between Pageton and Gunnington. Massacre of elements of 3rd Motorized which was caught in the open by BMP’s who unleashed a barrage of AT-5i Spandrels into the rear of 5 Ton Truck loaded with infantry. That BMP Company was finally savaged by an ICM stike but not after putting quite a hurt on a Mechanized company attempting to flank that unit.
Turns 16-20
Opfor MLRS strike north of Gunnington as more Opfor forces pour into the Fouse Bridgehead. Blue Bde HQ decides to restrict M-60A1 from firing at ranges over 2km after countless rounds wasted in company volley fire. More skirmishing takes place in the vicinity of Thorpe Bridge as two previously unidentified mechanized rifle companies appear north of Thorpe.
Turns 21-25
An Opfor Support By Fire (SBF) position unveils itself vic GC 610292 and establishes an ATGM cross fire just about ending the valiant resistance in the Thorpe Bridge area. An apparent breakout of the Fouse Bridgehead appears to have begun. The remnants of 2nd Mechanized Bn is putting up what resistance it can. 1st Tank Bn is in ambush positions. And should be able to provide effective enfilade fire. 2nd Bn Javelins engage as forces breaking out of Fouse enter their effective range. The Javelins of the devastated 3rd Bn enter into the breakout fray.
Turns 26-30
Opfor is stalled in vic of Thorpe Bridge. Brutal ATGM duels are taking place in the area surrounding the Fouse Bridgehead breakout. 1st Tank Bn, after suffering the equivalent of one company lost, pulls back to regroup, suffering even further during the breaking of contact. Three companies (two tank and one mech) of 5th Host Nation Bn launch a spoiling attack out of Gunnington.
Turn 31-35
Two immobilized M-60’s of 1st Tank Bn remain covering the rest of its battalion and disrupting the enemy advance as most of the US ATGM units have either exhausted their supplies or have been eliminated. Remnants of Alpha LAR engages a mech rifle company with M203’s south of Thorpe. Intense battle between the 5th Host Nation Battalion’s attack and a mechanized rifle company, and now the Opfor joins in with a previously unidentified force in the area of Lafferty Heights, north of the river. An Opfor airstrike devastes the mech company of the 5th Host Nation Bn. 5th Battalion has to go over to a hasty defense.
Looks as both US and Opfor have reach relative culminating points. I’ll need to re-set, devalue some of the ATGM death rays from Javelins, AT-5i and AT-11 to Dragons, AT-3, and no-ATGM armed Tanks.
Plenty of things done wrong tactically for the sake of testing the scenario. It was conducted by just me, hot seat. After tweaking the OOB's some I may post the second AAR if there is much change.
 got to see screenshots :laugh: