- Forums
- Individual Game Forums
- Board Games
- Advanced Squad Leader
- ASL Unofficial Support
- Multi-Man Publishing
ASL Overlay Bundle is now up for preorder!
- Thread starter Scott_Blanton
- Start date
Bill Kohler
Senior Member
My wife got a Cricut machine for Christmas: it cuts paper very precisely, according to programmed instructions. By any chance, has any ASLer written instructions for cutting out the ASL Overlays?
Cricut Cutter
Scouting Report 04
Cricut Cutter
Scouting Report 04
Last edited:
Bill Kohler
Senior Member
Have you had experience with them? Is it difficult aligning the paper precisely enough?Be very, very, very careful.
Or do you mean that I should be worried that a thousand ASLers will be sending me their Overlays to cut with the machine?
Last edited:
Scott_Blanton
Senior Member
I've thought about getting one to see how it cuts out the overlays. If I played more FTF ASL then it would drive me to pull the trigger.
Bill Kohler
Senior Member
I'll peek over my wife's shoulder and see how complicated the programming is. If I decide to give it a go, I'll let you know how it turns out.
My impression is that it'll cut the designs just fine: the big issue will likely be, as "Old Noob" hints, of programming the cuts exactly right and of getting the pages perfectly aligned inside the Cricut.
My impression is that it'll cut the designs just fine: the big issue will likely be, as "Old Noob" hints, of programming the cuts exactly right and of getting the pages perfectly aligned inside the Cricut.
Last edited:
Bill Kohler
Senior Member
So I did some experimenting.
Made a scan of "Overlay Sheet 1" at 72 dpi in black and white (monochrome).
Then I edited the image in an image processing program to remove the hex-center dots and other stuff to get a monochrome image.

Then I uploaded the image into "Cricut Design Space" and had it automatically remove the background (e.g., have it automatically create cut lines along the boundaries between the black and the white).
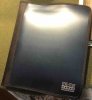
Then my wife helped me cut the image (on a plain blue piece of paper):
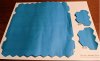
Thoughts:
--The backplate you put the paper on is sticky, so removing the thin paper caused it to curl. I'm sure that'll be less of an issue with cardstock. (And when peeling off the paper, you're apparently supposed to curl the backplate so you can peel the paper off without curling.)
--I don't know of an easy way to move the cutlines in by 1/16th of an inch or so, as I would want to do. I suppose I could shrink the image by some small percentage, but then I'd have to re-center each of the overlays by hand. Hmmm.
It was an interesting experiment.
------------------------
EDIT:
The process I'll try next:
--Scan the overlay in monochrome at 300 dpi.
--Remove the clutter in an image processing program.
--Save the image as 8-bit color.
--Copy each of the overlay blobs in, say, red, and shrink them just a bit, and then center them overtop of the black overlay blobs.
--Turn the resulting black trim to the color white, then turn the red remainder back to black.
--Save the image as monochrome again, and either shrink it to 72 dpi or try to shrink it in Cricut Design Space.
There'll still be a few issues to iron out, like keeping the straight edges on overlay #1 unshrunk, but that shouldn't be too difficult.
Made a scan of "Overlay Sheet 1" at 72 dpi in black and white (monochrome).
Then I edited the image in an image processing program to remove the hex-center dots and other stuff to get a monochrome image.
Then I uploaded the image into "Cricut Design Space" and had it automatically remove the background (e.g., have it automatically create cut lines along the boundaries between the black and the white).
Then my wife helped me cut the image (on a plain blue piece of paper):
Thoughts:
--The backplate you put the paper on is sticky, so removing the thin paper caused it to curl. I'm sure that'll be less of an issue with cardstock. (And when peeling off the paper, you're apparently supposed to curl the backplate so you can peel the paper off without curling.)
--I don't know of an easy way to move the cutlines in by 1/16th of an inch or so, as I would want to do. I suppose I could shrink the image by some small percentage, but then I'd have to re-center each of the overlays by hand. Hmmm.
It was an interesting experiment.
------------------------
EDIT:
The process I'll try next:
--Scan the overlay in monochrome at 300 dpi.
--Remove the clutter in an image processing program.
--Save the image as 8-bit color.
--Copy each of the overlay blobs in, say, red, and shrink them just a bit, and then center them overtop of the black overlay blobs.
--Turn the resulting black trim to the color white, then turn the red remainder back to black.
--Save the image as monochrome again, and either shrink it to 72 dpi or try to shrink it in Cricut Design Space.
There'll still be a few issues to iron out, like keeping the straight edges on overlay #1 unshrunk, but that shouldn't be too difficult.
Last edited:
PNMarkW2
Member
Bill Kohler
Senior Member
In my original post I posted a link to "Scouting Report 04", by Neal Ulen. (When I clicked on your link, it took me to a Commando Operation.) Neal uses a different make of cutter than my wife's, however, plus it's a couple years old, so pre-Overlay Pack.There is a YouTube video here by Neal Ulen from the Advance Squad leader Academy channel showing overlays being cut by one of these magical devices. He doesn't talk through his process, but I believe if you leave a comment he will respond if you have a question.
Last edited:
Tuomo
Keeper of the Funk
This sounds like something screaming out for a completely over-the-top investment of time and effort to develop a needlessly complicated solution that, in the end, is barely more acceptable than the simplest low-tech approach that any Caveman could do.I'll peek over my wife's shoulder and see how complicated the programming is. If I decide to give it a go, I'll let you know how it turns out.
My impression is that it'll cut the designs just fine: the big issue will likely be, as "Old Noob" hints, of programming the cuts exactly right and of getting the pages perfectly aligned inside the Cricut.
In short, the perfect ASL Way
")
PNMarkW2
Member
Sorry, I missed that it had been linked before. I did fix the like in my post though. Not sure how that happened.In my original post I posted a link to "Scouting Report 04", by Neal Ulen. (When I clicked on your link, it took me to a Commando Operation.) Neal uses a different make of cutter than my wife's, however, plus it's a couple years old, so pre-Overlay Pack.
Mark
Faded 8-1
Elder Member
Neat machine, but if you have to scan each sheet, make templates for all of them, do test-runs and adjust the template as necessary, etc - seems like a way to turn a relatively quick and simple task into a PITA project. And what happens if one of the pages binds and gets ruined, or you accidentally feed it in the wrong way? Then you have to order a whole new pack.
I dunno, seems like a solution in search of a problem. I'll stick to scissors and x-acto/ruler and save myself a few hundred bucks and potentially a lot of effort and misery.
I dunno, seems like a solution in search of a problem. I'll stick to scissors and x-acto/ruler and save myself a few hundred bucks and potentially a lot of effort and misery.
- Joined
- Jul 26, 2003
- Messages
- 19,636
- Reaction score
- 5,613
- Location
- St-Légier
- First name
- Robin
- Country
-

I would first scan some of the sheets and print them, so no harm is done to the original stuff.
Bill Kohler
Senior Member
The idea, of course, is that if one person does this, he could then share the files and others could be saved that part of it.Neat machine, but if you have to scan each sheet, make templates for all of them, do test-runs and adjust the template as necessary, etc - seems like a way to turn a relatively quick and simple task into a PITA project.
Yep. Or one could make B&W photocopies to try first. Or a group of ASLers could order an extra Overlay pack between them, for mistakes.And what happens if one of the pages binds and gets ruined, or you accidentally feed it in the wrong way? Then you have to order a whole new pack.
Solutions often present themselves if one works at things. And at the moment I'm merely in the proof-of-concept phase.
Last edited:
Faded 8-1
Elder Member
That's cool. This thread had me seriously considering it as an option. If it works for you I'm all for it. That was just the conclusion I came to after checking out the site and a couple youtube videos.
Probably will go ahead and knock mine out this evening. Then just gotta figure out how to store the damn things. Right now my old ones are just loose in my old 1st edition Hollow Legions box with no rhyme or reason. It works, but isn't very organized.
Probably will go ahead and knock mine out this evening. Then just gotta figure out how to store the damn things. Right now my old ones are just loose in my old 1st edition Hollow Legions box with no rhyme or reason. It works, but isn't very organized.
Steve H
Senior Member
Yeah...I store mine in various sized Ziploc bags, labeled as to what type, and stored in my KW box.
pwashington
Elder Member
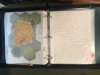
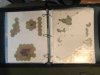
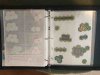
I use various sized mailing envelopes with labels (some overlays are grouped) all in an oversized ziplock bag. It's worked fine. I've also seen 3-ring binders with overlays in document protectors - easy to see what's what, but I would worry about things sliding out the tops of the protectors. There's probably several workable options based on personal preferences and what you can find at your local office supply store.
Wayne
Doing Plenty, Kinda Slow
I use a blend of page/photo/business-card/trading-card/negatives protector pages (showing my age, re that last) in a binder that zippers shut.... I've also seen 3-ring binders with overlays in document protectors - easy to see what's what, but I would worry about things sliding out the tops of the protectors. ...
Good for cut overlays and w/the easy option to stow uncut sheets too in full-page protectors (scissors are p/o my carry kit).
I've had a small cut overlay occasionally stray slightly from its protector pouch, but never far, and all are trapped within the zippered binder w/no chance of loss. [Just be mindful to open carefully and page through w/a bit of caution.]
The fatter your overlays collection the more secure each bit becomes. Use of alphabetical divider pages adds some protective inner structure, too.
fenyan
Elder Member
This is exactly what I use Wayne, various card holder pages in a zipper binder. One of the few ASL storage items that I haven't changed since I started because it works so well.