now that IS a good idea!As von Marwitz says
"Lastly, one could just settle on 'one RR car' per counter and per hex, acknowledging some level of abstraction despite a RR car being shorter than 40 meters. This causes no 'technical' problems with regard to the rules problems at all. For that reason, it is probably the most sensible thing to do.
After all, you could park a number of Tigers in a row in a 40m hex as well, which never happens because the overstacking penalties incurred by the system."
This is the rules as presently written. The idea that a 25 foot AFV (or even the small L3 tankette) can cause a LOS hindrance in a 120 foot wide hex is a game abstraction to begin with.
I see no difference here, one RR Car per hex would be an abstraction on the same order (and easier to visualize) and the train would be treated as vehicles in Convoy except that the MP would all be based on the Locomotive.
Another thought for all of you. Since RR Tracks are normally kept fairly level when build, how would using the Level 0 Open Ground Green (map color) for a base counter color. The actual car drawings could be either wood brown or steel grey with the white Open-top conventions that we are already used to? Kinda like the Glider being blue on 1 side (airborne) and Green of the (Earth-bound) side.
- Forums
- Individual Game Forums
- Board Games
- Advanced Squad Leader
- ASL Specialty Forums
- The Designers Forum
Armored Trains
- Thread starter sswann
- Start date
von Marwitz
Forum Guru
Opposed to boats, which will always operate in 'blue' water and thus justify a blue background, this is not true for RR cars.Another thought for all of you. Since RR Tracks are normally kept fairly level when build, how would using the Level 0 Open Ground Green (map color) for a base counter color. The actual car drawings could be either wood brown or steel grey with the white Open-top conventions that we are already used to? Kinda like the Glider being blue on 1 side (airborne) and Green of the (Earth-bound) side.
A train might pass DTO desert colors, normal OG 'green' but also Ground Snow 'white'. While the latter is not represented on cardboard boards, it is surely on VASL. DTO colors are also found on the desert boards in their cardboard versions.
Following my train of thought (pun intended...) I believe that RR car 'terrain background color' should be neutral as to not contradict any conceivable 'terrain background color'. I.e. OG 'green' would 'contradict' DTO 'yellow' or snow 'white'.
Thus I would opt for 'generic white' as a background color as this is in line with other generic counters in the general system and does not create 'contradictions'. 'White' is most versatile and thus should be preferred IMHO.
von Marwitz
von Marwitz
Forum Guru
That might be a solution. Somewhat of a parallel are the 'Assault Boat' counters which look like this in the upper right corner:We couuld place a national symbol in the upper right corner since there will not have any MP [EXC: Locomotive]
2/+4
with the '+' being in reality the German cross on the cardboard counter next to the boats MFs to distinguish the faster German Assault Boats from the rest.
- In case a RR car has no 'own' MP, you put merely the nationality symbol
- In case of a generic Locomotive, you put merely the MPs.
- In case of something like a German self propelled RR Car, you put the German nationality symbol followed by the MPs.
sswann
Elder Member
- Joined
- Jan 31, 2003
- Messages
- 2,914
- Reaction score
- 1,387
- Location
- Middle of Kansas
- First name
- Steven
- Country
-

I think we have something, or are at least getting there.
Please note that all of MMP's RR overlays have the Level 0 Green background. When we place them across streans and/or rivers, we just declare the the tracks over water and gullies are "RR Bridges". As do many overlays used in other terrain already.
Please note that all of MMP's RR overlays have the Level 0 Green background. When we place them across streans and/or rivers, we just declare the the tracks over water and gullies are "RR Bridges". As do many overlays used in other terrain already.
von Marwitz
Forum Guru
That's right. And green background RR overlay crossing a river, for example, looks plain stupid with the existing RR overlays IMHO.Please note that all of MMP's RR overlays have the Level 0 Green background. When we place them across streans and/or rivers, we just declare the the tracks over water and gullies are "RR Bridges". As do many overlays used in other terrain already.
If you want to be truly innovative, what about 'transparent' RR overlays?
I keep voicing this idea for a couple of years and your RR pack would be the perfect opportunity to introduce them.
See here. I am sure that I elaborated not too long ago in some thread which was about new ideas for overlays but for the love of God, I can't find the thread after searching for it here (and via google) for 15 mins.
So I will reiterate the idea here:
You print the RR artwork on tranparency film. This film is available for standard printers. The company I used to work for used these often. The cost should not be high to produce them. They could be included in your module. Best would be matte transparency film as not to create glare when you apply it as an overlay to a geo-board.
You'd print merely the RR artwork and the hex-outlines. This way, the level beneath automatically remains what it originally was. Unless cutting through buildings, transparent overlays will look just fine being applied with RR artwork across rivers, through woods, over hills, etc. You could even slide two lenghts of RR overlays across each other to create any length desired.
Another idea I had:
There is not a single ASL board with a small rural station that aesthetically appears as such. Usually, it is merely a building in one hexrow and a RR track passing it in the next. No switches, no platforms, to Watertowers. BFP has some boards (ITR for example) that feature such, but they are not versatile. If you have a small set of overlays (transparent or not depending on purpose), you could create a 'station kit' with which you could put together varieties of RR stations, platforms, switches, a watertower, etc. This set could be applied to any appropriate geo-board and would be extremely versatile.
von Marwitz
sswann
Elder Member
- Joined
- Jan 31, 2003
- Messages
- 2,914
- Reaction score
- 1,387
- Location
- Middle of Kansas
- First name
- Steven
- Country
-
I agree with you completely.
What type of transparent overlay material would you recommend?
I admit, my knowledge on clear transparency file is extremely small.
As to RR Stations, I also agree.
I have already inputed my request to a couple of map gurus for RR Station overlays.
One a small village station (building siding tracks and loading dock
two a slightly larger station with the above plus a 2nd loading dock and water tower.
Three would include all the above plus a coal yard, larger station & side tracks.
While I like the BFP RR Station maps, they are too big for most scenarios that are outside a major city.
Gordon
Forum Guru
- Joined
- Apr 6, 2017
- Messages
- 2,493
- Reaction score
- 2,944
- Country
-
Might want to consider not printing the hex grid on the fully transparent parts of any such overlays. Instead, just have sufficient registration points to ensure the overlays are positioned properly. Having 2 slightly misaligned hex grids (and dots) will cause havoc with my OCD as well as making me think I can't focus my eyes. 
von Marwitz
Forum Guru
I have to admit that I have no idea. I was not responsible for buying the stuff but more concerned with mess that happened when inadequate transparency films were fed into the wrong printers. Laser printers can get quite hot, melting some of the transparency films within creating the need for expensive repairs... That was not an issue with ink jet printers or the correct transparency films for laser printers.I agree with you completely.
What type of transparent overlay material would you recommend?
I admit, my knowledge on clear transparency file is extremely small.
If you use the right stuff, though, you're good. Before the widespread advent of beamers, the people of the company would have died if they hadn't been able to project their masses of PowerPoint presentations printed on transparency film by means of overhead projectors.
If you are planning to pull off the idea of tranparent overlays, which I would welcome, then it should not be too difficult to find out what stuff to use, though.
von Marwitz
von Marwitz
Forum Guru
Hm, that might actually be a good point!Might want to consider not printing the hex grid on the fully transparent parts of any such overlays. Instead, just have sufficient registration points to ensure the overlays are positioned properly. Having 2 slightly misaligned hex grids (and dots) will cause havoc with my OCD as well as making me think I can't focus my eyes.
My idea for the printing the grid was mostly based on providing an outline to cut out the transparent overlays.
For the best of both worlds, one could consider the following:
- Provide sufficient 'registration points' as you suggest, which will be printed on the transparent overlay.
- On the printed transparent overlay beside the actual artwork and the 'registration points' for placement, merely print hexides for the outer outline of the overlay.
- Then instruct the people to cut out the transparent overlay just within the printed outline. That way, you get the proper hex-forms which makes the overlays better to handle as if you would only have a cut-out artwork outline. Furthermore, the danger of hexsides printed on the transparent overlay being slightly offset in relation to the visible printed cardboard hexside outlines would be eliminated.
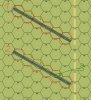
Figure 1 - Not like this:
Green: Actual printed artwork.
Red: Actual printed grid - imagine the red line exactly on the hexsides and over the artwork.
Blue: Actual printed 'registration points' for alignment of the overlay.
Figure 2 - But rather like this:
Green: Actual printed artwork.
Red: Actual printed grid. This time, the prined grid does not match with the cardboard grid, nor is it printed across the artwork. And does not need to, because it serves only the sole purpose to help cutting out the overlay just within the red grid, which will thus later not exist on the cut out overlay.
Blue: Actual printed 'registration points' for alingment. As only 'points' are printed, this will allow correct alignment. If, however, the printed points for some reason do not exactly match with the cardboard grid below, it is no catastrophe, because a minimum offset of a few printed points is not offensive to the eye.
Figure 3 - Green - Transparent overlay on Transparent overlay:
Imagine a one-hex transparent overlay depicting a RR switch. You could place a RR switch overlay (as one example) anywhere along a given length of RR track. Another RR track overlay could - in the example, then be added from P7 to Q6. By this method you are very flexible in created RR networks as needed for your scenario and terrain.
To elaborate on the length of RR tracks. In the example, we have to RR track overlay with the length of 6 hexes. If you place them on the board with an overlap, this allows you to create any length of RR track from 7 to 11 hexes. So RR track overlays will not extend beyong a cardboard board-edge. This is especially valuable, if you have only halfboard playing area or if the current overlays are too long / otherwise ill suited to create the RR net you want.
If the printed artwork is only as outlined in green, then it is much less fuss to have RR track overlays crossing hills, gullies or water obstacles. The apparel of the artwork comes close to a RR brigde in itself. If your sense of aesthetics is not content with that, then create 1-hex, 2-hex, 3-hex transparent overlays with RR Bridge artwork. Just as the RR switches, these could be placed atop a lower RR track overlay at any place along its length - for example just where the river is.
Added benefit of the transparent RR Bridge overlay: As only the artwork is printed, it the representation of RR Bridges at any level and/or across multiple levels.
Next the RR Tunnel entry. Imagine you have a Level 3 hill with an elevation change of 1 Level per ADJACENT Hex. In reality, this would be much to steep for any train to drive up and down. A 1-hex RR Tunnel entry overlay placed on each side of a hill would solve that issue and allow for completely new tactical situations: Trains/other units passing beneath hills.
Yet another application which are aestethically appealing: transparent overlays for RR crossings. They would eliminate the OG part next to RR tracks which happen now if RR overlays are used (see picture/example in next post).
Everything outlined above could in the same way applied to transparent road overlays, btw.
von Marwitz
Last edited:
von Marwitz
Forum Guru
Note, that in VASL transparent overlays do already exist. This is little known.
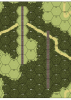
Here is an example of the 'standard' RR4 overlay and its VASL 'transparent' version XP_RR4:
This looks quite cool if you ask me. Aside from RR tracks, imagine adding your own road net to existing boards with transparent Road overlays (which do not exist even in VASL).
I do not know if the 'transparent overlays' are inherently part of VASL - I don't think so.
But they can be downloaded here at vasl.info.

This is the description that comes with them:
Transparent-background overlays: Same as the standard overlays, but with Level 0 Open Ground turned transparent. See here for discussion. Brush (XP_B), Grain (XP_G), Hedge (XP_HD), Marsh (XP_M), Orchard (XP_O), Pond (XP_P), Rice Paddy (XP_RP), Railroad (XP_RR), Shellhole (XP_SH), Stone Rubble (XP_ST), Swamp (XP_SW), Vineyard (XP_V), Woods (XP_WD), Wooden Rubble (XP_WR), Building (XP_X)
von Marwitz
Here is an example of the 'standard' RR4 overlay and its VASL 'transparent' version XP_RR4:
This looks quite cool if you ask me. Aside from RR tracks, imagine adding your own road net to existing boards with transparent Road overlays (which do not exist even in VASL).
I do not know if the 'transparent overlays' are inherently part of VASL - I don't think so.
But they can be downloaded here at vasl.info.
This is the description that comes with them:
Transparent-background overlays: Same as the standard overlays, but with Level 0 Open Ground turned transparent. See here for discussion. Brush (XP_B), Grain (XP_G), Hedge (XP_HD), Marsh (XP_M), Orchard (XP_O), Pond (XP_P), Rice Paddy (XP_RP), Railroad (XP_RR), Shellhole (XP_SH), Stone Rubble (XP_ST), Swamp (XP_SW), Vineyard (XP_V), Woods (XP_WD), Wooden Rubble (XP_WR), Building (XP_X)
von Marwitz
MichalS
Member
I love the idea of transparent overlays. With a friend of mine we have been thinking of producing small batch transparent system counters (smoke, trench...) which would enable to see some of the terrain below.
I also like the two-tone counters with white edging and inside nationality colour. It makes the train counters visually distinct and yet intuitively understandable.
This is the ASL product I have been most excited to hear about in the last year! Really looking forward to this!!! (And the Slovak actions.)
I think the problem with transparent overlays is that the inks, pigments, dyes do not adhere to the film very well and rub off rather quickly. After a few uses all that is left is clear acetate.
william.stoppel
Elder Member
I think this project sounds ideally sized for a LFT Out of the Cellar pack. 10 pages of rules, 8-12 scenarios, 1/2 sheet of counters and some overlays.Wow!
Lots of opinions here.
I only have counters designed for Germany, Russia, Poland, Japan, Slovak and a few generic.
While other countries had them, I have only found ASL Scenario combat actions for these 6 types.
German, Polish & Russian Self-propelled RR Scout Cars (RRSC) are included.
Instead of printing a couple of hundred counters, I want to limit it to a reasonable number with at least 1 scenario for each type.
One thing that I am aiming for is to keep the rules as close to the normal ASL Vehicle/Gun rules as possible.
It cuts down the learning curve by not having a ton of new rules.
So AF/Guns/MGs rules are basically the same using all the same TH/TK modifiers.
They are larger in size (-3 to hit) and without all the different smoke capabilities.
PP for transporting Passenger/Riders is handled the same as standard vehicles.
Movement is the major difference since they MUST follow the RR Tracks.
Maybe I should first find a producer and let them decide the counters?
Steve
von Marwitz
Forum Guru
Personally, I have no expericence with durability of such prints. It might be a difference if they are made by a professional printer like the rest of the product or printed on your printer at home.I think the problem with transparent overlays is that the inks, pigments, dyes do not adhere to the film very well and rub off rather quickly. After a few uses all that is left is clear acetate.
In case an issue with durability emerges, one could make available the file for the overlays, so that people could print home-made replacements individually.
von Marwitz
In the far distant past, when Squad Leader was "cutting edge", I dimly remember that private parties tried selling overlays made of
printed terrain on plastic {have somewhere a 'shellholes' example}. Nothing ever came out of this approach, though..
printed terrain on plastic {have somewhere a 'shellholes' example}. Nothing ever came out of this approach, though..
Gordon
Forum Guru
- Joined
- Apr 6, 2017
- Messages
- 2,493
- Reaction score
- 2,944
- Country
-
Printing them so that the printed side is down when placed might reduce wear and tear. Also, I'm sure a coat of matt clear enamel spray paint before use will help seal in the printing.Personally, I have no expericence with durability of such prints. It might be a difference if they are made by a professional printer like the rest of the product or printed on your printer at home.
In case an issue with durability emerges, one could make available the file for the overlays, so that people could print home-made replacements individually.
von Marwitz
von Marwitz
Forum Guru
Whatever method is used to produce them, of course it makes sense to test what happens under various circumstances before releasing them in a finished product.Printing them so that the printed side is down when placed might reduce wear and tear. Also, I'm sure a coat of matt clear enamel spray paint before use will help seal in the printing.
von Marwitz
What are the opinions of the ASL community: do we use the RR overlays for scenarios that have Armored trains (which would include BFP 1 and 2 mapboards) and/or just SSR that some road sections are RRs?
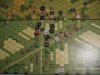
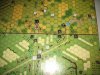
I did some playtesting on ATr back in 2010 (!)-- See attached pics--and found that the usage of overlays really enhanced play. As you see from these pics that SSRing the road as a GLRR was okay, but aesthetically disappointing. Give me trains, then give me tracks! As always, this is my own opinion. After all of these years, with so many counters, boards and overlays I really eschew playing scenarios where I have to pretend. I do not like SSRs that state all hills are wheatfields as an example. Perhaps I have too many things to ponder and do not want to have to remember more than necessary, thanks to the aging brain.
As for the counters, I think generic train counters could be white--or one color and those that are nationality specific have those specific colors.
As work progresses, I fear that these rules need to be as precise (and wordy, unfortunately) as possible as we bring in a new section of rules. Keeping it simple may lead itself to many a future debate that needs clarification. Think of how many rules debates still persist despite the many years ASL has been available.
The best news is that so far everything see looks real good. Kudos to the hard work put in so far by Steve and the original designers.
As for the counters, I think generic train counters could be white--or one color and those that are nationality specific have those specific colors.
Attachments
-
 205.9 KB Views: 33
 -
 256.5 KB Views: 34
Tom Morin
Senior Member
Overlays definitely enhance play visually, but they don't always work on every map, so an SSR for a particular road net works.
Tom
Tom