von Marwitz
Forum Guru
AP4 / ASL186 L'Abbaye Blanche - AAR
Somehow, I have never played this old classic before which has been republished in Yanks 2 as ASL186. Now I took it out as a small scenario to teach VASL.
Set in August 1944 in France, this scenario is special in that the entire US order of battle sets up HIP. Not that it is much: The Americans only have a single full squad, a single halfsquad, and two vehicular crews to stand up against 10 German 658 SS squads, four MGs, a PSK, a DC, four Leaders, and two SPW 251/9s. This US 'nothing' is stiffened by two M5 anti-tank guns, three MMG, a BAZ and 24 AP (only) Mine factors along with the US Leaders being SSR'ed to have firepower comparable to a Hero and a CCV of 2 (though no other heroic traits).
The objective for the Germans is to exit a substantial number of Exit VP which is upped for any Casualty VP inflicted by the Americans. The AFVs/Germans crews do not factor in this equation. The hook is that the Germans cannot lose much, else they lose the game.
Let's analyze a bit what the Americans and Germans have to care about. If you do not want to be spoilered with tactics, skip the following paragraphs until you see the next screenshot of the Situation at Game Start.
Well, what to do with the flimsy Americans against the hordes of 'Übermenschen'?
To win, the US must kill some of the German units. The German SS-Squads have a Good Order Morale of 8, a broken Morale of 9, an ELR of 5 and Assault Fire Capability. So breaking Germans does not make it easier, it makes it harder in a way... What the Americans wish for are K/ or KIA results.
Alas, with the firepower the US has at hand, these might be hard to come by. Their best chances might be the pair of M5 AT Guns, which will attack with 14FP if they score a hit on the ITT. As things are likely to become close & personal quickly and these Guns can Bore Sight, there is a somewhat increased probability that they might score a Critical Hit by rolling less than half of their Modified TH number. Bore Sighting can also be used for the three MMGs. If American units fire Point Blank, this doubles their firepower, but things can quickly go awry if the Germans survive the fire unpinned and then go into CC. So to get those K/ and KIA results, the Americans need to make the maximum out of Bore Sighting, surprise/HIP, the enemy using FFNAM/FFMO, and maybe Point Blank fire. You might want to add ROF and luck to that...
Another important asset of the Americans are the AP-Mines. These won't break as the US units will. And they can negate TEM and Concealment when attacking units that step onto them. Theoretically, you might force a broken German unit to rout back into a Minefield. Again, you will need luck for that, but it should at least be thought about.
Bocage is in effect. This can help the Americans with regard to one specific hex in particular: X2
Obviously, a Stone Building with +3 TEM is a nice place for the brittle US units to be in. However, if the Americans use in-hex TEM, they will not have Wall Advantage over the Bocage nor will they be able to see beyond ADJACENT hexes if LOS crosses Bocage. In other words, if the Americans are IN the Stone Building of X2, the approaching Germans can't see them and thus can't fire at them unless ADJACENT. You should read up the Wall Advantage rules:
Per B9.322, "Claiming WA is voluntary [EXC: 9.323], and can be done by a unit at five times: during its setup; at the end of any RPh (step 1.32B of ASOP, ATTACKER first); during its MPh/APh (either as part of, or before/after MF/MP expenditures); when losing HIP status; whenever all enemy units lose/forfeit WA over shared wall/hedge hexsides. WA must be forfeited immediately if a unit no longer fulfills 9.32 and may be forfeited at any other time."
So if the Americans in their Turn have WA in X2, which is not mandatory because of the Stone Building, they can Prep Fire, immediately thereafter forfeit WA and be safe from German return fire in the Defensive Fire Phase, then reclaim WA during the APh, and gain Concealment behind Bocage as long as no enemy LOS crosses non-Bocage hexsides. Pretty nifty.
Yet, the US has to be very careful about how and when to forfeit WA: If they forfeit it claiming +3 Building TEM, they cannot be harmed by non-ADJACENT enemy Infantry across Bocage hexsides. The enemy will have to move ADJACENT and to expose himself to Point Blank fire, however, he will be able to claim WA and thus the +2 Bocage TEM while doing so.
I set up the 666+MMG in X2 with WA to be able to fire not only to adjacent hexes, while at the same time, the 9-1 Leader does not have WA. That way, the Leader cannot be harmed by the Germans while still raising the Morale of the 666 in the hex (I do not think that he can direct its attack, though, to non-adjacent hexes for lack of LOS.) and he has a chance to rally the broken 666 under DM on a DR of 6 or less which it about the best it can get in this one. Having WA, the 666+MMG will deny it to Germans who may attempt to rush ADJACENT - and a shot @-2 (FFMO/FFNAM) is so much better than one at +1 (-1 FFNAM / +2 Bocage TEM).
One needs to carefully consider whether to use the US -1 Leaders to direct the MMGs or to use them as 'Einzelkämpfer'. They do have 1FP, a range of 4 and a CCV of 2 by SSR, but they cannot use their FP in the same phase while directing an attack nor as part of a Fire Group. If such a Leader lurks HIP alone somewhere hoping for a surprise Point Blank 2 @ -2 (FFNAM/FFMO shot), he might also find him in the unwanted situation that his hex is entered by enemy units unforseen from an unwanted direction. In such a case, an Infantry OVR can occur. One should read up the rules on this one, too. Probably, it is not a good idea to hold the Leader's fire if this is about to happen, but once more, the options at hand should be considered.
Bocage is also important with regard to the Guns: Look up B9.53: You cannot change CA across a Bocage hexside AND then fire the Gun in the same phase. Nor fire the Gun across a Bocage hexside AND then change its CA (in case of ROF for example) in the same phase. That said, Defensive First Fire during the enemy MPh and your DFPh is counted as one phase for this rule. Thus setting up your precious Guns in hexes with Bocage hexsides might limit the options of your most valuable assets.
Another interesting point: HIP units, Bocage, WA, Bore Sighting.Per the original B9.324,
"a hidden unit can never claim WA and must be placed (concealed) onboard to be able to claim WA during play, but may do so at any time—even at the moment an enemy unit moves adjacent and wants to claim WA."
As a consequence, if a HIP Gun or another HIP unit elegible for Bore Sighting would set up in a hex with Bocage hexside and not being able to claim WA, it could only Bore Sight hexes across a Bocage hexside that are adjacent. This does, of course, not make sense. Thus there has been an erratum that reads as follows:
"A HIP unit that desires to claim WA during setup must secretly record such WA status [EXC: 9.323]. A HIP unit may forfeit WA (even if it had been mandatory) to an enemy unit claiming WA (even implicitly; 9.323) over a shared hexside and remain hidden but must be placed on board (concealed) to deny an enemy unit from claiming WA, or to claim WA that is not mandatory and was not recorded, or to forfeit WA if no enemy is claiming it. Hidden units are not considered when determining if broken/unarmed units may claim WA (9.32)."
This erratum allows you to set up HIP units with WA and in this case in turn allows you to Bore Sight such weapons to non-ADJACENT hexes across Bocage hexsides.
Finally, note that you cannot use the BAZ against enemy units behind Bocage. Bocage is different to a Wall (or Building) in this regard.
Why am I going into endless detail on the tidbits of individual US units here? Well, because there aren't many US units around and you'll need every trick in the book to inflict the necessary amount of casualties to the Germans before being wiped out.
Now, let's have a look at the Germans.
What they need to care for is a bit easier.
First and foremost they have to watch out that increasing their Exit VP requirement due to taking losses does not make winning the game impossible for them. This could happen quite quickly, so be always aware of how many casualties you can still take.
Secondly, even if losses are not the issue by themselves, units not in position to exit by scenario end might be. There is no much wiggling room for both in this scenario for the Germans.
Thirdly, you can afford to lose your halftracks. They do not matter with regard to EVP or CVP. However, they are very important assets. The Americans don't have too much firepower to begin with. If US positions are SMOKED, this does help the Germans a lot. The German force is elite and thus the SPWs do have a SMOKE Depletion number of 10 (!).
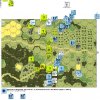
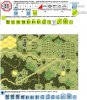
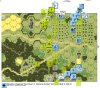
Situation at Game Start:
I played the defending Amercians in this one. Remember, that the entire US order of battle sets up HIP. In the above picture, the Americans are shown Concealed, the AP-Mines revealed and the Bore Sighted Locations visible only for convenience's sake.
The big problem for the Americans is obviously how to harm the Germans without being harmed directly in return. I placed the AT Guns in a way which partly protects them against incoming fire of the assaulting Germans. Hopefully, I could cause casualties if the Germans stumbled into Bore Sighted Locations. Furthermore, both Guns had LOS to a couple of Locations of Open Ground. And I gave them flanking protection in the form of Minefields, which would hopefully stop the Germans and allow my Guns to switch CA to finish them off. Why I placed the 9-1, 666+MMG in X2 in exactly the way depicted has been discussed above already. The MMG's were placed in a way that they could lay down Fire Lanes, but I was more focused on their Bore Sighted locations or hoping for Germans to blunder into ADJACENT hexes in Open Ground to take Point Blank fire attacks. Two of the Leaders I set up alone - just because there is so precious little with which to defend against the Germans. The Bazooka was set up in the faint hope of scoring a hit vs. a halftrack moved too boldly or vs the ADJACENT building if the enemy should venture in it without first discovering the BAZ.
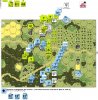
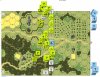
Situation at the End of German Turn 1:
In German Turn 1, there was not much action for my defending Americans yet. I merely temporarily revealed a unit in X2 to deny the Germans some Concealment. As I had expected, the Germans tried a two pronged attack along the flanks.
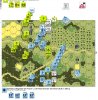
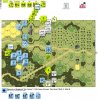
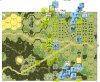
Situation at the End of American Turn 1:
In my US Turn 1, I had not much opportunity to fire at Germans units yet. During the Rally Phase, the 9-1 Leader in X2 Claimed WA, then in Prep Fire the whole stack 9-1, 666+MMG shot at the German HS in AA1 for no effect. WA was immediately relinquished thereafter, thus avoiding German Defensive Fire. The Germans continued to acquire the suspiciously 'empty' Woods in Y1. During the APh, my 666+MMG in X2 reclaimed WA, at the end of the CCPh, the stack grew Concealment (all enemy LOS crossing Bocage). That was it.
To be continued in a subsequent post.
von Marwitz
Somehow, I have never played this old classic before which has been republished in Yanks 2 as ASL186. Now I took it out as a small scenario to teach VASL.
Set in August 1944 in France, this scenario is special in that the entire US order of battle sets up HIP. Not that it is much: The Americans only have a single full squad, a single halfsquad, and two vehicular crews to stand up against 10 German 658 SS squads, four MGs, a PSK, a DC, four Leaders, and two SPW 251/9s. This US 'nothing' is stiffened by two M5 anti-tank guns, three MMG, a BAZ and 24 AP (only) Mine factors along with the US Leaders being SSR'ed to have firepower comparable to a Hero and a CCV of 2 (though no other heroic traits).
The objective for the Germans is to exit a substantial number of Exit VP which is upped for any Casualty VP inflicted by the Americans. The AFVs/Germans crews do not factor in this equation. The hook is that the Germans cannot lose much, else they lose the game.
Let's analyze a bit what the Americans and Germans have to care about. If you do not want to be spoilered with tactics, skip the following paragraphs until you see the next screenshot of the Situation at Game Start.
Well, what to do with the flimsy Americans against the hordes of 'Übermenschen'?
To win, the US must kill some of the German units. The German SS-Squads have a Good Order Morale of 8, a broken Morale of 9, an ELR of 5 and Assault Fire Capability. So breaking Germans does not make it easier, it makes it harder in a way... What the Americans wish for are K/ or KIA results.
Alas, with the firepower the US has at hand, these might be hard to come by. Their best chances might be the pair of M5 AT Guns, which will attack with 14FP if they score a hit on the ITT. As things are likely to become close & personal quickly and these Guns can Bore Sight, there is a somewhat increased probability that they might score a Critical Hit by rolling less than half of their Modified TH number. Bore Sighting can also be used for the three MMGs. If American units fire Point Blank, this doubles their firepower, but things can quickly go awry if the Germans survive the fire unpinned and then go into CC. So to get those K/ and KIA results, the Americans need to make the maximum out of Bore Sighting, surprise/HIP, the enemy using FFNAM/FFMO, and maybe Point Blank fire. You might want to add ROF and luck to that...
Another important asset of the Americans are the AP-Mines. These won't break as the US units will. And they can negate TEM and Concealment when attacking units that step onto them. Theoretically, you might force a broken German unit to rout back into a Minefield. Again, you will need luck for that, but it should at least be thought about.
Bocage is in effect. This can help the Americans with regard to one specific hex in particular: X2
Obviously, a Stone Building with +3 TEM is a nice place for the brittle US units to be in. However, if the Americans use in-hex TEM, they will not have Wall Advantage over the Bocage nor will they be able to see beyond ADJACENT hexes if LOS crosses Bocage. In other words, if the Americans are IN the Stone Building of X2, the approaching Germans can't see them and thus can't fire at them unless ADJACENT. You should read up the Wall Advantage rules:
Per B9.322, "Claiming WA is voluntary [EXC: 9.323], and can be done by a unit at five times: during its setup; at the end of any RPh (step 1.32B of ASOP, ATTACKER first); during its MPh/APh (either as part of, or before/after MF/MP expenditures); when losing HIP status; whenever all enemy units lose/forfeit WA over shared wall/hedge hexsides. WA must be forfeited immediately if a unit no longer fulfills 9.32 and may be forfeited at any other time."
So if the Americans in their Turn have WA in X2, which is not mandatory because of the Stone Building, they can Prep Fire, immediately thereafter forfeit WA and be safe from German return fire in the Defensive Fire Phase, then reclaim WA during the APh, and gain Concealment behind Bocage as long as no enemy LOS crosses non-Bocage hexsides. Pretty nifty.
Yet, the US has to be very careful about how and when to forfeit WA: If they forfeit it claiming +3 Building TEM, they cannot be harmed by non-ADJACENT enemy Infantry across Bocage hexsides. The enemy will have to move ADJACENT and to expose himself to Point Blank fire, however, he will be able to claim WA and thus the +2 Bocage TEM while doing so.
I set up the 666+MMG in X2 with WA to be able to fire not only to adjacent hexes, while at the same time, the 9-1 Leader does not have WA. That way, the Leader cannot be harmed by the Germans while still raising the Morale of the 666 in the hex (I do not think that he can direct its attack, though, to non-adjacent hexes for lack of LOS.) and he has a chance to rally the broken 666 under DM on a DR of 6 or less which it about the best it can get in this one. Having WA, the 666+MMG will deny it to Germans who may attempt to rush ADJACENT - and a shot @-2 (FFMO/FFNAM) is so much better than one at +1 (-1 FFNAM / +2 Bocage TEM).
One needs to carefully consider whether to use the US -1 Leaders to direct the MMGs or to use them as 'Einzelkämpfer'. They do have 1FP, a range of 4 and a CCV of 2 by SSR, but they cannot use their FP in the same phase while directing an attack nor as part of a Fire Group. If such a Leader lurks HIP alone somewhere hoping for a surprise Point Blank 2 @ -2 (FFNAM/FFMO shot), he might also find him in the unwanted situation that his hex is entered by enemy units unforseen from an unwanted direction. In such a case, an Infantry OVR can occur. One should read up the rules on this one, too. Probably, it is not a good idea to hold the Leader's fire if this is about to happen, but once more, the options at hand should be considered.
Bocage is also important with regard to the Guns: Look up B9.53: You cannot change CA across a Bocage hexside AND then fire the Gun in the same phase. Nor fire the Gun across a Bocage hexside AND then change its CA (in case of ROF for example) in the same phase. That said, Defensive First Fire during the enemy MPh and your DFPh is counted as one phase for this rule. Thus setting up your precious Guns in hexes with Bocage hexsides might limit the options of your most valuable assets.
Another interesting point: HIP units, Bocage, WA, Bore Sighting.Per the original B9.324,
"a hidden unit can never claim WA and must be placed (concealed) onboard to be able to claim WA during play, but may do so at any time—even at the moment an enemy unit moves adjacent and wants to claim WA."
As a consequence, if a HIP Gun or another HIP unit elegible for Bore Sighting would set up in a hex with Bocage hexside and not being able to claim WA, it could only Bore Sight hexes across a Bocage hexside that are adjacent. This does, of course, not make sense. Thus there has been an erratum that reads as follows:
"A HIP unit that desires to claim WA during setup must secretly record such WA status [EXC: 9.323]. A HIP unit may forfeit WA (even if it had been mandatory) to an enemy unit claiming WA (even implicitly; 9.323) over a shared hexside and remain hidden but must be placed on board (concealed) to deny an enemy unit from claiming WA, or to claim WA that is not mandatory and was not recorded, or to forfeit WA if no enemy is claiming it. Hidden units are not considered when determining if broken/unarmed units may claim WA (9.32)."
This erratum allows you to set up HIP units with WA and in this case in turn allows you to Bore Sight such weapons to non-ADJACENT hexes across Bocage hexsides.
Finally, note that you cannot use the BAZ against enemy units behind Bocage. Bocage is different to a Wall (or Building) in this regard.
Why am I going into endless detail on the tidbits of individual US units here? Well, because there aren't many US units around and you'll need every trick in the book to inflict the necessary amount of casualties to the Germans before being wiped out.
Now, let's have a look at the Germans.
What they need to care for is a bit easier.
First and foremost they have to watch out that increasing their Exit VP requirement due to taking losses does not make winning the game impossible for them. This could happen quite quickly, so be always aware of how many casualties you can still take.
Secondly, even if losses are not the issue by themselves, units not in position to exit by scenario end might be. There is no much wiggling room for both in this scenario for the Germans.
Thirdly, you can afford to lose your halftracks. They do not matter with regard to EVP or CVP. However, they are very important assets. The Americans don't have too much firepower to begin with. If US positions are SMOKED, this does help the Germans a lot. The German force is elite and thus the SPWs do have a SMOKE Depletion number of 10 (!).
Situation at Game Start:
I played the defending Amercians in this one. Remember, that the entire US order of battle sets up HIP. In the above picture, the Americans are shown Concealed, the AP-Mines revealed and the Bore Sighted Locations visible only for convenience's sake.
The big problem for the Americans is obviously how to harm the Germans without being harmed directly in return. I placed the AT Guns in a way which partly protects them against incoming fire of the assaulting Germans. Hopefully, I could cause casualties if the Germans stumbled into Bore Sighted Locations. Furthermore, both Guns had LOS to a couple of Locations of Open Ground. And I gave them flanking protection in the form of Minefields, which would hopefully stop the Germans and allow my Guns to switch CA to finish them off. Why I placed the 9-1, 666+MMG in X2 in exactly the way depicted has been discussed above already. The MMG's were placed in a way that they could lay down Fire Lanes, but I was more focused on their Bore Sighted locations or hoping for Germans to blunder into ADJACENT hexes in Open Ground to take Point Blank fire attacks. Two of the Leaders I set up alone - just because there is so precious little with which to defend against the Germans. The Bazooka was set up in the faint hope of scoring a hit vs. a halftrack moved too boldly or vs the ADJACENT building if the enemy should venture in it without first discovering the BAZ.
Situation at the End of German Turn 1:
In German Turn 1, there was not much action for my defending Americans yet. I merely temporarily revealed a unit in X2 to deny the Germans some Concealment. As I had expected, the Germans tried a two pronged attack along the flanks.
Situation at the End of American Turn 1:
In my US Turn 1, I had not much opportunity to fire at Germans units yet. During the Rally Phase, the 9-1 Leader in X2 Claimed WA, then in Prep Fire the whole stack 9-1, 666+MMG shot at the German HS in AA1 for no effect. WA was immediately relinquished thereafter, thus avoiding German Defensive Fire. The Germans continued to acquire the suspiciously 'empty' Woods in Y1. During the APh, my 666+MMG in X2 reclaimed WA, at the end of the CCPh, the stack grew Concealment (all enemy LOS crossing Bocage). That was it.
To be continued in a subsequent post.
von Marwitz
Last edited: