von Marwitz
Forum Guru
AP163 Dingoes At Damour - AAR
Scenario Overview:
From the latest Action Pack #16, being tournament-sized and somewhat unusual in pitting Vichy French vs. Australian with tankettes and Carriers in Syria 1941, probably this scenario will see numerous playings. At least it has recently. My Australian mentor proposed to play this one, so I happily obliged and - needless to say - let him have the Australians.
All buildings are Wooden, one is added per overlay, and have a ground level only with Rowhouse bars N/A. Offboard terrain exists as printed. Despite being 2nd line, the Australians do not Cower by SSR - note these are ANZAC (A25.44) and thus also Stealthy unless Green. The French armored trucks are radio-equipped and have Speacial Ammo AP increased to 11.
The objective of the Australians is to gain Control of Building Locations. So those not familiar with the difference between 'Building Control' and 'Control of Building Locations' should read up the appropriate rules to avoid unhappy surprises.
Preliminary Assessment:
My opponent remarked that this scenario is a 'typical Andrew Rodgers' design. Of course, I inquired what made it 'typical'. My opponent answered that many of Andrew Rodgers' designs feature engagements in which most of the forces involved tend to struggle with each other at rather short distances. I wish I could express myself more succinctly, as this description fits a very wide range of ASL scenarios, but I understood what my opponent meant. I have just recently played AP150 The Sangshak Redemption, also an Andrew Rodgers design which had this similar characteristic. So - learned something new even before I began play.
The Vichy French defenders have 10 squads (1 elite, 9 first line), 3 Leaders, a MMG, 2 LMG, a 60mm MTR and a 75* ART piece plus Crew with a scant Special Ammo of AP5 and possibly useful s6. 8 Concealment Counters and 3 Foxholes provide some extra cover. In French Turn 2, two armored trucks arrive. True tin cans with an AF of 0 all around. With 23MP, these are only quick on roads. Their 37* Gun is a threat to any British AFV, but the difficulty will lie in hitting them.
The Australians begin with an onboard force of 12 2nd Line squads (not subject to Cowering by SSR) led by four Leaders and only equipped with light if ample SW consisting of 4 LMG, 3 50mm MTRs, and 2 ATRs. Given the likely close-range fighting and the French armor that barely deserves the name, the number of these SW might defeat the enemy armored trucks by themselves.
But then, there is also the 'cavalry' entering no Turn 1 along the South (left) consisting of 3 Carriers with their inherent half-squads and removable weapons and two Mk VIB tankettes, which will be the 'kings of the battlefield' under the given circumstances with their 10FP CMG and their two TK rolls vs. vehicles. All Australian AFV have Smoke Dispensers as well. Last but not least, the Australian vehicles are fast offroad and can move about just anywhere in short order.
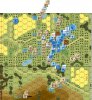
The playing area consists of two boards of which roughly 2/3 of the space are 'onboard'. The western (top) board 35 is dominated by Orchards and Grain. Roughly in the center sit the buildings which are contested. The eastern (bottom) board 58 is dominated by a large hill. Board 58 will only play a minor role because the Orchards an lack of upper building levels severely curtail LOS to the relevant areas so that the usual advantage of the high ground is hardly significant in this scenario. Most of the action will take place in the northern (right) half of board 35.
The omnipresent Orchards will greatly impact how this scenario plays. It means that most fighting will be at close range because otherwise the cumulative hindrances of the Orchards makes fire ineffective. Besides the contested Buildings, there is not much Rout Terrain in the relevant area except for a few small patches of Woods on the eastern and western fringes of board 35. This does have a great impact on the attacker and also on the setup of the defence.
Theoretically, the French setup area would allow quite a lot of room for a forward or flanking setup on board 35. The question is: Why would one want to do that?
Of course, the answer would be to delay the Aussie approach. But the scarcity of Rout Terrain has already been mentioned as has been the attackers capability to outmaeuver the defenders almost at will. As the defender must defend the buildings to win, he could at best put some of his units further up front. As soon as they break, they will be in dire straits to rout anywhere and are very likely to be cut off and overrun in short order.
Therefore, I see no sense for a forward defensive setup but interestingly, I have observed a game on VASL in which the Vichy tried just that. I did not have the opportunity to follow that game in detail, it was not over quickly. But I cannot report the reasons why it lasted. Maybe future plays will show if there is any benefit in such a defensive setup, but I doubt it will do against a proficient attacker.
Consequently, I'd expect a defender to 'build a castle' around the buildings. These at least provide the best TEM around and force the enemy to close if this protection is not to be further enhanced by Orchard hindrances while losing Orchard hindrance protection themselves the closer they come. Once the attackers are broken, though, they are facing the issue of Rally Terrain. Broken attackers could likey use Low Crawl or might not even be required to Rout at all - but in proximity of the defenders, they aren't likely to rally quickly either. If they instead rout back to some woods, it might be a long way to get there - and back into action once recuperated. This might be one of the factors this scenario hinges on.
Another point is the danger of being eliminated for Failure to Rout for the French defenders. It is very easy for the Australians get into the back of the French quickly with the AFV and soon thereafter with Infantry under the cover of the Orchards. Generally, there is precious little the French can do to delay the Australian approach due to the Orchards except if they are ready to sacrifice some of their defenders up front which probably brings more harm than gain.
The Australians must make the best out of the opportunities provided to them by their AFV - and these offer plenty. They have to think up a plan how to best rally broken forces. And more importantly attempt not to be broken in numbers during their approach. This becomes ever more difficult the closer they get to the French. A lot might hinge on whether the Australians find SMOKE for their 3 Mortars or how the sDs may work - or not. The Diggers have a slight advantage in CC as - being ANZAC troops unless Green - they are Stealthy, which is beneficial for Ambush. CC, however, is always a fickle thing. In some cases a unit bound in Melee might be just fine as it will not be able to fire anywere allowing other friendly units to close in. Then, there is the French ART piece to be reckoned with. It has thorough punch vs. the Australian Infantry, but the Australian AFV might neutralize it easily to have it finished off by following up footsloggers. The French armored trucks could be potent, but it is very questionable if they last long. I would not bet on it. Last but not least, there are some outlying buildings that the Australians must take care of. This should best be done in short order because if Australian assets are tied up for long in securing them, this will lessen the pressure they can put on the central buildings.
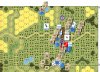
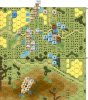
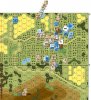
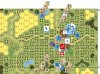
Situation at the Start of Australian Turn 1 - Game Start:
The Battle Plan:
Having dismissed the idea for deploying some French forward because I was convinced the benefit of a short delayed would be outweighed by losing units to quickly in the process, I settled on a classic 'castle' defence around the central buildings where I also placed the foxholes to create sort of a connection between the buildings. To divert at least some of the Australian attackers for a while, a small force defended the 35Y10 building with the intention of falling back to the center if the situation allowed - which I did not really count on. The reinforcements in form of my two armored trucks would also move to the center to threaten enemy AFV which I expected to show up in my rear area to interfere with routing.
My French would keep fire discipline and retain concealment which would make them difficult to harm. When the Australians had come very close, I'd open up at short range in the hope of breaking as many of the attackers as possible, buying time for me when they struggled to regain Good Order, which would not be easy close to my defenders or cost them time routing back to the few patches of Woods and moving to the front again.
Since my defenders are bunched together, it would be kind of difficult to discern anything (which might be a trouble for later pictures as well), so I have only expanded part of the stacks in the above picture and will provide dispositions for the others in the following:
35X6: 458+LMG
35Y6: 457+LMG
35Y7: 9-1, 457+MMG
35Z5: 457 (in Foxhole), 75*ART+228 (HIP, CA: 35X5)
35Z7: 457
The attackers would close in quickly, I'd slug it out, and just hang on long enough to deny Australian victory. Not much subtlety here.
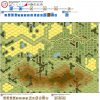
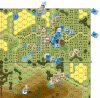
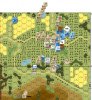
Situation at the End of Australian Turn 1:
A quick 1st Australian Turn. The Australians closed in unopposed, I did nothing at all.
The attack came in with a strong western (top) flank, where the Australians pushed forward with their two best Leaders (9-1 and 8-1), all 4 LMGs, and the two Mk VIB tankettes.
In the center came two lt. MTRs, an ATR and the 8-0 with roughly half of the Australian Infantry force.
This left the Carriers for the eastern (bottom) flank on the hill with the 3rd lt. MTR, the 7-0 Leader and a small Infantry force apparently aiming for the 35Y10 building or for a flanking move into my rear area.
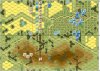
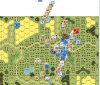
Situation at the End of Vichy French Turn 1:
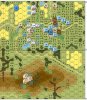
My French Turn 1 was, again, a very quick one.
My 9-1, 457+MMG in 35Y7 broke one enemy squad.
The Australians acquired 35X6 with one of their lt. MTRs and assembled another one atop the hill.
To be coninued in a subsequent post...
von Marwitz
Scenario Overview:
From the latest Action Pack #16, being tournament-sized and somewhat unusual in pitting Vichy French vs. Australian with tankettes and Carriers in Syria 1941, probably this scenario will see numerous playings. At least it has recently. My Australian mentor proposed to play this one, so I happily obliged and - needless to say - let him have the Australians.
All buildings are Wooden, one is added per overlay, and have a ground level only with Rowhouse bars N/A. Offboard terrain exists as printed. Despite being 2nd line, the Australians do not Cower by SSR - note these are ANZAC (A25.44) and thus also Stealthy unless Green. The French armored trucks are radio-equipped and have Speacial Ammo AP increased to 11.
The objective of the Australians is to gain Control of Building Locations. So those not familiar with the difference between 'Building Control' and 'Control of Building Locations' should read up the appropriate rules to avoid unhappy surprises.
Preliminary Assessment:
My opponent remarked that this scenario is a 'typical Andrew Rodgers' design. Of course, I inquired what made it 'typical'. My opponent answered that many of Andrew Rodgers' designs feature engagements in which most of the forces involved tend to struggle with each other at rather short distances. I wish I could express myself more succinctly, as this description fits a very wide range of ASL scenarios, but I understood what my opponent meant. I have just recently played AP150 The Sangshak Redemption, also an Andrew Rodgers design which had this similar characteristic. So - learned something new even before I began play.
The Vichy French defenders have 10 squads (1 elite, 9 first line), 3 Leaders, a MMG, 2 LMG, a 60mm MTR and a 75* ART piece plus Crew with a scant Special Ammo of AP5 and possibly useful s6. 8 Concealment Counters and 3 Foxholes provide some extra cover. In French Turn 2, two armored trucks arrive. True tin cans with an AF of 0 all around. With 23MP, these are only quick on roads. Their 37* Gun is a threat to any British AFV, but the difficulty will lie in hitting them.
The Australians begin with an onboard force of 12 2nd Line squads (not subject to Cowering by SSR) led by four Leaders and only equipped with light if ample SW consisting of 4 LMG, 3 50mm MTRs, and 2 ATRs. Given the likely close-range fighting and the French armor that barely deserves the name, the number of these SW might defeat the enemy armored trucks by themselves.
But then, there is also the 'cavalry' entering no Turn 1 along the South (left) consisting of 3 Carriers with their inherent half-squads and removable weapons and two Mk VIB tankettes, which will be the 'kings of the battlefield' under the given circumstances with their 10FP CMG and their two TK rolls vs. vehicles. All Australian AFV have Smoke Dispensers as well. Last but not least, the Australian vehicles are fast offroad and can move about just anywhere in short order.
The playing area consists of two boards of which roughly 2/3 of the space are 'onboard'. The western (top) board 35 is dominated by Orchards and Grain. Roughly in the center sit the buildings which are contested. The eastern (bottom) board 58 is dominated by a large hill. Board 58 will only play a minor role because the Orchards an lack of upper building levels severely curtail LOS to the relevant areas so that the usual advantage of the high ground is hardly significant in this scenario. Most of the action will take place in the northern (right) half of board 35.
The omnipresent Orchards will greatly impact how this scenario plays. It means that most fighting will be at close range because otherwise the cumulative hindrances of the Orchards makes fire ineffective. Besides the contested Buildings, there is not much Rout Terrain in the relevant area except for a few small patches of Woods on the eastern and western fringes of board 35. This does have a great impact on the attacker and also on the setup of the defence.
Theoretically, the French setup area would allow quite a lot of room for a forward or flanking setup on board 35. The question is: Why would one want to do that?
Of course, the answer would be to delay the Aussie approach. But the scarcity of Rout Terrain has already been mentioned as has been the attackers capability to outmaeuver the defenders almost at will. As the defender must defend the buildings to win, he could at best put some of his units further up front. As soon as they break, they will be in dire straits to rout anywhere and are very likely to be cut off and overrun in short order.
Therefore, I see no sense for a forward defensive setup but interestingly, I have observed a game on VASL in which the Vichy tried just that. I did not have the opportunity to follow that game in detail, it was not over quickly. But I cannot report the reasons why it lasted. Maybe future plays will show if there is any benefit in such a defensive setup, but I doubt it will do against a proficient attacker.
Consequently, I'd expect a defender to 'build a castle' around the buildings. These at least provide the best TEM around and force the enemy to close if this protection is not to be further enhanced by Orchard hindrances while losing Orchard hindrance protection themselves the closer they come. Once the attackers are broken, though, they are facing the issue of Rally Terrain. Broken attackers could likey use Low Crawl or might not even be required to Rout at all - but in proximity of the defenders, they aren't likely to rally quickly either. If they instead rout back to some woods, it might be a long way to get there - and back into action once recuperated. This might be one of the factors this scenario hinges on.
Another point is the danger of being eliminated for Failure to Rout for the French defenders. It is very easy for the Australians get into the back of the French quickly with the AFV and soon thereafter with Infantry under the cover of the Orchards. Generally, there is precious little the French can do to delay the Australian approach due to the Orchards except if they are ready to sacrifice some of their defenders up front which probably brings more harm than gain.
The Australians must make the best out of the opportunities provided to them by their AFV - and these offer plenty. They have to think up a plan how to best rally broken forces. And more importantly attempt not to be broken in numbers during their approach. This becomes ever more difficult the closer they get to the French. A lot might hinge on whether the Australians find SMOKE for their 3 Mortars or how the sDs may work - or not. The Diggers have a slight advantage in CC as - being ANZAC troops unless Green - they are Stealthy, which is beneficial for Ambush. CC, however, is always a fickle thing. In some cases a unit bound in Melee might be just fine as it will not be able to fire anywere allowing other friendly units to close in. Then, there is the French ART piece to be reckoned with. It has thorough punch vs. the Australian Infantry, but the Australian AFV might neutralize it easily to have it finished off by following up footsloggers. The French armored trucks could be potent, but it is very questionable if they last long. I would not bet on it. Last but not least, there are some outlying buildings that the Australians must take care of. This should best be done in short order because if Australian assets are tied up for long in securing them, this will lessen the pressure they can put on the central buildings.
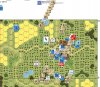
Situation at the Start of Australian Turn 1 - Game Start:
The Battle Plan:
Having dismissed the idea for deploying some French forward because I was convinced the benefit of a short delayed would be outweighed by losing units to quickly in the process, I settled on a classic 'castle' defence around the central buildings where I also placed the foxholes to create sort of a connection between the buildings. To divert at least some of the Australian attackers for a while, a small force defended the 35Y10 building with the intention of falling back to the center if the situation allowed - which I did not really count on. The reinforcements in form of my two armored trucks would also move to the center to threaten enemy AFV which I expected to show up in my rear area to interfere with routing.
My French would keep fire discipline and retain concealment which would make them difficult to harm. When the Australians had come very close, I'd open up at short range in the hope of breaking as many of the attackers as possible, buying time for me when they struggled to regain Good Order, which would not be easy close to my defenders or cost them time routing back to the few patches of Woods and moving to the front again.
Since my defenders are bunched together, it would be kind of difficult to discern anything (which might be a trouble for later pictures as well), so I have only expanded part of the stacks in the above picture and will provide dispositions for the others in the following:
35X6: 458+LMG
35Y6: 457+LMG
35Y7: 9-1, 457+MMG
35Z5: 457 (in Foxhole), 75*ART+228 (HIP, CA: 35X5)
35Z7: 457
The attackers would close in quickly, I'd slug it out, and just hang on long enough to deny Australian victory. Not much subtlety here.
Situation at the End of Australian Turn 1:
A quick 1st Australian Turn. The Australians closed in unopposed, I did nothing at all.
The attack came in with a strong western (top) flank, where the Australians pushed forward with their two best Leaders (9-1 and 8-1), all 4 LMGs, and the two Mk VIB tankettes.
In the center came two lt. MTRs, an ATR and the 8-0 with roughly half of the Australian Infantry force.
This left the Carriers for the eastern (bottom) flank on the hill with the 3rd lt. MTR, the 7-0 Leader and a small Infantry force apparently aiming for the 35Y10 building or for a flanking move into my rear area.
Situation at the End of Vichy French Turn 1:
My French Turn 1 was, again, a very quick one.
My 9-1, 457+MMG in 35Y7 broke one enemy squad.
The Australians acquired 35X6 with one of their lt. MTRs and assembled another one atop the hill.
To be coninued in a subsequent post...
von Marwitz
Last edited:
")