von Marwitz
Forum Guru
AP143 Late For Chow - AAR
Edit:
I was made aware that we have used incorrect setup areas for the Americans in our game:
SSR 2 forces the Americans to set up in hexes numbered => 4, not =< 4
In this 1944 Bocage action, a dozen of tough 548 Fallschirmjäger squads lead by four leaders with decent SW support need to punch through a thinly held line of US troops with modest leadership and scant SW support. In Turn 3, the Americans receive some infantry support with which they will get on par with the Germans in squad equivalents. The Germans win by either exiting 8VP (Prisoners don't count double) or moving Good Order units into certain buildings.
While this might sound like a cake-walk for the Germans, it isn't. In May 2020, ROAR had this 8 to 13 in favor of the Americans. Apparently, the scenario has seen quite some play recently, so after our playing now in August 2020, the current ROAR is 13 to 16 in favor of the Americans with a decent Excitement Rating of 6.65. I had the Americans in our playing.

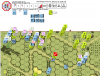
Looking at the map with the dispersed US setup areas shown in red, it appears that the Germans can just make a run for it or overwhelm one flank of the Americans, who will find it very difficult to cover all the terrain against the German attack.
Soon it will become apparent, that the terrain is the biggest ally of the Americans if he knows how to use it. The situation calls for a classic fall-back defence - not the easiest of challenges in ASL.
Situation Start US Turn 1:
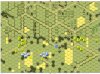
It is clearly seen that the Germans can choose their Schwerpunkt. Half of the US force on the right cannot have any effect for the moment at all and will need to reposition fast. The US force on the left must find the balance in delaying the Germans and falling back. Getting stuck in the woods of the setup area would bring quick doom.
Situation Start US Turn 3:
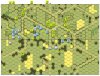
The Americans, mostly successful in pulling back on the left side, have just in time positioned their units to make the crossing of the roads painful for the Germans. However, the right side is almost completely devoid of US units (only Dummies), so if the German had a hunch, he might make a flanking move. On the left side, a German Schwerpunkt is developing with not many Americans in their way. Luckily, reinforcements are bound to arrive now.
Situation Start US Turn 5:
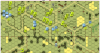
Maybe the Germans have been a bit too cautious before in their attempt to cross the center road. Now the Americans are firmly in place and the center is tighly guarded. Trouble is brewing on both flanks, though: On the right, the Germans make a run for it. But as I am aware that they will only have 3VP there, I let them go and rather concentrate on the other areas to keep the front tight. Now I am realizing, that on the far left side, I will have serious problems to stop what has assembled there - moving across bocage country is slow business, especially without a leader.
Situation Start US Turn 6:
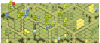
The German push across the central road has been partly repulsed and the Americans were in a good position to keep the area tightly closed. That's when the key 546+MMG with WA elected to become Berserk last turn... So there would be no 18 flat PrepFire shot vs. the ADJACENT German stack poised to rush offboard! The Melee on the far left is yet undecided. The Germans on the far right are safe to exit. Now, the US would have to redeploy to somehow fix the problems on the left side...
Situation during US Turn 7 MPh - End of Game:
On the far right, it was clear that he could exit two HS and a leader unmolested for 3VP. With my Berserker from H3 having found a very violent death in I4 by a 42@-3 shot and the Melee in D2 being decided in favor of the Americans, the situation had turned very dangerous for the Americans on the left. I did not exactly know how many units he had around the C3 area but it turned out to be 3.5 squads and a leader. In addition in I4 he had 2x 548+LMG with a 8-1 Leader.
The I-road was very well covered by the Americans, but by detouring through the G3 orchard area to G1, he could conceivably advance the I4 squad offboard. I had an American 666 in F1 to counter this. In the event, his stack was stopped by the Americans in J2 when he moved into H3. On the far left, I had to consider my fire very carefully because I only had a 346 and 546 there to cover the exit area and it was obvious that I would not be able to place RFP everywhere in an attempt to prevent exit. I did manage to break a HS, placing RFP in C2 and C1. Next, I had to let go the Leader, raising his VPs to 4. Now came the tricky part, as I had only a single shot of the 546 left and did not know if a concealed stack consisted of 1squad+SW, 1squad+1HS, or 2squads. He moved a squad frist, with concealed units left behind, so there would be at least another HS. Luckily my 5@-2 broke the first squad. This was probably the decisive roll for the game. He revealed a second full squad that CX'ed offboard raising his VP to 6 and with it, this flank was done.
With this, the Germans only had one single slim chance to win by moving a 8-1+548 from P7 towards the buildings, survive all defensive fire, advance in for CC and eliminate any possible defenders. It was not to be - a US 346 HS waiting at a crossroads broke his Leader and squad before they could become dangerous giving the Americans the win.
This was very much a game of movement and only a little shooting except in the end game. Key for the Americans is to be in the way always just before the Germans arrive and to pull back just in time to avoid withering German fire in order to buy the maximum amount of time. Bocage can make it very difficult for both sides to shift forces quickly to close or to exploit gaps in the defence. But this is exactly what needs to be done to bring this one home.
von Marwitz
Edit:
I was made aware that we have used incorrect setup areas for the Americans in our game:
SSR 2 forces the Americans to set up in hexes numbered => 4, not =< 4
In this 1944 Bocage action, a dozen of tough 548 Fallschirmjäger squads lead by four leaders with decent SW support need to punch through a thinly held line of US troops with modest leadership and scant SW support. In Turn 3, the Americans receive some infantry support with which they will get on par with the Germans in squad equivalents. The Germans win by either exiting 8VP (Prisoners don't count double) or moving Good Order units into certain buildings.
While this might sound like a cake-walk for the Germans, it isn't. In May 2020, ROAR had this 8 to 13 in favor of the Americans. Apparently, the scenario has seen quite some play recently, so after our playing now in August 2020, the current ROAR is 13 to 16 in favor of the Americans with a decent Excitement Rating of 6.65. I had the Americans in our playing.
Looking at the map with the dispersed US setup areas shown in red, it appears that the Germans can just make a run for it or overwhelm one flank of the Americans, who will find it very difficult to cover all the terrain against the German attack.
Soon it will become apparent, that the terrain is the biggest ally of the Americans if he knows how to use it. The situation calls for a classic fall-back defence - not the easiest of challenges in ASL.
Situation Start US Turn 1:
It is clearly seen that the Germans can choose their Schwerpunkt. Half of the US force on the right cannot have any effect for the moment at all and will need to reposition fast. The US force on the left must find the balance in delaying the Germans and falling back. Getting stuck in the woods of the setup area would bring quick doom.
Situation Start US Turn 3:
The Americans, mostly successful in pulling back on the left side, have just in time positioned their units to make the crossing of the roads painful for the Germans. However, the right side is almost completely devoid of US units (only Dummies), so if the German had a hunch, he might make a flanking move. On the left side, a German Schwerpunkt is developing with not many Americans in their way. Luckily, reinforcements are bound to arrive now.
Situation Start US Turn 5:
Maybe the Germans have been a bit too cautious before in their attempt to cross the center road. Now the Americans are firmly in place and the center is tighly guarded. Trouble is brewing on both flanks, though: On the right, the Germans make a run for it. But as I am aware that they will only have 3VP there, I let them go and rather concentrate on the other areas to keep the front tight. Now I am realizing, that on the far left side, I will have serious problems to stop what has assembled there - moving across bocage country is slow business, especially without a leader.
Situation Start US Turn 6:
The German push across the central road has been partly repulsed and the Americans were in a good position to keep the area tightly closed. That's when the key 546+MMG with WA elected to become Berserk last turn... So there would be no 18 flat PrepFire shot vs. the ADJACENT German stack poised to rush offboard! The Melee on the far left is yet undecided. The Germans on the far right are safe to exit. Now, the US would have to redeploy to somehow fix the problems on the left side...
Situation during US Turn 7 MPh - End of Game:
On the far right, it was clear that he could exit two HS and a leader unmolested for 3VP. With my Berserker from H3 having found a very violent death in I4 by a 42@-3 shot and the Melee in D2 being decided in favor of the Americans, the situation had turned very dangerous for the Americans on the left. I did not exactly know how many units he had around the C3 area but it turned out to be 3.5 squads and a leader. In addition in I4 he had 2x 548+LMG with a 8-1 Leader.
The I-road was very well covered by the Americans, but by detouring through the G3 orchard area to G1, he could conceivably advance the I4 squad offboard. I had an American 666 in F1 to counter this. In the event, his stack was stopped by the Americans in J2 when he moved into H3. On the far left, I had to consider my fire very carefully because I only had a 346 and 546 there to cover the exit area and it was obvious that I would not be able to place RFP everywhere in an attempt to prevent exit. I did manage to break a HS, placing RFP in C2 and C1. Next, I had to let go the Leader, raising his VPs to 4. Now came the tricky part, as I had only a single shot of the 546 left and did not know if a concealed stack consisted of 1squad+SW, 1squad+1HS, or 2squads. He moved a squad frist, with concealed units left behind, so there would be at least another HS. Luckily my 5@-2 broke the first squad. This was probably the decisive roll for the game. He revealed a second full squad that CX'ed offboard raising his VP to 6 and with it, this flank was done.
With this, the Germans only had one single slim chance to win by moving a 8-1+548 from P7 towards the buildings, survive all defensive fire, advance in for CC and eliminate any possible defenders. It was not to be - a US 346 HS waiting at a crossroads broke his Leader and squad before they could become dangerous giving the Americans the win.
This was very much a game of movement and only a little shooting except in the end game. Key for the Americans is to be in the way always just before the Germans arrive and to pull back just in time to avoid withering German fire in order to buy the maximum amount of time. Bocage can make it very difficult for both sides to shift forces quickly to close or to exploit gaps in the defence. But this is exactly what needs to be done to bring this one home.
von Marwitz
Last edited:

") but I think the extra space favors the US as they have more range, they won't have to redeploy across open ground (which is dangerous with 6 morale), and the close range fighting of the proper setup allows the 548's to make better use of their range/assault fire bonus.
but I think the extra space favors the US as they have more range, they won't have to redeploy across open ground (which is dangerous with 6 morale), and the close range fighting of the proper setup allows the 548's to make better use of their range/assault fire bonus.