jrv
Forum Guru
I was told by a good player that this was a dog. The Japanese could not win. I took that as a challenge. I looked at the scenario, and I developed some theories about how it needs to be played. Recently I got the opportunity to test those ideas for playing as the Japanese.
My theory is that the Japanese player can lose this before the first DR, before the Americans set up even, if he doesn't recognize how the early part of the scenario is going to develop. Both sides are going to try to rush for the top of the hill. The Japanese move first, but from their entry area they cannot reach the hilltop on the first turn. The Americans can get all their to the second level in four hexes on the first turn if they commit all their leaders to movement and use CX. But if the Americans go "all-in" or even "mostly-in" they end up in large stacks. If the Japanese can attack those stacks in the early turns, the Americans can fall apart quickly.
My opponent surprised me a bit with his defense. He had nearly all his Americans heading for the hill, with only three stacks (one squad and two dummy stacks, it turned out) staying behind to guard the gap around L9. The shellholes were placed in P6, O6 & M7. Clearly my opponent had counted out where he could reach on the first turn, and prepared positions for his units. The pillbox was facing P5, which again surprised me, because it allowed my units unhampered access up the Q3 slope. His halfsquad in the pillbox did not rally until the beginning of the second Japanese turn, but that's soon enough.
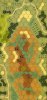
(The green overlays are the American start areas. The Americans also get three shellholes to place.)
The first dummy was in E10, and it was revealed by a bump-scout on the first turn. A total of four Japanese squads attacked toward the L9 gap. They went without a leader because the 10-0 was escorting two squads and the MMG crew to I4. The Americans countered in their part of the first turn by moving up stacks of three squads and a leader to the three shellholes.
In their second turn the Japanese continued their pursuit toward the L9 gap, finding the second dummy stack and threatening the remaining 6-6-6. The 10-0 and company moved to M5, from which two squads advanced into M6 & N5. Three squads, MTR and the 9-0 entered O1 and ended up in P4, Q5 & R4 (MTR). Three more squads entered W1 and ended up in T4 (squad with LMG & half, 9-1), T5 (squad with LMG) and U6 (halfsquad, dummy).
The Americans now faced a problem. Should they attack or should they move out of their heavily stacked hexes? They chose to attack, and at this point the dice failed them. The only successful attack reduced a Japanese squad in Q5. The Japanese returned fire, and the stack in M7 broke and the stack in O6 partially broke. The squad guarding the L9 gap also broke.
During the Japanese third turn the Japanese fired Smoke into P6, hindering that stack (although the Japanese 50mm MTR fires dispersed Smoke even in PFPh), and the stack in O6 was hammered again. The Japanese rushed through the L9 gap to eliminate four squads for failure when combined with a halfsquad in U9. The units around T4 were planning to advance into the bamboo in S4, S5 and S6, but this was unnecessary as my opponent resigned.
The Japanese have to bring in a substantial number of their units on the second turn on the south edge. I think they have to bring in the six maximum. They have to be up on the hill on the second turn, even though this potentially means exposing themselves to very powerful attacks, potentially a thirty-six-add-one in fact. The Japanese have to have hex R6 in LOS on turn two. The Japanese also have to commit forces to at least some of the other approaches (L9, L7, M5, T4, T7 and T9), trying to come at the Americans from all angles. Encirclement will make the Americans even more vulnerable, as will messing with American rout routes.
That attack leaves the Americans either stacking or not having the massive firepower they are capable of, and I think they need to avoid the stacking. That leaves both sides attempting to use reverse-slopes to avoid enemy firepower, and it's almost a Mexican standoff.
An interesting question is what to do with the 2-3-6 halfsquad if it rallies early. The "obvious" thing to do is leave it in the pillbox, but potentially one could move it to, say, R4 or even S5. In our game it did not rally early so there was nothing for the American player to consider.
Overall I think this is more subtle than it first appears. I don't know how the scenario plays out when the Americans don't leave themselves open as targets in large stacks. I suspect it becomes a struggle between the Americans trying to knock down the Japanese using high firepower and the Japanese trying to crumble the American low morale. May the dice be with you.
JR
My theory is that the Japanese player can lose this before the first DR, before the Americans set up even, if he doesn't recognize how the early part of the scenario is going to develop. Both sides are going to try to rush for the top of the hill. The Japanese move first, but from their entry area they cannot reach the hilltop on the first turn. The Americans can get all their to the second level in four hexes on the first turn if they commit all their leaders to movement and use CX. But if the Americans go "all-in" or even "mostly-in" they end up in large stacks. If the Japanese can attack those stacks in the early turns, the Americans can fall apart quickly.
My opponent surprised me a bit with his defense. He had nearly all his Americans heading for the hill, with only three stacks (one squad and two dummy stacks, it turned out) staying behind to guard the gap around L9. The shellholes were placed in P6, O6 & M7. Clearly my opponent had counted out where he could reach on the first turn, and prepared positions for his units. The pillbox was facing P5, which again surprised me, because it allowed my units unhampered access up the Q3 slope. His halfsquad in the pillbox did not rally until the beginning of the second Japanese turn, but that's soon enough.
(The green overlays are the American start areas. The Americans also get three shellholes to place.)
The first dummy was in E10, and it was revealed by a bump-scout on the first turn. A total of four Japanese squads attacked toward the L9 gap. They went without a leader because the 10-0 was escorting two squads and the MMG crew to I4. The Americans countered in their part of the first turn by moving up stacks of three squads and a leader to the three shellholes.
In their second turn the Japanese continued their pursuit toward the L9 gap, finding the second dummy stack and threatening the remaining 6-6-6. The 10-0 and company moved to M5, from which two squads advanced into M6 & N5. Three squads, MTR and the 9-0 entered O1 and ended up in P4, Q5 & R4 (MTR). Three more squads entered W1 and ended up in T4 (squad with LMG & half, 9-1), T5 (squad with LMG) and U6 (halfsquad, dummy).
The Americans now faced a problem. Should they attack or should they move out of their heavily stacked hexes? They chose to attack, and at this point the dice failed them. The only successful attack reduced a Japanese squad in Q5. The Japanese returned fire, and the stack in M7 broke and the stack in O6 partially broke. The squad guarding the L9 gap also broke.
During the Japanese third turn the Japanese fired Smoke into P6, hindering that stack (
The Japanese have to bring in a substantial number of their units on the second turn on the south edge. I think they have to bring in the six maximum. They have to be up on the hill on the second turn, even though this potentially means exposing themselves to very powerful attacks, potentially a thirty-six-add-one in fact. The Japanese have to have hex R6 in LOS on turn two. The Japanese also have to commit forces to at least some of the other approaches (L9, L7, M5, T4, T7 and T9), trying to come at the Americans from all angles. Encirclement will make the Americans even more vulnerable, as will messing with American rout routes.
That attack leaves the Americans either stacking or not having the massive firepower they are capable of, and I think they need to avoid the stacking. That leaves both sides attempting to use reverse-slopes to avoid enemy firepower, and it's almost a Mexican standoff.
An interesting question is what to do with the 2-3-6 halfsquad if it rallies early. The "obvious" thing to do is leave it in the pillbox, but potentially one could move it to, say, R4 or even S5. In our game it did not rally early so there was nothing for the American player to consider.
Overall I think this is more subtle than it first appears. I don't know how the scenario plays out when the Americans don't leave themselves open as targets in large stacks. I suspect it becomes a struggle between the Americans trying to knock down the Japanese using high firepower and the Japanese trying to crumble the American low morale. May the dice be with you.
JR
Last edited: