Paul S NJ
Senior Member
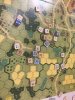
Round 5 J154 Cradle to Grave vs Bill Hayward
Bill and Bret run ASLOK. Bill is the night owl who mans the tournament director spot for late night gamers there. We only had this pick in common. This is a very complex scenario which really needs to be played a couple times in advance to fully understand it and appreciate the choices for both sides that need to be made.
We decided that the mines must set up in the partisan area (not just in woods or buildings) and the partisans can use DC’s without penalty for not being elite (even their SMC are not elite). I bid US3 and Bill bid US4 so I got the attackers and upgraded two 467 to 468, deleted the 9-1 AL, and deleted five concealment counters.
VC are for the germans to control more stone hexes than the partisan have surviving VP still in play. I like this scenario because both sides have some major and interesting decisions before the game even starts. How does the US/Partisan player set up his 8 SE of partisans? He also must decide how much of the 7 SE, two M10 TD, and two 81 mortars of US troops will defend the hilltops or set up back in the city. The partisans have four choices (pick two) for SW/mines/DC/concealment. They can also set up back near the city and run there, or in the middle near the flanking germans, or forward in a large woods clump. The germans need to divide their attacking force in two parts before seeing the US/partisan setup, with one part entering on the flank of the city near some level two hills. Also the US gets two gyro stuarts with four squads on turn 3 with their entry area in the rear of the germans.
Melvin Falk recently commented about how difficult this one is for the germans and I do see how a hilltop defense by the M10’s and mortars can really slow the german attack down (and if lucky with APCR (A5 with TK=22), maybe even kill a panther).
If the partisan sets up in mid board with two DC’s, four AT mines, the HIP squad?SMC, and their inherent Molotovs, they might be able to really damage the german attack.
On the other hand, an aggressive german player can mess with the partisan retreat and if established on the level 2 hills can really pound the city area. The germans get 14 squads with two panthers, two Pz4, two 150mm assault guns (no mg and Circle B10), a mortar HT and a MG HT (with the inherent 247/HMG).
I divided my attacking germans with all six 468, both 8-1 and both Pz4 on the flank. Bill set up one M10 on the hill and one protecting his flank behind the wall. I thought he used his dummy counters for partisans in the mid-board stream and figured he had most of the partisans ready to run back into the city. I brought on a couple half squad flankers to see if the mortars were on the hill (they weren’t) and which way the M10 was facing or if it was hull down (it wasn’t). I entered my panthers to bring the M10 under fire and Bill put it in motion (I can’t remember if he first tried to find APCR). I tried to run my CE Pz4 past the (what I thought) were dummies, but the first one was a 337 who didn’t find a molotov (it would have killed the tank on 5). A bit chastened, it buttoned up and continued past a four counter stack in the stone building near the stream and ended in the grain field a hex or two short of it’s intended interdiction spot.
UST1 Bill revealed a mortar who shrouded my forward Pz4 in WP. With that cover most of his partisans made it into the city, but in final fire i discovered the forward stone building had two squads and an 8-1.
In my turn 2 I turned one partisan into a berserker, got a CH to eliminate the other, and brought up my panthers and infantry to pressure the city. In defensive fire Bill revealed I had parked my CE panther right next to his HIP squad. Lucky for me he missed his Molotov roll as he would have killed it on a 7. meanwhile the sniper activated four times over the next turn and Bill rolled four 1’s to recall my other panther, recall my mortar HT, break a squad and kill the 7-0. I was able to get a 467 into CC with his partisan 527 next to my panther to at least tie him up and those two ended up in six player turns of melee. Bill also moved a bazooka up and burned a Pz4 with an advancing fire shot from stone building (eating the backblast without harm).
On my turn 3 things were looking pretty grim for me. I had to protect my broken units in my rear (I had moved some units up to add to the melee but had missed the LOS from the already revealed mortar who promptly broke them). The gyro stuarts seemed like a big threat with 17 MP and riders, a thorn in my side. In imagining the damage they could cause it felt like there were 12 of them coming, not just two!
Things began to turn around when Bill parked one stuart where my Pz4 could just see it. I confirmed a sneaky LOS by turning my turret three hex spines and firing my my CMG, who actually managed to roll low and break the dismounting squad. Then the MA got rate and hit the stuart with the rate final fire shot.
In my turn 4 the Pz4 rolled up to the remaining stuart and wrecked it. One M10 went down to a PF shot and the other M10 was stunned and BU with a panther nearby.
My infantry was moving into the city by that point and killed a 337 in CC. Bill tried to return the favor by advancing his 9-2/337 into CC with my 9-1/467 but failed to gain the ambush or kill the units. Bill then threw in the towel as I could have reinforced the melee and there were only four partisan points not in CC at that point. Bret stopped by and razzed Bill a bit for resigning in mid-game and asked me to roll a hypothetical CC roll. Of course I rolled boxcars which would have let the 9-2 withdraw from melee. A close run game where we both had some streaky luck.
As for balance, again between players who have played it a couple times, the only balance I think this needs is to take away the M10s’ APCR (A5). If the US can get it, they are fairly likely to also get a turret hit and rate. If that takes out a panther or two the game is extremely tough on the germans. Without the APCR the panthers rule at long range. In any case it’s a fun and interesting scenario.
Round 6 J175 Bedbug Bite vs Michael Hastrup-Leth
I have enjoyed playing Michael through the years at Albany and Aslok. We always have a good time and great games. His positive energy, humor and enjoyment of the game shine through. This was our first choice and we both bid G1. I got the Canadians (brits) with a DC after Michael’s intricate tie-breaking procedure. This scenario has the brits needing 17 VP. They get one each for each of the three stone buildings in the forward village each turn (we clarified that turn 7 counts, even though it is just a half turn). They also get four points for controlling 64L5 in the german rear and 3 points for having more non-crew infantry points past a road in the german rear area. They gain a point for each german afv eliminated and lose a point for their own AFV’s killed. Kangaroos (the armored, fully tracked personnel carriers) don’t count as an AFV lost, but are recalled when empty or at the start of turn 4.
My view is that the germans should try to hold the village, full stop. A fighting withdrawal to the rear building seems very tough. The canadians can hold the entire rear area for 7 VP, plus kill both german vehicles for 2 more, and still need to hold 8 more points of the village (without losing any AFV’s themselves).
The 1945 germans defend the forward village with 9 mixed 468/467 squads, four mg, one psk, one 81 mortar, and 24 mines factors. Turn 3 they get a Jgpz V (88LL and 18 armor) and a mg ht (with its inherent 248/HMG). The brits have 12 458 squads, plus 3 slow Churchill 7’s (lots of SMOKE options) plus three Kangaroos. “And then there’s the Badger”. This was a recurring phrase as the FT kangaroo (the badger) had a very nasty BF24 with a two hex range. It is OT but can fire the FT BU, since it’s bow mounted. Here is where reading the vehicle notes is important. It’s easy to read the back of the counter “Stun = Recall” followed below by “CE/MA FP NA” and think those are two separate notes. Perhaps thinking the vehicle has to be CE to fire the BF24. However the vehicle notes make it clear that IF the vehicle has been stunned, it is recalled AND it may not use it’s BF24 NOR may it go CE. After reading that I immediately placed the BU counter on the piece.
In looking at Michael’s set up he seemed to heavily defend in the center and my left, while leaving a large stack of defenders in the rear to my right with just a few screening troops in front of them. I was afraid of a massed use of mines but decided to concentrate my attack on my far left flank. I’d try to punch a hole, inflict infantry casualties, and take the village quickly. I would use my kangaroos in bypass, risking in-hex PF (7 TH if taking the back blast), staying BU and trying for BU smoke grenades. The Churchills would try to keep moving up each turn, using armored assault and their smoke mortars to provide cover and only shooting their MA in defensive fire. They are so slow that it’s easy to have them sit for a turn and then be out of the end-game. ‘And then there’s the Badger’, he would move last usually, staying a threat in being and then blast at key points from a relatively PF-safe two hex range (24 flat, risking a PF hit on a 3) and using it’s last MP to always go back into motion.
BT1 Michael killed two kangaroos (with their passenger half squads) but had two squads surrender, a half squad in CC, and a broken squad and leader routing back into the center. His flank had been breached. On my right I made a mistake in entering a solitary squad and had it break/elr taking an 8 flat that I could have easily avoided.
GT1 Michael ran his rear area troops back to the rear VC building and consolidated his forward defenders around the K4 and L6 buildings. He failed a PAATC in K4 trying to street fight/ambush my kangaroo there.
BT2 My mortar fired smoke into K4. The squad there succeeded in street fighting my kangaroo to kill it. I moved a 9-1 and three squads into a minefield in L3 (Michael was very consistent in rolling 7 repeatedly for his minefield attacks) then they advanced out with the leader and one squad making it.
Over the next few player turns Michael’s village force surrendered or was eliminated in CC. I took two buildings turn 3 and all the buildings thereafter (which adds up to 14 VP for the village). I did make a big mistake in driving the badger in the village where Michael’s half squad was able to kill it using street fighting, costing me a VP.
The net of the situation by British turn 4 was that Michael had a leader, 2.5 SE and both AFV in his rear building area and I had a long way to run (holding lots of prisoners I wish I hadn’t taken). I could probably get the across-the-road VP but that would leave me one short. I figured I needed to kill one of his vehicles, or two if I lost one of my tanks.
I charged (verrry slowlly) one tank after his half track, tried to hit his JgPz with a captured Psk (only breaking it), and ran up the infantry.
German turn 5 the half track got away by using VBM across an iffy hex side (B1/B2). It was very close so we rolled for it with Michael getting his roll. The sniper stunned one churchill so he moved his JgPz in position to kill it. Also Michael advanced a squad forward into the front lumberyard hex to give him a chance for a two-hex PF shot at a Churchill. This proved a costly mistake as that tank hit the offending squad with WP which broke the squad on a 10. My BU tank fired smoke and then intensive fired to cut the JgPz’s LOS to it. Now that the VP building only held 1.5 squads I prep fired my third tank and broke the squad but not the leader. I ran my infantry forward to assault the building in my last turn.
In GT6 Michael ran his JgPz over but didn’t have enough MP to use his snooglewoofer for smoke so he attempted ESB, got it, but failed the sN roll. Interestingly he still needed to use the last MP since it was not used in entry of the hex. He used it to pivot since it still had my only tank still in its front covered arc. Michael then routed the broken squad out of the building which, in hindsight, was a mistake since the game now hinged on me gaining control of the building and the chance of rolling a DR5 to rally the DM 467 would have added a lot to the leader and 248/HMG now defending the building.
In my final turn I smoked the hex with his leader and half squad/HMG (on separate levels) and ran up my infantry. His fire out of smoke was ineffective but the MG HT did break one squad. In the end I advanced two half squads into his leader hex and a 9-1, with a squad and half squad into the half squad hex. In neither case did I have enough infantry left to prevent ambush withdrawal into another hex on the same level. So Michael would win if I lost either ambush (one where I had a -1) or if I failed to win either CC. Gary Mei figured later that my odds were only 60% of doing all four things successfully. I won one ambush, didn’t lose the other and got both the 4:1 and the 3:1(-2) to win the game. Couldn’t have been much closer! We ended up playing over six hours in a fun, exciting game!
Thanks again to Michael, Gary Trezza, Steve, Joe, and all those I played. Attending Albany is always a highlight of my year and being lucky enough to win is the cherry on top!
Attachments
-
 542 KB Views: 52
 -
 749.5 KB Views: 51
 -
 669.2 KB Views: 62
 -
 606.5 KB Views: 61
 -
 704.1 KB Views: 56
 -
 713.8 KB Views: 58
 -
 760.7 KB Views: 54
 -
 778.8 KB Views: 59
 -
 717.1 KB Views: 57
")