Vrosso
Member
Many thanks to Paul for graciously hosting an ASL day in Chester NJ it was great fun for all involved.
For me, I joined up with Jim Brackin and we selected scenario 206, Hey, That ain’t a ROK. Random selection afforded me the attacking Korean army.
From a strategy standpoint (see graphic below), I had two set up groups on the board.
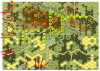
My lead elements (B50 west of E) was hell bent on attacking his command group, which was conveniently setup at the front of the column - within one hex of 50G9. My hilltop forces (level ¾ on B50) were split between attacking toward the road to cut off American units and attacking downhill vs. L & M companies.
The units coming onto the board were spread out everywhere. Notables included the mtr with a leader that was climbing the hill to set up in 50K4.
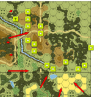
The locations of American units are roughly marked. The command group (3 leaders, 1 hs, 1 jeep) have to setup within a hex of 50G9, the setup for Company L and Platoon M (75 RCL) is marked right behind the command group with stars, company K is spread out on the hill behind them (concealment counters) and then companies I and M are within one hex of the road on the far right of B50. Exit area is the right side of B50 for both sides.
Turn 1 was absolutely brutal on Jim’s forces. The MTR and prep fires broke both 75 RCL crews and multiple squads/hs went down on MC’s. I was able to prep fire 4 628's at point blank range also doing a lot of damage, then advancing into cc vs. half squads. To make things worse, my sniper was setup in the area of M company and had ~6 killing results in the first turn to cause chaos in that area.
My MG on the hilltop also did a lot of damage, but Malf’d and then was out of the game.
By my Turn 3, there was only a broken HS to mop up from the forward units, and most of the forces that entered on B37 were racing down the road on that board.
The main battle lines had shifted to rows T/U on B50 where I was started to get a serious bloody nose from Companies L&M along with some remnants of K company that either got across the bridge/gully or fled on the board edges.
By this time I had a wide margin of victory points, Jim still had enough units left to off set this by exiting so the strategy shifted to engaging units along the front lines formed on the right half of B50.
Around turn 6, my 458’s were pressing from the areas of AA2 to EE4 on B38 fighting 546's arrayed in the woodline opposite of them. More units were battling a few 546’s holed up in the gully at Z9/AA10 at close range. Other forces were battling across the bridge (most of my casualties occurred here) and a couple 447’s managed to cross into the area of T1.
At game end, I may have been able to get a couple of 458’s off the board around hex GG10, but I was not going to threaten to get anything off elsewhere. For Jim by the time we got into the late turns the math was not working out anymore as units started to break and not rally quickly enough. Ammunition shortage was also taking its toll, his mortars where crushing my units in the woods.
Looking back a few things to consider when playing this scenario.
A couple things we misplayed, the light woods should be a +2 hindrance, on challenge for the US was routing, particularly with the lead units and well placed attackers can really mess up the routs for most of the forward units. We played them as +1 hindrances.
We were also playing 2.5 mp to enter the paddies (my misread on mud rules) as opposed to 3, and 2 mp to go across the banks as hazardous movement which may have favored me some.
Fire. This could be really important for the defender. In this game Jim forgot all of his WP (he tried, but his troops didn’t bring any, with ammunition shortage and high rolls on WP attempts, we almost ran out of No WP counters). But with the very dry conditions, this can cause the woods to burn and this can really constrain the attacker. Also kindling is allowed and one must figure out what to do with the trucks. If they can’t be used well to move troops around and only worth 1 VP off the board, would it be useful to park them in hexes where they might draw a lot of fire or serious cc attacks in the hopes that they will cause a conflagration.
As the Korean player the basic strategy here seemed to work well, it is important to polish off the forward units quickly and move in. I would probably play this one in a similar fashion and maybe put a little more emphasis from the hilltop units moving to the right as opposed to attacking downhill into the forward units.
From a US standpoint, if I were to draw these, would try to hide the armed jeeps someplace where the 50 Cal could be unloaded and try to form some type of hedgehog defense to tie up the attacker as long as possible.
I think Jim has pretty good notes on the Casualty count as the battle progressed.
Also one question for the rules wizards, we read that prisoners do not count toward CVP, so does this mean when I capture a crew, that Jim does not have two points counted against his CVP total. In order for these two points to count, I'd have to massacre them? I always thought the 2 points would be awarded right away and then you'd get two more for having the prisoners at the end (if they counted).
Overall, we rated this game a little lower, as in turn 2-5 I was moving a lot of units against a force that didn’t really have too many shots to take. Also, in the first turns, Jim had to pass some serious PTC’s as the forward units were being overrun. Our playing time was about 8 hours, stopping with about a turn left to go.
For me, I joined up with Jim Brackin and we selected scenario 206, Hey, That ain’t a ROK. Random selection afforded me the attacking Korean army.
From a strategy standpoint (see graphic below), I had two set up groups on the board.
My lead elements (B50 west of E) was hell bent on attacking his command group, which was conveniently setup at the front of the column - within one hex of 50G9. My hilltop forces (level ¾ on B50) were split between attacking toward the road to cut off American units and attacking downhill vs. L & M companies.
The units coming onto the board were spread out everywhere. Notables included the mtr with a leader that was climbing the hill to set up in 50K4.
The locations of American units are roughly marked. The command group (3 leaders, 1 hs, 1 jeep) have to setup within a hex of 50G9, the setup for Company L and Platoon M (75 RCL) is marked right behind the command group with stars, company K is spread out on the hill behind them (concealment counters) and then companies I and M are within one hex of the road on the far right of B50. Exit area is the right side of B50 for both sides.
Turn 1 was absolutely brutal on Jim’s forces. The MTR and prep fires broke both 75 RCL crews and multiple squads/hs went down on MC’s. I was able to prep fire 4 628's at point blank range also doing a lot of damage, then advancing into cc vs. half squads. To make things worse, my sniper was setup in the area of M company and had ~6 killing results in the first turn to cause chaos in that area.
My MG on the hilltop also did a lot of damage, but Malf’d and then was out of the game.
By my Turn 3, there was only a broken HS to mop up from the forward units, and most of the forces that entered on B37 were racing down the road on that board.
The main battle lines had shifted to rows T/U on B50 where I was started to get a serious bloody nose from Companies L&M along with some remnants of K company that either got across the bridge/gully or fled on the board edges.
By this time I had a wide margin of victory points, Jim still had enough units left to off set this by exiting so the strategy shifted to engaging units along the front lines formed on the right half of B50.
Around turn 6, my 458’s were pressing from the areas of AA2 to EE4 on B38 fighting 546's arrayed in the woodline opposite of them. More units were battling a few 546’s holed up in the gully at Z9/AA10 at close range. Other forces were battling across the bridge (most of my casualties occurred here) and a couple 447’s managed to cross into the area of T1.
At game end, I may have been able to get a couple of 458’s off the board around hex GG10, but I was not going to threaten to get anything off elsewhere. For Jim by the time we got into the late turns the math was not working out anymore as units started to break and not rally quickly enough. Ammunition shortage was also taking its toll, his mortars where crushing my units in the woods.
Looking back a few things to consider when playing this scenario.
A couple things we misplayed, the light woods should be a +2 hindrance, on challenge for the US was routing, particularly with the lead units and well placed attackers can really mess up the routs for most of the forward units. We played them as +1 hindrances.
We were also playing 2.5 mp to enter the paddies (my misread on mud rules) as opposed to 3, and 2 mp to go across the banks as hazardous movement which may have favored me some.
Fire. This could be really important for the defender. In this game Jim forgot all of his WP (he tried, but his troops didn’t bring any, with ammunition shortage and high rolls on WP attempts, we almost ran out of No WP counters). But with the very dry conditions, this can cause the woods to burn and this can really constrain the attacker. Also kindling is allowed and one must figure out what to do with the trucks. If they can’t be used well to move troops around and only worth 1 VP off the board, would it be useful to park them in hexes where they might draw a lot of fire or serious cc attacks in the hopes that they will cause a conflagration.
As the Korean player the basic strategy here seemed to work well, it is important to polish off the forward units quickly and move in. I would probably play this one in a similar fashion and maybe put a little more emphasis from the hilltop units moving to the right as opposed to attacking downhill into the forward units.
From a US standpoint, if I were to draw these, would try to hide the armed jeeps someplace where the 50 Cal could be unloaded and try to form some type of hedgehog defense to tie up the attacker as long as possible.
I think Jim has pretty good notes on the Casualty count as the battle progressed.
Also one question for the rules wizards, we read that prisoners do not count toward CVP, so does this mean when I capture a crew, that Jim does not have two points counted against his CVP total. In order for these two points to count, I'd have to massacre them? I always thought the 2 points would be awarded right away and then you'd get two more for having the prisoners at the end (if they counted).
Overall, we rated this game a little lower, as in turn 2-5 I was moving a lot of units against a force that didn’t really have too many shots to take. Also, in the first turns, Jim had to pass some serious PTC’s as the forward units were being overrun. Our playing time was about 8 hours, stopping with about a turn left to go.