J. R. Tracy
Elder Member
Round 1 - AP 87 Empire’s Fall
Opponent
Wai Wong, a member of Canada’s sinister effort to subvert the North American ASL community

Does not cower
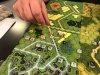
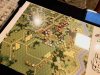
Situation
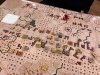
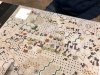
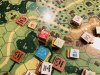
Burma, January 1942 – 35 British and Commonwealth squads supported by OBA and a battery of four Bofors defend against 29 well-led IJA squads attacking from two directions, supported by artillery of their own. Minefields and wire augment the already difficult terrain, as the British attempt to defend multiple objectives. The Japanese score VPs for completing a variety of tasks – one each for clearing board 9b of good order Commonwealth MMCs, one point each for capturing two hilltop multihex stone buildings (8aN6 and 8aG3), one point each for clearing all good order Commonwealth MMCs from within a four hex radius of hexes 8aE7 and 8aE17, and one point for every two Bofors eliminated or captured (FRU). The IJA win immediately if they get one VP by the end of turn three, two VP by the end of turn five, three by the end of turn eight, or four by the end of turn ten, the conclusion of the scenario. Wai had the Commonwealth to my Japanese.
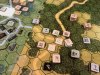
Moving out
Plan
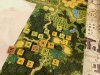
My troops were split into two roughly equal groups, one attacking from board 40 (the hills on this board do not exist by SSR) and the other across board 9b. Each group had a handful of elite squads stiffening a majority of first liners, plus MMGs and light mortars; sadly, no DCs. The leadership was solid, however. I planned to open by dropping a smoke mission on 8bN6, a great spot for a leader-directed MMG stack. On board 40, I set up to Banzai into the light jungle around 8bL1, with some forces on the left flank moving in support; on the right flank, I HIP’d a platoon of LMG-armed 448s led by a 9-1 in 40E9, ready to move out on turn two and attempt to break into the rear area to grab some AA guns. On board 9b, I set up for two separate Banzai charges – one out of the 9bW2 area to breach the defenses around 9bR4, and the other composed of troops stretching from 9bX2 to 9bCC6, really just for movement and morale purposes. I had my 10-1 leading this flank’s elite platoon, opting out of the Banzai charges but ready to exploit any breakthroughs. The far left had a pair of half squads and a pair of 9-1-led MMGs, with a mission of inhibiting Commonwealth reinforcement from that flank while maybe causing some trouble of their own. I figured I had an outside chance of taking building 8aN6 by the end of turn three with converging forces, but my real hope was to take it on turn four and kill at least one Bofors by turn five.
May you live 10,000 years
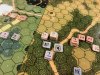
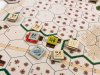
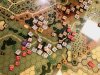
Early Going
Before I launched my Banzai charges my scouts probed for minefields and discovered a solid belt from 8bO1 down to 8bQ4. However, to my surprise the board 40 charge route was unobstructed, and I reached 8bL1 and M2, with supporting forces just behind. Thanks to mortar smoke my second charge easily reached 8bQ4 and Q5, and the rest of that board’s forces moved up without incident. By turn two I was closing in on 8bN6 from two directions, as further Banzais carried me into 8bN4 and 8bP6/P7/P8; my HIPsters emerged but thanks to a bad Wire roll got no further than 8bB2/C2. I still had a shot at a turn three capture of 8bN6 but Wai’s redeployments were making life difficult.

Crashing through the second line
Uh-Oh!
My entire game plan was fueled by Banzais and black coffee, but mines and Commonwealth firepower took their toll. I sensed if I did not win early I would not win at all. At the end of turn two, Wai survived a 2:1 HtH CC in 8bN4. That ultimately killed two squads of the Emperor’s finest but more importantly, it broke up my anticipated Banzai group for the coming turn. I needed maximum efficiency from my charges and I would now have to scramble to piece together my final assault on 8bN6.
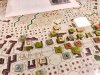
Up the hill
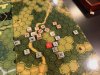
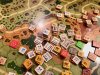
Big Moment
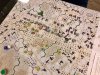
Opening turn three, I had a live SR on the map for my 70mm OBA. I could deliver another smoke mission atop 8bN6 but I reckoned additional cover wasn’t worth the movement penalties. Instead I went for a harassing mission against some Commonwealth troops on board 9b – Wai had six MMC still on 9b, one of which was broken and another locked up in melee. A perfect drift roll plopped the FFE into 9bR11. A pair of green squads in the kunai broke, and two more squads in Q12 and Q13 pinned – the latter possessed an MMG, and the pin would loom large.
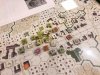
Gunning for the Big House
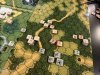
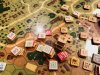
Endgame
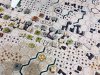
Opening the movement phase of turn three, my focus remained on the 8bN6 building. Three separate Banzai charges got me into the ground level but Wai had troops upstairs as well. I was mulling how to possibly break them all and kill them for failure to rout when I noticed the precarious Commonwealth situation on 9b. My 10-1 and a platoon of elites were in and around 9bQ8/Q9 with LOS to Q12 and Q13. My own OBA was in the way but I figured that’s why the gods blessed me with such highly motivated infantry. My 10-1 led one more Banzai, straight through the OBA – I took some lumps from the 4(-1) shots and Wai’s defensive fire, but crashed into Q12, forcing a break on an FPF shot. That same break disrupted the defending squad, allowing my last unit in the Banzai to continue through into Q13. The Q13 MMG squad also broke on the FPF, so all that remained was assembling a 4:1(-1) HtH attack on the melee’d halfsquad in V13 to close out a turn three win. Had the Q13 squad not been pinned by my OBA, I would’ve been charging straight down a 2(-2) firelane, which might have exceeded my capacity for recklessness.
Not-so-friendly fire
Lessons Learned
The power of multiple Banzai charges is a wonder to behold. The movement and morale benefits are substantial, and successive waves force difficult choices on a strapped defender. Sequenced properly, they can force FPF shots as well, with potentially devastating results. They come at a price, as my dead pile demonstrated, but the payoff is worth the risk. We also had fun with the classic ASL Sicilian Dilemma with the 8bN6 building: “You think I wouldn’t put a leader-led machine gun stack up there because it’s too obvious, but I know you think it would be too obvious, so I might have put it up there after all, unless I thought you knew I thought you thought it would be too obvious.”
The price of empire
Scenario Impressions
This scenario is all about the planning. Often for PTO scenarios it’s the Japanese who must construct an intricate defense so it’s refreshing to see them on the other side of the ball for a change. That said, the attack takes just as much thought, due to the timing issues and all the options in the IJA toolbox. I like the mix of forces, with two thirds of the Commonwealth subject to cowering and one third on the precarious edge of disruption (green troops with two ELR), but well supported with infantry kit and the Bofors. The IJA order of battle is potent but outnumbered, with just a very basic loadout of SWs. I think the attacker has the edge but thanks to the Pleva Balancing System, Wai picked up an LMG and boosted his SAN, getting things close to even. Happy to play it again as either side.
Opponent
Wai Wong, a member of Canada’s sinister effort to subvert the North American ASL community
Does not cower
Situation
Burma, January 1942 – 35 British and Commonwealth squads supported by OBA and a battery of four Bofors defend against 29 well-led IJA squads attacking from two directions, supported by artillery of their own. Minefields and wire augment the already difficult terrain, as the British attempt to defend multiple objectives. The Japanese score VPs for completing a variety of tasks – one each for clearing board 9b of good order Commonwealth MMCs, one point each for capturing two hilltop multihex stone buildings (8aN6 and 8aG3), one point each for clearing all good order Commonwealth MMCs from within a four hex radius of hexes 8aE7 and 8aE17, and one point for every two Bofors eliminated or captured (FRU). The IJA win immediately if they get one VP by the end of turn three, two VP by the end of turn five, three by the end of turn eight, or four by the end of turn ten, the conclusion of the scenario. Wai had the Commonwealth to my Japanese.
Moving out
Plan
My troops were split into two roughly equal groups, one attacking from board 40 (the hills on this board do not exist by SSR) and the other across board 9b. Each group had a handful of elite squads stiffening a majority of first liners, plus MMGs and light mortars; sadly, no DCs. The leadership was solid, however. I planned to open by dropping a smoke mission on 8bN6, a great spot for a leader-directed MMG stack. On board 40, I set up to Banzai into the light jungle around 8bL1, with some forces on the left flank moving in support; on the right flank, I HIP’d a platoon of LMG-armed 448s led by a 9-1 in 40E9, ready to move out on turn two and attempt to break into the rear area to grab some AA guns. On board 9b, I set up for two separate Banzai charges – one out of the 9bW2 area to breach the defenses around 9bR4, and the other composed of troops stretching from 9bX2 to 9bCC6, really just for movement and morale purposes. I had my 10-1 leading this flank’s elite platoon, opting out of the Banzai charges but ready to exploit any breakthroughs. The far left had a pair of half squads and a pair of 9-1-led MMGs, with a mission of inhibiting Commonwealth reinforcement from that flank while maybe causing some trouble of their own. I figured I had an outside chance of taking building 8aN6 by the end of turn three with converging forces, but my real hope was to take it on turn four and kill at least one Bofors by turn five.
May you live 10,000 years
Early Going
Before I launched my Banzai charges my scouts probed for minefields and discovered a solid belt from 8bO1 down to 8bQ4. However, to my surprise the board 40 charge route was unobstructed, and I reached 8bL1 and M2, with supporting forces just behind. Thanks to mortar smoke my second charge easily reached 8bQ4 and Q5, and the rest of that board’s forces moved up without incident. By turn two I was closing in on 8bN6 from two directions, as further Banzais carried me into 8bN4 and 8bP6/P7/P8; my HIPsters emerged but thanks to a bad Wire roll got no further than 8bB2/C2. I still had a shot at a turn three capture of 8bN6 but Wai’s redeployments were making life difficult.
Crashing through the second line
Uh-Oh!
My entire game plan was fueled by Banzais and black coffee, but mines and Commonwealth firepower took their toll. I sensed if I did not win early I would not win at all. At the end of turn two, Wai survived a 2:1 HtH CC in 8bN4. That ultimately killed two squads of the Emperor’s finest but more importantly, it broke up my anticipated Banzai group for the coming turn. I needed maximum efficiency from my charges and I would now have to scramble to piece together my final assault on 8bN6.
Up the hill
Big Moment
Opening turn three, I had a live SR on the map for my 70mm OBA. I could deliver another smoke mission atop 8bN6 but I reckoned additional cover wasn’t worth the movement penalties. Instead I went for a harassing mission against some Commonwealth troops on board 9b – Wai had six MMC still on 9b, one of which was broken and another locked up in melee. A perfect drift roll plopped the FFE into 9bR11. A pair of green squads in the kunai broke, and two more squads in Q12 and Q13 pinned – the latter possessed an MMG, and the pin would loom large.
Gunning for the Big House
Endgame
Opening the movement phase of turn three, my focus remained on the 8bN6 building. Three separate Banzai charges got me into the ground level but Wai had troops upstairs as well. I was mulling how to possibly break them all and kill them for failure to rout when I noticed the precarious Commonwealth situation on 9b. My 10-1 and a platoon of elites were in and around 9bQ8/Q9 with LOS to Q12 and Q13. My own OBA was in the way but I figured that’s why the gods blessed me with such highly motivated infantry. My 10-1 led one more Banzai, straight through the OBA – I took some lumps from the 4(-1) shots and Wai’s defensive fire, but crashed into Q12, forcing a break on an FPF shot. That same break disrupted the defending squad, allowing my last unit in the Banzai to continue through into Q13. The Q13 MMG squad also broke on the FPF, so all that remained was assembling a 4:1(-1) HtH attack on the melee’d halfsquad in V13 to close out a turn three win. Had the Q13 squad not been pinned by my OBA, I would’ve been charging straight down a 2(-2) firelane, which might have exceeded my capacity for recklessness.
Not-so-friendly fire
Lessons Learned
The power of multiple Banzai charges is a wonder to behold. The movement and morale benefits are substantial, and successive waves force difficult choices on a strapped defender. Sequenced properly, they can force FPF shots as well, with potentially devastating results. They come at a price, as my dead pile demonstrated, but the payoff is worth the risk. We also had fun with the classic ASL Sicilian Dilemma with the 8bN6 building: “You think I wouldn’t put a leader-led machine gun stack up there because it’s too obvious, but I know you think it would be too obvious, so I might have put it up there after all, unless I thought you knew I thought you thought it would be too obvious.”
The price of empire
Scenario Impressions
This scenario is all about the planning. Often for PTO scenarios it’s the Japanese who must construct an intricate defense so it’s refreshing to see them on the other side of the ball for a change. That said, the attack takes just as much thought, due to the timing issues and all the options in the IJA toolbox. I like the mix of forces, with two thirds of the Commonwealth subject to cowering and one third on the precarious edge of disruption (green troops with two ELR), but well supported with infantry kit and the Bofors. The IJA order of battle is potent but outnumbered, with just a very basic loadout of SWs. I think the attacker has the edge but thanks to the Pleva Balancing System, Wai picked up an LMG and boosted his SAN, getting things close to even. Happy to play it again as either side.
Last edited: