J. R. Tracy
Elder Member
(Elsewhere on these august forums Tuomo noted I haven't been crossposting my AARs here, so I will try to catch up with a few from BGG - this was originally posted there 28 Jan 2020)
Recently I was lucky enough to tackle a monster scenario twice in a matter of days, playing WO 12 Heart of Wilderness at Winter Offensive with Stephen Frum, and again this past week against Jonathan Alpeyrie. With the experience still fresh in my mind, I thought I’d write it up from both perspectives and offer some general thoughts on the card.
The Scenario
Heart of Wilderness is a Pete Shelling title from the WO Bonus Pack #5. Set in the forests outside Leningrad in the summer of 1942, this card features a massive Soviet force on the attack in an effort to left the siege. Seventeen Soviet squads kick off the assault from the east, followed by a flanking force of nine more on turn two hitting the south, with a final four 527s and four past-their-prime BT-7s arriving on turn four on either the east, south, or west board edge. The Reds get a batch of light machine guns, a couple 50mm mortars, and two heavy-ass MMGs, always so useful on the attack. They also get a DC, and most important of all, seven leaders, including two Commissars.
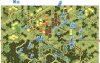
:strip_icc()/pic5196539.jpg "A cunning plan")
A cunning plan
The Germans face this onslaught with sixteen squads of their own, including four 468s. They are backed by two MMGs, four LMGs, an ATR, a couple 50mm mortars, a 37mm ATG and a 75mm infantry gun. Leading this array are five leaders, with a 10-2 at the top of the org chart. The Germans enjoy extensive fortifications, with two 2-3-5 pillboxes, six trenches, and six foxholes at their disposal.
The playing area consists of boards 67 and 32; to win, the Soviets must control the 67T6 bridge location and either or both of the 67J4/67L6 buildings. The board 67 terrain is thickly wooded outside the town, with loads of brush, orchards, and in-season grain further complicating matters. Board 32 is almost all woods with a stream cutting through it for added movement difficulty. The attacker enjoys a wide selection of covered approaches, but that cover will also slow his pace. With only six and a half turns to accomplish his objectives, the Soviet player is fighting the clock as well as the Germans.
:strip_icc()/pic5196529.jpg "Brace for collision")
Brace for collision
Manning the Trenches
At Winter Offensive, the dice gave me the defense. I decided to use my fortifications to create two blocking positions for the main Soviet force, with a platoon in the board 32 woods fighting a delaying action and a reserve in town ready to meet whichever thrust broke through first. I reinforced the bridge defense with the 75* INF, but kept the 37L in town in a victory building because I feared a coup de main by the turn four forces, who could enter on the west edge and be in town in one movement phase.
My first blocking position had a pillbox and trench in 67W2, alongside trenches in W3 and W4. An 8-1 led a platoon of three squads with a medium and a light, with orders to hold until dead. The second position was a few rows west, with a pillbox/trench in S6 flanked by trenches in S5 and S7. This was defended by the 10-2, leading a platoon similar to the first, but with an MMG and two LMGs. The 75* was in S6 as well, and a mortar-equipped halfsquad supported the group from a foxhole in R6.
:strip_icc()/pic5196548.jpg "Plotting my demise")
Plotting my demise
In town, the only static positions were the 37L facing west from J4 and another MTR/247 in a foxhole in K8, with an eye on the Y10 woods/road hex. The 8-0 and 7-0 were ready to deploy squads and lead reinforcements against any looming threats.
Board 32 had the 9-1 leading two squads and an LMG, with orders to deploy one squad and head up to Y3/X2 to greet the turn two Sovs. Scattered around the periphery were a 247 in 32U6 and a 467 in 32R9 to watch the stream, a 467 to slow an unlikely turn one attack down board 32, and a halfsquad supported by four dummies on and around the 67AA7 hill, pretending to be a much stronger position than it actually was. Last but not least, I had a pair of dummies in 67H1 ‘holding’ that flank, with a foxhole on top for added verisimilitude.
:strip_icc()/pic5196585.jpg "First contact")
First contact
My general scheme was to slow the turn one force for as long as possible, sacrificing everyone but the 10-2 for the cause. The 10-2 would run back to the town at the last possible moment to lead the final defense. I was counting on the 37L and the ATR to fend off the BTs, and marry the 10-2 up with a 468 in the most threatened victory building for my last stand. My biggest concern was the turn four group, who could select my weak point and fall upon it in force.
:strip_icc()/pic5195641.jpg "First wave")
Sizing up the defense
Stephen hurled his forces down board 67, with about half down the middle and about half down the northern board edge. A couple squads poked along the 67/32 board seam but the heavy hitting would all be on 67. Stephen rolled over the AA7 knoll, but came to a screeching halt when he hit the W2/3/4 position.
:strip_icc()/pic5195639.jpg "Trouble brewing")
Trouble brewing
In the south, my 9-1 did a good job stuffing the entry of the turn two reinforcements (restricted to on/between 32I1/Y1) and fell back in good order after converting a few 447s to conscripts. The intermittent pop of a Makarov indicated a kind and gentle Commissar going about his business. With the board 32 attack hung up, Stephen paused his board 67 forces to consolidate. As multi-MMC stacks began to form, I had a suspicion what would come next.
:strip_icc()/pic5195635.jpg "The second line falls")
The second line falls
Sure enough, Stephen brought his turn four reinforcements on the east edge, using the speed of the BTs to crash into my row W position. Right behind came the expected human wave, overwhelming my little platoon. The following turn a second wave struck my row S bunker complex. With the writing on the wall my 10-2 fled along with a broken Fanatic MMG/468 and a crew. Both rallied immediately to blunt Frumkin’s attempt to exploit his success.
:strip_icc()/pic5195637.jpg "Above and beyond")
Above and beyond
With two turns to go Stephen was several hexes away from his objectives. I still had a decent force in town so he had to come at me from two directions to succeed. Three BTs swooped in from the east but their supporting infantry could not follow. It was up to the board 32 Reds to take the town. However, a brave stand by a lonely 447, marked by multiple FPFs, prevented the southern force from exiting the woods. With victory out of reach, Stephen conceded.
:strip_icc()/pic5195636.jpg "Goal line D")
Goal line D
Throughout our match, I kept thinking, “Crikey, so many Russians!” There were still a lot of Russians left at the end, but not where they needed to be. Pausing on turn three proved to a fatal error. Stephen wanted the armor support for a coordinated assault, and once launched, it was a thing of beauty. However, the time spent preparing was too costly and left him short of his goal. We both had a blast, however, and the session left me wanting to try the scenario again soon.
On the Attack
After I returned from WO my buddy Jonathan pinged me with a couple scenario options. One was Heart of Wilderness – I told him I’d just played it but would be happy to try it again. He was up for it and prepared a defense.
Jonathan’s D was further west than my own, with nothing substantial east of the row T gully. Until I had LOS to the fortifications I wouldn’t get a solid read on what was where. I hustled the first couple turns figuring I’d take my lumps where necessary in exchange for forward momentum.
:strip_icc()/pic5195650.jpg "Time's a-wastin'")
Time's a wastin'!
I sent about 40% of my force down the right along the northern board edge, with the balance cheating more toward board 32. Things got serious when I saw hexrow S – a trench complex appeared in in S2/S3/R2/Q3, and two pillboxes covered the bridge from R6 (facing southeast) and R5 (facing east). The 10-2 directed an MMG from the R6 PB, making any attempt to cross the R hexrow a foolish enterprise. My 10-0 Commissar sorted out the squads unlucky enough to discover the 9-2, while an 8-1 lead a platoon into the stream for a flanking move. Meanwhile I formed up for an assault on the northern trench line.
:strip_icc()/pic5195647.jpg "Plotting his fallback")
Plotting his retreat
My southern force made good time, smashing Jonathan’s initial screen before cautiously peering into town from the board 32 woods. The town looked thinly held, leading me to my one big mistake of the game. I figured I could use my turn two infantry to draw fire and then have my BTs go hell for leather into the town itself and drop a few 527s on top of the objective. Let’s just say it looked good when I drew it up. Unfortunately, my execution sucked, with a boneheaded move allowing Jonathan to place residual in 67J9, smack in my path into town. I’m as careless with cardboard life as the next guy, but I draw a line at driving through residual fire power with riders on board.
:strip_icc()/pic5195649.jpg "Into the woods")
Into the woods
Stymied, I unloaded my riders at the tree line and headed left with the armor after the guns popped up in H5 and I6. By this point I had cracked the northern trench complex and threw enough bodies at the pillboxes to take the bridge. The 10-2 and friends departed in good order, using an escape route of trenches in Q6 and P6 to avoid fire. I was now pressuring the town from two directions but it was defended by two thirds of Jonathan’s original force, with a couple heroes thrown in for good measure.
:strip_icc()/pic5195648.jpg "Reaching the MLR")
Reaching the MLR
The endgame was very tight. The 10-2 led a stack of 468s in L6, with a medium and a light. The J4 building had both guns nearby and several squads along with the ATR. However, I still had scads of troops. On the penultimate turn I sent my conscripts forward to do what they do best: absorb enemy ammunition. To my astonishment, they did so and survived. Jonathan broke a few of my follow-on forces with subsequent fire and residual, but I soon had ten squads within two hexes of L6. His ATR killed a couple of my BTs, but the remaining two were positioned to crash through the walls of J4 on the final turn. German Prep Fire in the bottom of the sixth broke several Soviet squads, but I was still able to set up an encircling shot on L6 that pinned the 10-2. A follow-up 20(+3) broke the whole stack, with the encirclement proving decisive. He managed to get a hero and a 468 back into L6, but they went down in my final Advancing Fire Phase, as did the defenders of J4.
:strip_icc()/pic5196608.jpg "My own worst enemy")
My own worst enemy
This was an intense game, and could’ve gone either way at the end. I ultimately took both buildings but if the dice had gone a pip or two the other way, I would’ve been left out in the cold. I needlessly increased the degree of difficulty by bringing in my turn four reinforcements on the south edge. I think they should almost always enter from the west, adding a new front and even more pressure to a German already stretched thin. Jonathan played very well throughout – his only errors were giving too much ground in the woods, and failing to recognize the danger of impending encirclement. The latter cost him dearly at several points and ultimately decided the game.
Thoughts Overall
ROAR has this a little pro-Soviet, and I believe it. I don’t think it’s a dog, and the printed balance (the Reds must take both buildings) overdoes it quite a bit. I would happily take the Germans again. I think the key to German success is drawing out the Soviet approach as long as possible, sacrificing troops as necessary but preserving key assets (MMGs and leaders). Ideally you want at least half your squads and a suite of support weapons on hand in town for the final two turns, and make sure the Reds are coming at you with not much better than even odds.
:strip_icc()/pic5196617.jpg "Taking the bridge")
Taking the bridge
The woods fight on board 32 is crucial – you have to meet that element as far forward as possible and fall back each turn, leaving a two-hex cushion to deny assault movement. The tactics are straightforward, but the trick is how much force to assign to the task. I defended with three and a half squads, which felt about right – any less and I would’ve been flanked. On turn six I left one squad behind and everyone else fell back to put some open ground in front of them for the final Soviet push.
The real puzzle is the board 67 defense and the use of the fortifications. I built two hardpoints, using my trenches for lateral movement and all-around defense of the pillboxes. Jonathan used his more for fallback routes, which helped his force preservation but left him with a smaller frontage to face my attack. I’d be inclined to repeat my own setup but I think the infantry gun should be back in town for the final stand.
:strip_icc()/pic5195645.jpg "Terrified BTs swing wide of the ordnance")
Terrified BTs swing wide of the ordnance
Tactically, the German needs to break up the massive Soviet firegroups. There are a lot of hindrances in play but a 24(+3) can still ruin your day. Also, as seen in my game against Jonathan, encirclement is always a risk so if your opponent is setting one up make its disruption your first priority. An often-overlooked German asset really comes into play here: spraying fire. All your squads have it, so always keep it in mind. The 10-2 especially can wreak havoc across multiple hexes.
:strip_icc()/pic5195644.jpg "Squeeze play")
Squeeze play
From the Soviet perspective you have a ton of bodies but not much time – sacrifice the former to make up for the latter. Forward forward forward! There’s a reason you have two Commissars – keep ‘em busy. Judicious use of Human Waves will help your cause. I wasn’t able to stitch one together but with a bit of planning you can set them up in your Advance Phase as you close on a German position. Just don’t burn a turn getting it exactly right. As I note above, unless you have a compelling reason to do otherwise, bring those turn four reinforcements in from the west to draw Germans away from your main effort. Those BTs have their best years behind them but they’re still crazy fast and are great for denying rout paths. Have them drop the 527s as close to town as possible, harass enemy brokies, and tie up key positions on the final push.
:strip_icc()/pic5195643.jpg "Last rites")
Last rites
I hope this inspires a couple players to pull out Heart of Wilderness and get it on the table. It’s a bit of a beast, but Jonathan and I finished in about six hours. The rules load is light, so the complexity lies in the planning and execution. Give the German a little lead time to create a challenging defense, and I think you’ll have a solid Saturday afternoon of cracking ASL.
Recently I was lucky enough to tackle a monster scenario twice in a matter of days, playing WO 12 Heart of Wilderness at Winter Offensive with Stephen Frum, and again this past week against Jonathan Alpeyrie. With the experience still fresh in my mind, I thought I’d write it up from both perspectives and offer some general thoughts on the card.
The Scenario
Heart of Wilderness is a Pete Shelling title from the WO Bonus Pack #5. Set in the forests outside Leningrad in the summer of 1942, this card features a massive Soviet force on the attack in an effort to left the siege. Seventeen Soviet squads kick off the assault from the east, followed by a flanking force of nine more on turn two hitting the south, with a final four 527s and four past-their-prime BT-7s arriving on turn four on either the east, south, or west board edge. The Reds get a batch of light machine guns, a couple 50mm mortars, and two heavy-ass MMGs, always so useful on the attack. They also get a DC, and most important of all, seven leaders, including two Commissars.
A cunning plan
The Germans face this onslaught with sixteen squads of their own, including four 468s. They are backed by two MMGs, four LMGs, an ATR, a couple 50mm mortars, a 37mm ATG and a 75mm infantry gun. Leading this array are five leaders, with a 10-2 at the top of the org chart. The Germans enjoy extensive fortifications, with two 2-3-5 pillboxes, six trenches, and six foxholes at their disposal.
The playing area consists of boards 67 and 32; to win, the Soviets must control the 67T6 bridge location and either or both of the 67J4/67L6 buildings. The board 67 terrain is thickly wooded outside the town, with loads of brush, orchards, and in-season grain further complicating matters. Board 32 is almost all woods with a stream cutting through it for added movement difficulty. The attacker enjoys a wide selection of covered approaches, but that cover will also slow his pace. With only six and a half turns to accomplish his objectives, the Soviet player is fighting the clock as well as the Germans.
Brace for collision
Manning the Trenches
At Winter Offensive, the dice gave me the defense. I decided to use my fortifications to create two blocking positions for the main Soviet force, with a platoon in the board 32 woods fighting a delaying action and a reserve in town ready to meet whichever thrust broke through first. I reinforced the bridge defense with the 75* INF, but kept the 37L in town in a victory building because I feared a coup de main by the turn four forces, who could enter on the west edge and be in town in one movement phase.
My first blocking position had a pillbox and trench in 67W2, alongside trenches in W3 and W4. An 8-1 led a platoon of three squads with a medium and a light, with orders to hold until dead. The second position was a few rows west, with a pillbox/trench in S6 flanked by trenches in S5 and S7. This was defended by the 10-2, leading a platoon similar to the first, but with an MMG and two LMGs. The 75* was in S6 as well, and a mortar-equipped halfsquad supported the group from a foxhole in R6.
Plotting my demise
In town, the only static positions were the 37L facing west from J4 and another MTR/247 in a foxhole in K8, with an eye on the Y10 woods/road hex. The 8-0 and 7-0 were ready to deploy squads and lead reinforcements against any looming threats.
Board 32 had the 9-1 leading two squads and an LMG, with orders to deploy one squad and head up to Y3/X2 to greet the turn two Sovs. Scattered around the periphery were a 247 in 32U6 and a 467 in 32R9 to watch the stream, a 467 to slow an unlikely turn one attack down board 32, and a halfsquad supported by four dummies on and around the 67AA7 hill, pretending to be a much stronger position than it actually was. Last but not least, I had a pair of dummies in 67H1 ‘holding’ that flank, with a foxhole on top for added verisimilitude.
First contact
My general scheme was to slow the turn one force for as long as possible, sacrificing everyone but the 10-2 for the cause. The 10-2 would run back to the town at the last possible moment to lead the final defense. I was counting on the 37L and the ATR to fend off the BTs, and marry the 10-2 up with a 468 in the most threatened victory building for my last stand. My biggest concern was the turn four group, who could select my weak point and fall upon it in force.
Sizing up the defense
Stephen hurled his forces down board 67, with about half down the middle and about half down the northern board edge. A couple squads poked along the 67/32 board seam but the heavy hitting would all be on 67. Stephen rolled over the AA7 knoll, but came to a screeching halt when he hit the W2/3/4 position.
Trouble brewing
In the south, my 9-1 did a good job stuffing the entry of the turn two reinforcements (restricted to on/between 32I1/Y1) and fell back in good order after converting a few 447s to conscripts. The intermittent pop of a Makarov indicated a kind and gentle Commissar going about his business. With the board 32 attack hung up, Stephen paused his board 67 forces to consolidate. As multi-MMC stacks began to form, I had a suspicion what would come next.
The second line falls
Sure enough, Stephen brought his turn four reinforcements on the east edge, using the speed of the BTs to crash into my row W position. Right behind came the expected human wave, overwhelming my little platoon. The following turn a second wave struck my row S bunker complex. With the writing on the wall my 10-2 fled along with a broken Fanatic MMG/468 and a crew. Both rallied immediately to blunt Frumkin’s attempt to exploit his success.
Above and beyond
With two turns to go Stephen was several hexes away from his objectives. I still had a decent force in town so he had to come at me from two directions to succeed. Three BTs swooped in from the east but their supporting infantry could not follow. It was up to the board 32 Reds to take the town. However, a brave stand by a lonely 447, marked by multiple FPFs, prevented the southern force from exiting the woods. With victory out of reach, Stephen conceded.
Goal line D
Throughout our match, I kept thinking, “Crikey, so many Russians!” There were still a lot of Russians left at the end, but not where they needed to be. Pausing on turn three proved to a fatal error. Stephen wanted the armor support for a coordinated assault, and once launched, it was a thing of beauty. However, the time spent preparing was too costly and left him short of his goal. We both had a blast, however, and the session left me wanting to try the scenario again soon.
On the Attack
After I returned from WO my buddy Jonathan pinged me with a couple scenario options. One was Heart of Wilderness – I told him I’d just played it but would be happy to try it again. He was up for it and prepared a defense.
Jonathan’s D was further west than my own, with nothing substantial east of the row T gully. Until I had LOS to the fortifications I wouldn’t get a solid read on what was where. I hustled the first couple turns figuring I’d take my lumps where necessary in exchange for forward momentum.
Time's a wastin'!
I sent about 40% of my force down the right along the northern board edge, with the balance cheating more toward board 32. Things got serious when I saw hexrow S – a trench complex appeared in in S2/S3/R2/Q3, and two pillboxes covered the bridge from R6 (facing southeast) and R5 (facing east). The 10-2 directed an MMG from the R6 PB, making any attempt to cross the R hexrow a foolish enterprise. My 10-0 Commissar sorted out the squads unlucky enough to discover the 9-2, while an 8-1 lead a platoon into the stream for a flanking move. Meanwhile I formed up for an assault on the northern trench line.
Plotting his retreat
My southern force made good time, smashing Jonathan’s initial screen before cautiously peering into town from the board 32 woods. The town looked thinly held, leading me to my one big mistake of the game. I figured I could use my turn two infantry to draw fire and then have my BTs go hell for leather into the town itself and drop a few 527s on top of the objective. Let’s just say it looked good when I drew it up. Unfortunately, my execution sucked, with a boneheaded move allowing Jonathan to place residual in 67J9, smack in my path into town. I’m as careless with cardboard life as the next guy, but I draw a line at driving through residual fire power with riders on board.
Into the woods
Stymied, I unloaded my riders at the tree line and headed left with the armor after the guns popped up in H5 and I6. By this point I had cracked the northern trench complex and threw enough bodies at the pillboxes to take the bridge. The 10-2 and friends departed in good order, using an escape route of trenches in Q6 and P6 to avoid fire. I was now pressuring the town from two directions but it was defended by two thirds of Jonathan’s original force, with a couple heroes thrown in for good measure.
Reaching the MLR
The endgame was very tight. The 10-2 led a stack of 468s in L6, with a medium and a light. The J4 building had both guns nearby and several squads along with the ATR. However, I still had scads of troops. On the penultimate turn I sent my conscripts forward to do what they do best: absorb enemy ammunition. To my astonishment, they did so and survived. Jonathan broke a few of my follow-on forces with subsequent fire and residual, but I soon had ten squads within two hexes of L6. His ATR killed a couple of my BTs, but the remaining two were positioned to crash through the walls of J4 on the final turn. German Prep Fire in the bottom of the sixth broke several Soviet squads, but I was still able to set up an encircling shot on L6 that pinned the 10-2. A follow-up 20(+3) broke the whole stack, with the encirclement proving decisive. He managed to get a hero and a 468 back into L6, but they went down in my final Advancing Fire Phase, as did the defenders of J4.
My own worst enemy
This was an intense game, and could’ve gone either way at the end. I ultimately took both buildings but if the dice had gone a pip or two the other way, I would’ve been left out in the cold. I needlessly increased the degree of difficulty by bringing in my turn four reinforcements on the south edge. I think they should almost always enter from the west, adding a new front and even more pressure to a German already stretched thin. Jonathan played very well throughout – his only errors were giving too much ground in the woods, and failing to recognize the danger of impending encirclement. The latter cost him dearly at several points and ultimately decided the game.
Thoughts Overall
ROAR has this a little pro-Soviet, and I believe it. I don’t think it’s a dog, and the printed balance (the Reds must take both buildings) overdoes it quite a bit. I would happily take the Germans again. I think the key to German success is drawing out the Soviet approach as long as possible, sacrificing troops as necessary but preserving key assets (MMGs and leaders). Ideally you want at least half your squads and a suite of support weapons on hand in town for the final two turns, and make sure the Reds are coming at you with not much better than even odds.
Taking the bridge
The woods fight on board 32 is crucial – you have to meet that element as far forward as possible and fall back each turn, leaving a two-hex cushion to deny assault movement. The tactics are straightforward, but the trick is how much force to assign to the task. I defended with three and a half squads, which felt about right – any less and I would’ve been flanked. On turn six I left one squad behind and everyone else fell back to put some open ground in front of them for the final Soviet push.
The real puzzle is the board 67 defense and the use of the fortifications. I built two hardpoints, using my trenches for lateral movement and all-around defense of the pillboxes. Jonathan used his more for fallback routes, which helped his force preservation but left him with a smaller frontage to face my attack. I’d be inclined to repeat my own setup but I think the infantry gun should be back in town for the final stand.
Terrified BTs swing wide of the ordnance
Tactically, the German needs to break up the massive Soviet firegroups. There are a lot of hindrances in play but a 24(+3) can still ruin your day. Also, as seen in my game against Jonathan, encirclement is always a risk so if your opponent is setting one up make its disruption your first priority. An often-overlooked German asset really comes into play here: spraying fire. All your squads have it, so always keep it in mind. The 10-2 especially can wreak havoc across multiple hexes.
Squeeze play
From the Soviet perspective you have a ton of bodies but not much time – sacrifice the former to make up for the latter. Forward forward forward! There’s a reason you have two Commissars – keep ‘em busy. Judicious use of Human Waves will help your cause. I wasn’t able to stitch one together but with a bit of planning you can set them up in your Advance Phase as you close on a German position. Just don’t burn a turn getting it exactly right. As I note above, unless you have a compelling reason to do otherwise, bring those turn four reinforcements in from the west to draw Germans away from your main effort. Those BTs have their best years behind them but they’re still crazy fast and are great for denying rout paths. Have them drop the 527s as close to town as possible, harass enemy brokies, and tie up key positions on the final push.
Last rites
I hope this inspires a couple players to pull out Heart of Wilderness and get it on the table. It’s a bit of a beast, but Jonathan and I finished in about six hours. The rules load is light, so the complexity lies in the planning and execution. Give the German a little lead time to create a challenging defense, and I think you’ll have a solid Saturday afternoon of cracking ASL.