- Forums
- Individual Game Forums
- Board Games
- Advanced Squad Leader
- ASL Reviews & Reports
- Illuminating Rounds Video Series
Illuminating Rounds Episode 30
- Thread starter RandyT0001
- Start date
asloser
The Head Tuomo of the Finnish ASL Community
Boy do I sound horrible compared to the smooth talking Englishmen!
And when I say shock a tank I mean it was stunned....
And when I say shock a tank I mean it was stunned....
daveramsey
Elder Member
- Joined
- Jun 10, 2006
- Messages
- 1,816
- Reaction score
- 1,051
- Location
- Hertfordshire
- First name
- Dave
- Country
-

Martin says the same about me when I'm talking in FinnishBoy do I sound horrible compared to the smooth talking Englishmen!
")
Thanks for your contribution, Tuomo - your English was great, and we appreciated you sharing the game with us!
von Marwitz
Forum Guru
If you are talking Finnish, Martin probably says: "Finish talking!"Martin says the same about me when I'm talking in Finnish
von Marwitz
Tuomo
Keeper of the Funk
Some extra thoughts and tidbits that didn't get into the Commentaries.
Overall, we're aware that it's hard to Commentate on a game where all you have is the logfile. We're trying to figure out some solution that lets us provide some kind of extra information to make it more obvious to the Commentators what's going on. Ideas solicited.
It is not easy playing against a Finn when they slip into using their native language. Tuomo would be muttering under his breath and CLAIMING to be counting Movement Factors, but was he really just calling my mama fat?
That one broken reinforcment squad of mine never rallied, the whole game.
As Martin, Dave, and others have said, 19X6 seems like a Fools Dream for the Russians. Not worth it - too hard to hold.
Setup - Dave and Martin wondered about my Dummy in 19Z2. As we've all noted, I've never played Tuomo before, so I had no idea whether he'd go after my turn 2 reinforcing infantry by pushing along that board edge himself. Those guys in 19Z2 were there to pretend to stop any such run. Shrug. Not much good can be done with the Dummies here, but I figured this might have some value. Ditto for the ?+1 who started the game down in 17H0, pretending to guard against a southern board edge run.
Loved that Tuomo named his tanks Dave and Martin
I'm happy that my Fancy MMG Firelane Trick with the HIP 10-2 worked, but one will note that the Russians gleefully ran through said firelane on both turns 2 and 3 with nary a scratch. FRUSTRATING!
German 2 - Dave and Martin felt like there were too many Germans coming in on the east side of board 19. It was just 467/LMG and two HS, one of which had the MTR and really wasn't going to do much except sit in that woods line and throw meatballs toward bd17 all game. Sure, one could say this was an unnecessary dilution of the German reinforcements, but I like to pressure my opponent's flank because some people really don't like that. Didn't seem to bother Tuomo too much; he didn't divert much of anything to stop them and managed to break the 467 when it finally did make its dash to threaten 17I8, but I still feel like this was a good idea.
German 3 - Falling back from 17P9 is a tough proposition. Think my 10-2, 127/MMG ate a 4-1 shot as they tried to skulk away and got lucky to survive. And yet, I think you really want to have that MMG in there to throw the firelane out toward J0 on R3, and you ultimately do want to retain the P9 building itself, so I think it's just one of those things you have to hope for the best.
EFFING immobilization on my tank with the Russian MTR! GRRR!
That 152mm-inspired Flame in 17S6 never did turn into a Blaze, all game. WRT Control of such a hex if the thing did Blaze up, I think A26.161 says it would go to whichever side controls the majority of adjacent hexes at game end. Which would be a Big Old Mess to figure out.
Russian 3 - I really didn't think much about what would happen when the weak German at-start forces started getting captured. Certainly the Russians could pass those Prisoners around and start creating halfsquads everywhere. Ugh.
German 4 - Yes, it was Dave's MGs that Stunned my CE tank. Shouldn't have taken that risk; I went CE in order to get 1 more MP out of the turn by using Road Movement. Totally not worth it. Totally bailed out by the Dice Gods.
Loved having my wounded 6+1 succeed in his Escape Attempt DR and create a Melee with his broken Guards. Helped block off that hex from Russians reinforcing P9.
Why were the Germans so aggressive in taking back P9? Shrug. The infantry reinforcements really weren't gonna jump off from the 17U9 woods line and make a push for the buildings on the west side of town. I thought P9 was the key to everything at that point, as it lets you push into the N9 woods and threaten all of the town, including I8. So I wanted to grab it while it was unoccupied. But yeah, I started getting into that "in for a penny, in for a pound" thing, where the first semi-aggressive move fails, so you just keep on reinforcing failure. Especially on turn 5's disastrous moves where I couldn't survive a 2-flat RFP shot to save my life.
Yes, the TCA change for the immobilized tank in 19N7 was to cover the west side in case a KV-2 came looking for trouble.
Russian 5 - Sniper took out my wounded 6+1! AWWWW.
Tuomo did the right thing by not trying to fix Dave's MA; the tank was better off as a mobile MG platform.
Our game didn't turn into a "Benny Hill" scenario with KV2's chasing MkIVs, but I wouldn't have minded that. I'd think the MkIVs could win that race, being faster with lots of cover to duck behind. But tell that to the guy in X3 who found himself with few good options once Martin trundled up to X5. Somehow I thought there was more cover with all the Woods hexes to Bypass behind, but nope. Had Martin not scored with that Advancing Fire Critical Hit, that MkIV was actually going to start G5 by plowing into the building in W3, just to get out of Martin's LOS. The other KV2 (Dave) in V3 might have been a tad surprised (visions of the Kool Aid Man breaking through the building shouting OHHH YEAHHH!) but he didn't have a MA to object with.
In retrospect, think how things would have been different if Martin had spent turn 6 moving back to the middle of town instead of cleaning up U5. Would have kept the German tanks from doing those fancy things during their turn 6. Funny how one little less-than-optimal move can have such huge impact.
German 5 - yes, Martin, it's possible for both of us to be doing really well AND really badly
You guys were right, I didn't need to push that much to eat all of that resid. At that point, I anticipated losing three more building hexes (W3, W4, U5) and I wanted to push. Didn't have a lot of time left, it felt like.
Russian 6 - funny, I didn't even think about the Russians continuing from W3/W4 to take the building in CC3. Would have helped the Russians.
German 6 - yes, I didn't illegally double-bounding-fire that tank. He overran M7 and then VBM'd P6, DMing the brokie in that hex
Russian 7 - no, that wasn't the end of the game! We had two more half-turns. Lemme describe them.
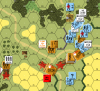
Here's what the board looked like at that point:
German 7:
PzIV in O6 moves through KV's hex, into bypass of P4, tries his sD7 but fails. Loops around the western side of Q4, stops in R4, takes an 8+1 BFF MG shot at the 447/LMG in R5, who Pins. Goes CE, moves to T5, ESB's and asks for 2 more, succeeds, moves into bypass of U5-U6, ends in Motion. We thought this would help with VCs since that was still a German-controlled Building Hex at the time. We THOUGHT that in order to retake the building hex, the Russians would need to pass a PAATC in order to advance in to the hex. Hope that was right.
PzIV in P6 moves down into bypass of P4, tries his sD7 but fails, goes to O4, stops, nails KV2 with a BFF TH DR of 5, TK DR of 3 (final TK # was 4). KV-2 crew survives. tank continues to O3 and stops, facing P4
467/MMG in P6 assault move over the wall to Q6, get hit with a 6-down-1 shot from the Pinned 447/LMG in R5, K/2 result, surviving HS BH's, goes berserk, charges R5, survives SFF shot
HS in P9 cx's to S7, survives a 4-2 from the 9-0,447 in P4L1, boxcars. advances in to retake bldg.
237 in O6 cx's, goes to P6, breaks from a 2-2 SFF shot from P4L1
wnd10-2, 127/MMG in O6 skulk to O7
CCPh - everybody survives CC in R5
R8 -
Dave tries to repair his MA, malfs it, is recalled
9-0's stack in P4L1 move downstairs and into bypass in Q4, take a 4-down-3 shot from O6, 1MC, leader is OK but squad pins and HS breaks, game over. Game board looked like this:
Overall, we're aware that it's hard to Commentate on a game where all you have is the logfile. We're trying to figure out some solution that lets us provide some kind of extra information to make it more obvious to the Commentators what's going on. Ideas solicited.
It is not easy playing against a Finn when they slip into using their native language. Tuomo would be muttering under his breath and CLAIMING to be counting Movement Factors, but was he really just calling my mama fat?
That one broken reinforcment squad of mine never rallied, the whole game.
As Martin, Dave, and others have said, 19X6 seems like a Fools Dream for the Russians. Not worth it - too hard to hold.
Setup - Dave and Martin wondered about my Dummy in 19Z2. As we've all noted, I've never played Tuomo before, so I had no idea whether he'd go after my turn 2 reinforcing infantry by pushing along that board edge himself. Those guys in 19Z2 were there to pretend to stop any such run. Shrug. Not much good can be done with the Dummies here, but I figured this might have some value. Ditto for the ?+1 who started the game down in 17H0, pretending to guard against a southern board edge run.
Loved that Tuomo named his tanks Dave and Martin
I'm happy that my Fancy MMG Firelane Trick with the HIP 10-2 worked, but one will note that the Russians gleefully ran through said firelane on both turns 2 and 3 with nary a scratch. FRUSTRATING!
German 2 - Dave and Martin felt like there were too many Germans coming in on the east side of board 19. It was just 467/LMG and two HS, one of which had the MTR and really wasn't going to do much except sit in that woods line and throw meatballs toward bd17 all game. Sure, one could say this was an unnecessary dilution of the German reinforcements, but I like to pressure my opponent's flank because some people really don't like that. Didn't seem to bother Tuomo too much; he didn't divert much of anything to stop them and managed to break the 467 when it finally did make its dash to threaten 17I8, but I still feel like this was a good idea.
German 3 - Falling back from 17P9 is a tough proposition. Think my 10-2, 127/MMG ate a 4-1 shot as they tried to skulk away and got lucky to survive. And yet, I think you really want to have that MMG in there to throw the firelane out toward J0 on R3, and you ultimately do want to retain the P9 building itself, so I think it's just one of those things you have to hope for the best.
EFFING immobilization on my tank with the Russian MTR! GRRR!
That 152mm-inspired Flame in 17S6 never did turn into a Blaze, all game. WRT Control of such a hex if the thing did Blaze up, I think A26.161 says it would go to whichever side controls the majority of adjacent hexes at game end. Which would be a Big Old Mess to figure out.
Russian 3 - I really didn't think much about what would happen when the weak German at-start forces started getting captured. Certainly the Russians could pass those Prisoners around and start creating halfsquads everywhere. Ugh.
German 4 - Yes, it was Dave's MGs that Stunned my CE tank. Shouldn't have taken that risk; I went CE in order to get 1 more MP out of the turn by using Road Movement. Totally not worth it. Totally bailed out by the Dice Gods.
Loved having my wounded 6+1 succeed in his Escape Attempt DR and create a Melee with his broken Guards. Helped block off that hex from Russians reinforcing P9.
Why were the Germans so aggressive in taking back P9? Shrug. The infantry reinforcements really weren't gonna jump off from the 17U9 woods line and make a push for the buildings on the west side of town. I thought P9 was the key to everything at that point, as it lets you push into the N9 woods and threaten all of the town, including I8. So I wanted to grab it while it was unoccupied. But yeah, I started getting into that "in for a penny, in for a pound" thing, where the first semi-aggressive move fails, so you just keep on reinforcing failure. Especially on turn 5's disastrous moves where I couldn't survive a 2-flat RFP shot to save my life.
Yes, the TCA change for the immobilized tank in 19N7 was to cover the west side in case a KV-2 came looking for trouble.
Russian 5 - Sniper took out my wounded 6+1! AWWWW.
Tuomo did the right thing by not trying to fix Dave's MA; the tank was better off as a mobile MG platform.
Our game didn't turn into a "Benny Hill" scenario with KV2's chasing MkIVs, but I wouldn't have minded that. I'd think the MkIVs could win that race, being faster with lots of cover to duck behind. But tell that to the guy in X3 who found himself with few good options once Martin trundled up to X5. Somehow I thought there was more cover with all the Woods hexes to Bypass behind, but nope. Had Martin not scored with that Advancing Fire Critical Hit, that MkIV was actually going to start G5 by plowing into the building in W3, just to get out of Martin's LOS. The other KV2 (Dave) in V3 might have been a tad surprised (visions of the Kool Aid Man breaking through the building shouting OHHH YEAHHH!) but he didn't have a MA to object with.
In retrospect, think how things would have been different if Martin had spent turn 6 moving back to the middle of town instead of cleaning up U5. Would have kept the German tanks from doing those fancy things during their turn 6. Funny how one little less-than-optimal move can have such huge impact.
German 5 - yes, Martin, it's possible for both of us to be doing really well AND really badly
You guys were right, I didn't need to push that much to eat all of that resid. At that point, I anticipated losing three more building hexes (W3, W4, U5) and I wanted to push. Didn't have a lot of time left, it felt like.
Russian 6 - funny, I didn't even think about the Russians continuing from W3/W4 to take the building in CC3. Would have helped the Russians.
German 6 - yes, I didn't illegally double-bounding-fire that tank. He overran M7 and then VBM'd P6, DMing the brokie in that hex
Russian 7 - no, that wasn't the end of the game! We had two more half-turns. Lemme describe them.
Here's what the board looked like at that point:
German 7:
PzIV in O6 moves through KV's hex, into bypass of P4, tries his sD7 but fails. Loops around the western side of Q4, stops in R4, takes an 8+1 BFF MG shot at the 447/LMG in R5, who Pins. Goes CE, moves to T5, ESB's and asks for 2 more, succeeds, moves into bypass of U5-U6, ends in Motion. We thought this would help with VCs since that was still a German-controlled Building Hex at the time. We THOUGHT that in order to retake the building hex, the Russians would need to pass a PAATC in order to advance in to the hex. Hope that was right.
PzIV in P6 moves down into bypass of P4, tries his sD7 but fails, goes to O4, stops, nails KV2 with a BFF TH DR of 5, TK DR of 3 (final TK # was 4). KV-2 crew survives. tank continues to O3 and stops, facing P4
467/MMG in P6 assault move over the wall to Q6, get hit with a 6-down-1 shot from the Pinned 447/LMG in R5, K/2 result, surviving HS BH's, goes berserk, charges R5, survives SFF shot
HS in P9 cx's to S7, survives a 4-2 from the 9-0,447 in P4L1, boxcars. advances in to retake bldg.
237 in O6 cx's, goes to P6, breaks from a 2-2 SFF shot from P4L1
wnd10-2, 127/MMG in O6 skulk to O7
CCPh - everybody survives CC in R5
R8 -
Dave tries to repair his MA, malfs it, is recalled
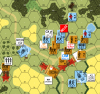
9-0's stack in P4L1 move downstairs and into bypass in Q4, take a 4-down-3 shot from O6, 1MC, leader is OK but squad pins and HS breaks, game over. Game board looked like this:
Honosbinda
Senior Member
ugh @ people who do this, you mean.Russian 3 ...... Certainly the Russians could pass those Prisoners around and start creating halfsquads everywhere. Ugh.
The Purist
Elder Member
- Joined
- Aug 16, 2004
- Messages
- 2,917
- Reaction score
- 1,480
- Location
- In my castle by the sea, Trochu, AB
- First name
- Gerry
- Country
-

Oh, I dunno. I've never done it myself but have been tempted. It is a bit at odds with the intent of the deploying rules but it's certainly no worse than how the VB Freeze sleaze can be used/abused (or the fact that it even exists).
asloser
The Head Tuomo of the Finnish ASL Community
? well it gives you an edge. I need all the help I can get...It is not easy playing against a Finn when they slip into using their native language. Tuomo would be muttering under his breath and CLAIMING to be counting Movement Factors, but was he really just calling my mama fat?
You can see me moving one squad halfway there on turn 2. In turn 3 I realize it is not going got happen and run away.As Martin, Dave, and others have said, 19X6 seems like a Fools Dream for the Russians. Not worth it - too hard to hold.
Yeah, I thought it would be fun to compare their performance as game progressed. It was good that our hosts noticed it about turn 3 giving me a great set-up for my mid game commentary.Loved that Tuomo named his tanks Dave and Martin
You got me there, the use of 10-2 was a nice move and I really did not see that one. When the KV named Dave did not manage to do anything in bounding fire about them I had no choice than to risk it. It worked, this time. One of the many "what if" moments of this match.I'm happy that my Fancy MMG Firelane Trick with the HIP 10-2 worked, but one will note that the Russians gleefully ran through said firelane on both turns 2 and 3 with nary a scratch. FRUSTRATING!
Well I was bothered by that- but I felt I did not have the resources. I needed to get the god damn buildings. and takin the two 2 hex buildings in the village was more that keeping the one hex building in the back.German 2 - Dave and Martin felt like there were too many Germans coming in on the east side of board 19. It was just 467/LMG and two HS, one of which had the MTR and really wasn't going to do much except sit in that woods line and throw meatballs toward bd17 all game. Sure, one could say this was an unnecessary dilution of the German reinforcements, but I like to pressure my opponent's flank because some people really don't like that. Didn't seem to bother Tuomo too much; he didn't divert much of anything to stop them and managed to break the 467 when it finally did make its dash to threaten 17I8, but I still feel like this was a good idea.
And to clarify - after the PzIV was stunned I decided to wait until final fire to get better DRM for the MA shot and claim acquisition for even better DRMs for the Prep fire shot. But Dave just HAD TO gack that one. Dave Dave Dave... After that malf it was about the buildings. If I had killed the Pz IV I'd probably hunted down the one in X3 and then on to the Immobilized dude.German 4 - Yes, it was Dave's MGs that Stunned my CE tank. Shouldn't have taken that risk; I went CE in order to get 1 more MP out of the turn by using Road Movement. Totally not worth it. Totally bailed out by the Dice Gods.
Ugh!Loved having my wounded 6+1 succeed in his Escape Attempt DR and create a Melee with his broken Guards. Helped block off that hex from Russians reinforcing P9.
It was a good idea to put on the pressure. But I think you went unit or two too far with that.Why were the Germans so aggressive in taking back P9? Shrug. The infantry reinforcements really weren't gonna jump off from the 17U9 woods line and make a push for the buildings on the west side of town. I thought P9 was the key to everything at that point, as it lets you push into the N9 woods and threaten all of the town, including I8. So I wanted to grab it while it was unoccupied. But yeah, I started getting into that "in for a penny, in for a pound" thing, where the first semi-aggressive move fails, so you just keep on reinforcing failure. Especially on turn 5's disastrous moves where I couldn't survive a 2-flat RFP shot to save my life.
There was precious little trouble available there for a KV-2....Yes, the TCA change for the immobilized tank in 19N7 was to cover the west side in case a KV-2 came looking for trouble.
Actually I tried twice- on turn 5 rally as that stun PzIV was still in my sights - I figured getting that out would have had long term value for me to justify the risk and the endgame proved it. And again in the last rally when I desperately needed everything. But Dave failed to deliver...Tuomo did the right thing by not trying to fix Dave's MA; the tank was better off as a mobile MG platform.
That CH took away some of the trouble I got in when Dave's MA malfunctioned. and hey, two TH rolls with an average of 7! Who can complain?Our game didn't turn into a "Benny Hill" scenario with KV2's chasing MkIVs, but I wouldn't have minded that. I'd think the MkIVs could win that race, being faster with lots of cover to duck behind. But tell that to the guy in X3 who found himself with few good options once Martin trundled up to X5. Somehow I thought there was more cover with all the Woods hexes to Bypass behind, but nope. Had Martin not scored with that Advancing Fire Critical Hit, that MkIV was actually going to start G5 by plowing into the building in W3, just to get out of Martin's LOS. The other KV2 (Dave) in V3 might have been a tad surprised (visions of the Kool Aid Man breaking through the building shouting OHHH YEAHHH!) but he didn't have a MA to object with.
Yes - with hindsight you are right. U5 could have been dealt with Dave. But I was short on MPs after that glorious HS overrun.In retrospect, think how things would have been different if Martin had spent turn 6 moving back to the middle of town instead of cleaning up U5. Would have kept the German tanks from doing those fancy things during their turn 6. Funny how one little less-than-optimal move can have such huge impact.
Double funny- I did not think of it either. Pre game I kinda figured W3/W4 was the farthest I could realistically get into. So I did not see that building during the endgame at all. Tunnel vision kicked in.Russian 6 - funny, I didn't even think about the Russians continuing from W3/W4 to take the building in CC3. Would have helped the Russians.
I think you needed 3 points on the ESB roll. Making it even more gutsy move.German 7:
PzIV in O6 moves through KV's hex, into bypass of P4, tries his sD7 but fails. Loops around the western side of Q4, stops in R4, takes an 8+1 BFF MG shot at the 447/LMG in R5, who Pins. Goes CE, moves to T5, ESB's and asks for 2 more, succeeds, moves into bypass of U5-U6, ends in Motion. We thought this would help with VCs since that was still a German-controlled Building Hex at the time. We THOUGHT that in order to retake the building hex, the Russians would need to pass a PAATC in order to advance in to the hex. Hope that was right.
TRIPLE UGH!!!PzIV in P6 moves down into bypass of P4, tries his sD7 but fails, goes to O4, stops, nails KV2 with a BFF TH DR of 5, TK DR of 3 (final TK # was 4). KV-2 crew survives. tank continues to O3 and stops, facing P4
467/MMG in P6 assault move over the wall to Q6, get hit with a 6-down-1 shot from the Pinned 447/LMG in R5, K/2 result, surviving HS BH's, goes berserk, charges R5, survives SFF sho
HS in P9 cx's to S7, survives a 4-2 from the 9-0,447 in P4L1, boxcars. advances in to retake bldg.
I was going to use Martin to break everyone in O6. That is why I did not care about the PzIV getting a rear shot. I mean I have this great armor, right?
After this it was all about rearranging the deck chairs on the Titanic. But I went down in style with Commissar running and gun blazing all around.
Last edited:
Thunderchief
Elder Member
You manage both English and ASL - we can't even say the two words of that Finnish module properly... ???Boy do I sound horrible compared to the smooth talking Englishmen!
And when I say shock a tank I mean it was stunned....
Honosbinda
Senior Member
The usual counter-argument, but It's a lot worse and you are 'truly pure' not to be playing that way and good for you. As I'm equally sure you are not in the least hesitant using VBM freeze and you shouldn't be, because it's a baked-in tactic that is ASL to the bone. Whether one thinks it should exist or not.Oh, I dunno. I've never done it myself but have been tempted. It is a bit at odds with the intent of the deploying rules but it's certainly no worse than how the VB Freeze sleaze can be used/abused (or the fact that it even exists).
Every nation basically has the chance to use VBM freeze as long as they have an AFV. The rule is universally applied (with the new exception of DN11, which interestingly and somewhat oddly justifies VBM freeze as a usual tactic, just not in the proximity of Dinant apparently, because it ruins the campaigns!).
It's not just deployment that passing the prisoner is at odds with. For that, we can blame the open-ended and poorly-written prisoner rules allowing the deployment, not only of units having prisoners, but prisoners themselves, allowing half-squads to breed like rats.
The thing that makes it the worst slime is that Russians have the unique ability to conduct Human Waves, and clearly the intent is that these are done with full squads and perhaps a remnant half-squad or two... not half-squads generated by playing pass the prisoner back and forth with an evil chuckle.
It's absolutely the cheesiest of cheese to do this as VBM pales in comparison.
Last edited:
asloser
The Head Tuomo of the Finnish ASL Community
For the record, I only deployed one squad at the moment I captured the wounded 6+1. I never transferred them for deployment purposes.Lots of text
So I think it is a bit overboard to complain about this here at this leght....
Honosbinda
Senior Member
It's overboard to take this personally. I was responding to Tuomo's point in his lengthy post and hadn't in the least paid attention to your activities, nor cited them. In fact I am in agreement with the idea that guards be allowed to deploy once -- that is, one time -- in order to handle prisoners. I'm obviously pointing to distorted play as a problem, not good play. cheersFor the record, I only deployed one squad at the moment I captured the wounded 6+1. I never transferred them for deployment purposes.
So I think it is a bit overboard to complain about this here at this leght....
asloser
The Head Tuomo of the Finnish ASL Community
Well I was the person playing. But as usually you are completely and utterly right. Feel free to enjoy the final word on this.It's overboard to take this personally.
JoeArthur
Elder Member
"Malfunctioning Dave" - I do hope that is not what the wife calls you
Many thanks to all involved for another entertaining AAR.
It might be an idea to see the casulaties by the side of the board - it gives you an idea as to how the game is going?
Still waiting for a phone call on Late For Chow - which I noticed was played on the VASL ASLOK yesterday. The Germans were getting smeared............
The Purist
Elder Member
- Joined
- Aug 16, 2004
- Messages
- 2,917
- Reaction score
- 1,480
- Location
- In my castle by the sea, Trochu, AB
- First name
- Gerry
- Country
-
Be that as it may it is one of the gaps in reality with the real world that exists in the game. I don't know where the idea came from but it is at odds with everything I learned as a soldier and the use of armour. Overruns and collapsing trenches is one thing, and is historically defensible. Parking a tank adjacent to stand of woods or a building and inviting everything from a flaming bottle of Calvados to grenades to a Bazooka round so an entire platoon can run up to said position unscathed is simply not (and would not have been) done, in Motion or otherwise.The usual counter-argument, but It's a lot worse and you are 'truly pure' not to be playing that way and good for you. As I'm equally sure you are not in the least hesitant using VBM freeze and you shouldn't be, because it's a baked-in tactic that is ASL to the bone. Whether one thinks it should exist or not.... <snip>...
At the same time, add Passengers or Riders to that tank/halftrack/whatever, or a form armoured assault that allowed the infantry to escort the tank into bypass and you are closer to a realistic tactic.
DN11 is a brilliant addition and, in my own view, should be standardized as the rule.
With this I agree,.... but like VBM Freeze, it is allowed and we would have to deal with it, sleaze or not. I would note that passing prisoners around enough to deploy sufficient squads to matter would take time the Soviet player likely does not have....<snip>... It's absolutely the cheesiest of cheese to do this as VBM pales in comparison.
Anyway, I don't want to hijack the thread so I'll leave it at that.
Cheers.
AdrianE
Senior Member
Two comments
Against Tom's setup, there is no reason not to armoured assault & double time a platoon with a leader down the road. You can get 9 or 10 hexes forward on turn 1 in relative safety
Tom is absolutely right that Russian Turn 6 was the turning point. The 6+1 should have double timed for DMing duty and fire absorption. Then the 237 and 7-0 could have followed if required. The 236 should have gone to I7 and advanced into the building.
asloser
The Head Tuomo of the Finnish ASL Community
Thanks for the comment.Two comments
Against Tom's setup, there is no reason not to armoured assault & double time a platoon with a leader down the road. You can get 9 or 10 hexes forward on turn 1 in relative safety
Tom is absolutely right that Russian Turn 6 was the turning point. The 6+1 should have double timed for DMing duty and fire absorption. Then the 237 and 7-0 could have followed if required. The 236 should have gone to I7 and advanced into the building.
The opening could have been a bit more aggressive, I do agree.
I went into defense mode on turn 6 and really missed that opportunity at the heat of the moment. I will probably kick myself rest of the year. ?
Doing this is a good way to improve one's game as you get good public critique. Thanks again.
Chas Argent
Play to the end.
Tuomo & Tom, very nice job. And it's fascinating to watch the game play out at a much faster-than-normal speed.
AdrianE
Senior Member
I did like the mopping up move that secured the center building. I often forget about mopping up.Thanks for the comment.
lightspeed
Senior Member
I'm of the camp that says if it's in the rules, it's not a sleaze. If either is an issue in a scenario, I wouldOh, I dunno. I've never done it myself but have been tempted. It is a bit at odds with the intent of the deploying rules but it's certainly no worse than how the VB Freeze sleaze can be used/abused (or the fact that it even exists).
think a good designer (and I'm not one) could SSR it away...
...Dave and Martin,
Another entertaining instalment. It was a lot of fun to chat. Janine was happy to finally meet one of
the famous duo!
indy