- Joined
- Feb 4, 2003
- Messages
- 4,650
- Reaction score
- 4,193
- Location
- La Belle Province
- First name
- Michael
- Country
-

Magnus Rimvall finished our second playing of A79 MIKE RED. This time I played the attacking Canadians. From our previous playing, we learned that the Canadians cannot waste any time getting to the beach.
The Canadian infantry (10 squads and 6 sapper HS) are in six LC, supported by four DD Shermans Their most important SW are six DC and three light mortars. The need the mortars to smoke the German defence so the sappers can reach the seawall. The sappers must use the DC to create breaches in the seawall so that the DD tanks can get off the beach and win the game because it is not likely that much infantry will exit the map. The Canadians need to exit 7VP or more to win, but also need to make the three pillboxes free of good order German MMC.
I decided to enter at the west and east edges because the German Pak 38 in a pillbox can point to one side or the other. Some of my units would be out of the pillbox covered arc.
The first Canadian turn was almost uneventful; the German Pak 38 obtained one damage point on a LC, which was one point more than I did last time. The Pak obtained two more damage points in the German turn to immobilize the LC. Fortunately, the LC was in a shallow ocean hex so the passengers would be able to disembark. The LC started beaching on the second turn. I took a chance with one LC; I went into a tetrahedron hex so that the passengers would be able to unload without getting tangled up in wire. The risk was from the tetrahedron attack against the LC. Magnus could hurt/kill the LC and passengers with a dr or 1 or 2. He rolled higher. All the LC need to check for running aground in the three shallow ocean hexes approaching the beach. I mitigated this possibility somewhat by using platoon movement.
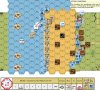
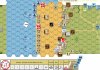
My infantry started dying as soon as they hit the beach. It is important to know that although the rules tell us to unload "as soon as possible", the passengers are not forced to unload as a stack. Keep in mind that as each unit unloads it uses one quarter of the LC MP, leaving less MF for each subsequent passenger that unloads. The following image was taken at the end of Canadian turn two.
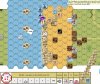
On the second German turn, only one more HS was eliminated. Magnus did not have success firing any MG at the DD tanks. With a two FP attack, he needed to roll a four to take it out of the game. On the third Canadian turn, more troops unload and more troops die to -1 or -2 or -3 (leader) shots. Failing a MC on the beach is casualty reduction. Look at the dead pile in the image for the end of Canadian turn 3 below.
During German turn 3, the Canadians take more casualties, but at least manage to eliminate a German HS. The German reinforcements are still offboard. They enter on a dr less than the current turn number. The Canadians on the wire cannot double time, but still need to decide if they will try to assault move through. Once off of the wire, there is still that decision about how to move. Since the wire guys could not move far no matter what, I saved the non-wire guys to the end when all the German defensive fire was used up.
The casualties removed the mortar teams, slowing down the assembly of the mortars because other units needed to recover them. The Canadians need their smoke desperately. I assemble one mortar during German turn three as well as the MMG. In Canadian turn four, that mortar rolls "no smoke". The DD tanks no longer need to swim only two hexes per turn because they reach the shallow ocean hexes which the DD tanks treat as shallow stream hexes. The last unit to unload is the 9-2. The most easterly Sherman received a CH from the Pak 38. All the Shermans must check for bog when leaving the water, and when entering every sand hex. The MP cost for the sand is two. The German right flank has pulled back.
During German turn four, the reinforcements enter. There is only one Canadian casualty: another Sherman receives a CH to eliminate it. I assemble my two more mortars.
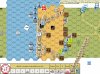
In Canadian turn five, they get the break they need. One light mortar puts smoke on the AT gun, the HMG and a MMG. One Sherman puts smoke on a German mortar team as well (although that mortar breaks soon after). This allows the rest of my infantry to move forward and some even get off the beach. I move the second Sherman adjacent to the pillbox containing the AT gun to fire AP through the pillbox NCA. The smoke enables some Canadian infantry to eliminate a MMG team in CC. During German turn five, the AT gun crew rolls a twelve on a MC to die from a CH by the adjacent Sherman. I have four DC adjacent to the seawall, to be set next turn; I was thinking to try four times for a breach. I realize a little later, however, that the Shermans don’t have the time to reach any eastern breach and still exit. The following image is taken at the end of German turn five.
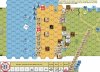
In Canadian turn six, I learn just how little chance I have at winning. I have only two DC in good positions for a breach. One is owned by a first line squad; the other is owned by a crew. I need to roll =< the possessor’s unit size to set the DC; then I need those units to pass a NTC to detonate the DC. Then I need to roll a KIA to have the breach. Then I need to hope at least one Sherman gets past any PF shot and hope that I can exit a couple of leaders. Only the crew is successful in setting its DC. The two Shermans get into motion adjacent to the possible breach, one of them passing multiple bog checks traveling from the waterline to the seawall. More Canadian units get off the beach as well. I send a HS to CC the HMG team, hoping for at least a melee (German 3 to 2 (with a -1 leader) vs Canadian 1 to 2). Magnus rolls high to give me what I need. While writing this AAR, I saw that Magnus and I both forgot that a Breeze was in effect, which would have made drifting smoke to the southeast. The next image is at the end of Canadian turn six.
In German turn six, they are unable to attack the crew that set the DC. Magnus puts a scare in me by moving a crew from the middle to the west. I had not garrisoned the AT gun pillbox and now the Germans are threatening to re-occupy it. The advice I remember too late is "Read the VC every turn". So two things counteracted each other here. The drifting smoke was missing so the crew spent less MF than it should have to get there. Magnus did not double time however, so only got into the accessible trench at the end of the German turn. This would give the Canadians a chance to get someone into the pillbox before the Germans. In the DFPh, the crew passes its NTC to detonate the DC and rolls low enough to create the breach. Hallelujah! To put a cherry on top of that, the melee with the HMG team continues.
During the final Canadian turn, the smoke disappears. I run the first Sherman by the west side German crew. It rolls a two to have a PF. It misses the TH, however. Both Shermans exit, so I have the exit VP. I need to also secure the remaining pillboxes. The 9-2 no longer needs to exit, so he moves adjacent to that crew. A full squad also moves adjacent in a different hex. I figure I will probably lose the melee with the HMG team, so I decide to try to obliterate it. The central 8-0 with a DC moves over there and places the DC in the melee hex. During the AFPh, I roll snake-eyes! The last thing to resolve is the CC with the crew; the 9-2 led squad eliminates it. There are no Germans left that can re-occupy any pillbox during the final German turn; the end to an exciting game.
I was surprised that the game came down to a few key dice rolls. If I had not rolled any smoke, I doubt any DC would have reached the western part of the seawall where my two surviving Shermans were. If I had not obtained a breach, I probably could not have won by trying to exit 7 points of infantry. They would have been shot up heading for the exit, or the Germans would have been able to re-occupy a pillbox. If the German HMG team had won their CC, they probably could have re-occupied the pillbox in their hex.
The Canadian infantry (10 squads and 6 sapper HS) are in six LC, supported by four DD Shermans Their most important SW are six DC and three light mortars. The need the mortars to smoke the German defence so the sappers can reach the seawall. The sappers must use the DC to create breaches in the seawall so that the DD tanks can get off the beach and win the game because it is not likely that much infantry will exit the map. The Canadians need to exit 7VP or more to win, but also need to make the three pillboxes free of good order German MMC.
I decided to enter at the west and east edges because the German Pak 38 in a pillbox can point to one side or the other. Some of my units would be out of the pillbox covered arc.
The first Canadian turn was almost uneventful; the German Pak 38 obtained one damage point on a LC, which was one point more than I did last time. The Pak obtained two more damage points in the German turn to immobilize the LC. Fortunately, the LC was in a shallow ocean hex so the passengers would be able to disembark. The LC started beaching on the second turn. I took a chance with one LC; I went into a tetrahedron hex so that the passengers would be able to unload without getting tangled up in wire. The risk was from the tetrahedron attack against the LC. Magnus could hurt/kill the LC and passengers with a dr or 1 or 2. He rolled higher. All the LC need to check for running aground in the three shallow ocean hexes approaching the beach. I mitigated this possibility somewhat by using platoon movement.
My infantry started dying as soon as they hit the beach. It is important to know that although the rules tell us to unload "as soon as possible", the passengers are not forced to unload as a stack. Keep in mind that as each unit unloads it uses one quarter of the LC MP, leaving less MF for each subsequent passenger that unloads. The following image was taken at the end of Canadian turn two.
On the second German turn, only one more HS was eliminated. Magnus did not have success firing any MG at the DD tanks. With a two FP attack, he needed to roll a four to take it out of the game. On the third Canadian turn, more troops unload and more troops die to -1 or -2 or -3 (leader) shots. Failing a MC on the beach is casualty reduction. Look at the dead pile in the image for the end of Canadian turn 3 below.
During German turn 3, the Canadians take more casualties, but at least manage to eliminate a German HS. The German reinforcements are still offboard. They enter on a dr less than the current turn number. The Canadians on the wire cannot double time, but still need to decide if they will try to assault move through. Once off of the wire, there is still that decision about how to move. Since the wire guys could not move far no matter what, I saved the non-wire guys to the end when all the German defensive fire was used up.
The casualties removed the mortar teams, slowing down the assembly of the mortars because other units needed to recover them. The Canadians need their smoke desperately. I assemble one mortar during German turn three as well as the MMG. In Canadian turn four, that mortar rolls "no smoke". The DD tanks no longer need to swim only two hexes per turn because they reach the shallow ocean hexes which the DD tanks treat as shallow stream hexes. The last unit to unload is the 9-2. The most easterly Sherman received a CH from the Pak 38. All the Shermans must check for bog when leaving the water, and when entering every sand hex. The MP cost for the sand is two. The German right flank has pulled back.
During German turn four, the reinforcements enter. There is only one Canadian casualty: another Sherman receives a CH to eliminate it. I assemble my two more mortars.
In Canadian turn five, they get the break they need. One light mortar puts smoke on the AT gun, the HMG and a MMG. One Sherman puts smoke on a German mortar team as well (although that mortar breaks soon after). This allows the rest of my infantry to move forward and some even get off the beach. I move the second Sherman adjacent to the pillbox containing the AT gun to fire AP through the pillbox NCA. The smoke enables some Canadian infantry to eliminate a MMG team in CC. During German turn five, the AT gun crew rolls a twelve on a MC to die from a CH by the adjacent Sherman. I have four DC adjacent to the seawall, to be set next turn; I was thinking to try four times for a breach. I realize a little later, however, that the Shermans don’t have the time to reach any eastern breach and still exit. The following image is taken at the end of German turn five.
In Canadian turn six, I learn just how little chance I have at winning. I have only two DC in good positions for a breach. One is owned by a first line squad; the other is owned by a crew. I need to roll =< the possessor’s unit size to set the DC; then I need those units to pass a NTC to detonate the DC. Then I need to roll a KIA to have the breach. Then I need to hope at least one Sherman gets past any PF shot and hope that I can exit a couple of leaders. Only the crew is successful in setting its DC. The two Shermans get into motion adjacent to the possible breach, one of them passing multiple bog checks traveling from the waterline to the seawall. More Canadian units get off the beach as well. I send a HS to CC the HMG team, hoping for at least a melee (German 3 to 2 (with a -1 leader) vs Canadian 1 to 2). Magnus rolls high to give me what I need. While writing this AAR, I saw that Magnus and I both forgot that a Breeze was in effect, which would have made drifting smoke to the southeast. The next image is at the end of Canadian turn six.
In German turn six, they are unable to attack the crew that set the DC. Magnus puts a scare in me by moving a crew from the middle to the west. I had not garrisoned the AT gun pillbox and now the Germans are threatening to re-occupy it. The advice I remember too late is "Read the VC every turn". So two things counteracted each other here. The drifting smoke was missing so the crew spent less MF than it should have to get there. Magnus did not double time however, so only got into the accessible trench at the end of the German turn. This would give the Canadians a chance to get someone into the pillbox before the Germans. In the DFPh, the crew passes its NTC to detonate the DC and rolls low enough to create the breach. Hallelujah! To put a cherry on top of that, the melee with the HMG team continues.
During the final Canadian turn, the smoke disappears. I run the first Sherman by the west side German crew. It rolls a two to have a PF. It misses the TH, however. Both Shermans exit, so I have the exit VP. I need to also secure the remaining pillboxes. The 9-2 no longer needs to exit, so he moves adjacent to that crew. A full squad also moves adjacent in a different hex. I figure I will probably lose the melee with the HMG team, so I decide to try to obliterate it. The central 8-0 with a DC moves over there and places the DC in the melee hex. During the AFPh, I roll snake-eyes! The last thing to resolve is the CC with the crew; the 9-2 led squad eliminates it. There are no Germans left that can re-occupy any pillbox during the final German turn; the end to an exciting game.
I was surprised that the game came down to a few key dice rolls. If I had not rolled any smoke, I doubt any DC would have reached the western part of the seawall where my two surviving Shermans were. If I had not obtained a breach, I probably could not have won by trying to exit 7 points of infantry. They would have been shot up heading for the exit, or the Germans would have been able to re-occupy a pillbox. If the German HMG team had won their CC, they probably could have re-occupied the pillbox in their hex.