boylermaker
Senior Member
I took a real beating from @ppalma3010 in Chasseurs at Yvoir from the Dinant module.
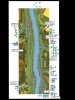
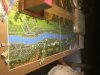
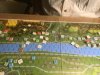
The scenario takes place before the main effort at Dinant, with a single bridge still standing across the river. Most of the Belgian force starts out strung out along the east bank, covered by a handful of west bank units. German units come from all sides: armored cars from the north, the bulk of their infantry from the south, and a few units can come in from the east. The Belgians have to get most of their CVP across the river (to aid in this effort, they have 6 wagons worth 3 CVP by SSR), then set DC on the bridge and blow it up. Otherwise the Germans win.
I figured that Pat would take the option to delay some of his forces entry to bring them on from the east, much closer to the bridge, so I set up the majority of my force as far north as possible, to interdict some of this effort, with a smaller stand-and-die rearguard to delay the main body coming up from the south until the wagons could get across.
I was surprised when Pat brought almost everything on from the South on turn 1. This turned out to be a great move on his part, because the south is an attackers' dream terrain: all single-hex buildings, so very easy to swarm my defenders. I managed to stall him long enough to keep his infantry out of my wagon train, but there are some great spots on the south part of the map from which his MGs could command the approaches to the bridge, and I couldn't defend all of them. By turn 5, my wagons had gone up in a hail of machine gun fire, and I no longer had enough VP to win, even if they all survived the bridge crossing.
My only success of any kind came in the north against the armored cars, where Pat had absolutely awful luck breaking his main armaments (I think he broke 4), and my ATRs and tiny Belgian armored-ish fighting vehicles took out the rest. Pat had some sort of master plan with the ACs that I never really figured out: I think he would have been better parking them on the river bank and just blasting the bridge with them. They would eventually go down, as the Belgians are pretty well equipped with LATW, but they would really hinder setting any DCs on the bridge, which is a hard task. To set a DC, you have to spend all your MPh as hazardous movement, then roll less than or equal to your US number. This means a squad will average two attempts to place a DC successfully. So you have to (on average) move onto the bridge, survive defensive fire, survive your opponents prep fire, survive a whole MPh worth of hazardous movement, fail to place the DC, survive your opponents prep fire phase again, survive a second whole MPh worth of hazardous movement, and succeed at placing the DC. That's 5 fire phases at +1 TEM, and that's assuming you can get smoke grenades to cover both placement attempts (3 engineer squads with 3 smoke exponents and whatever vehicular smoke grenades you can squeeze out of the Belgian AFVs are all you're getting). Even if you place it, it's not a sure thing to blow up the bridge (you need a 9 or less), so you need to place a second to be safe. Even if you place two, the only place you can detonate it from is open ground (or the elevated railroad, which will be open ground to German MGs by that point in the game), so it's not even a sure thing you'll get to detonate them!
Nobody's won this one as the Belgian's yet according to ROAR and ASL archive, and that sounds right to me. The Belgians just have too much to do on the bridge, and it seems to me that a competent German player can cover the bridge for the entire game without much the Belgians can do about it. There are only six playings, so I'm not yet ready to call it a dog, but I would definitely give the Belgians the balance.
Presumably somebody won it as the Belgians in playtesting: if you'd like to chime in, I'd love to hear how you did it!
Despite my doubts about balance, we enjoyed playing: the situation was a very exciting one, and the map is gorgeous.
") . The -1 leader types and elite squads almost always try to find their way to a leader.
. The -1 leader types and elite squads almost always try to find their way to a leader.